Places
In Maps > Locations , the location can be displayed which is defined by the module Master Data Management ( Topology ). Geographic coordinates, an address, multiple buildings, halls, stations and storage locations can be added to the location. Buildings, halls, stations and storage locations can also be assigned geographical coordinates and additional production supply areas (PSA = Production Supply Area) as well as outlines in the map (boundaries), which can be connected by paths and intersections. In order to improve orientation in the map view, images can be uploaded and adapted, such as site plans.
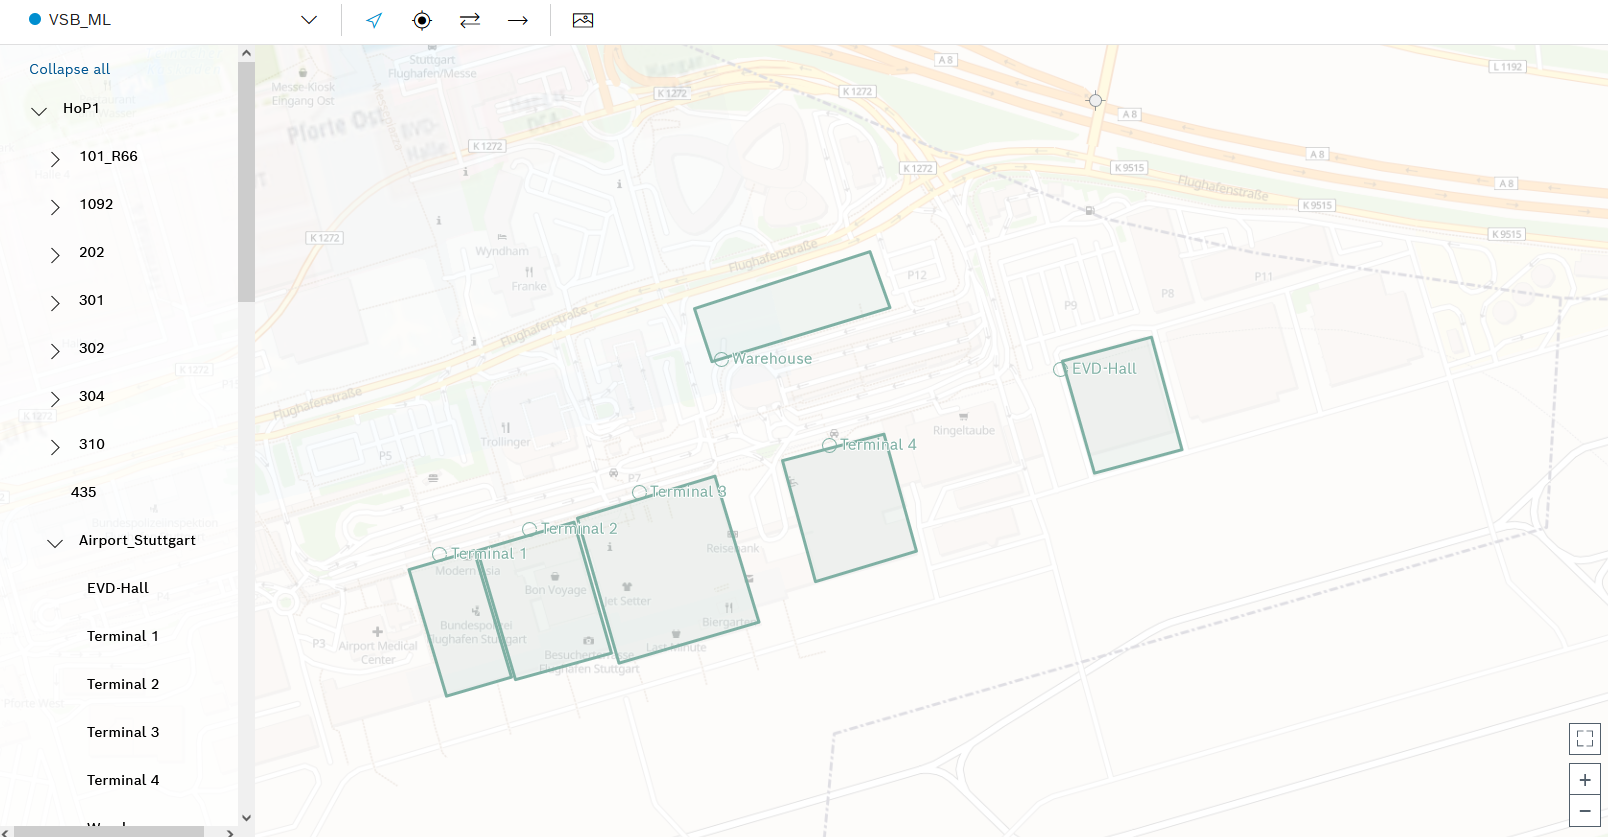
Overview: Places
Maps > Locations can be used to display locations and create the associated buildings, halls, stations and storage locations. These locations can be provided with geographical coordinates and boundaries (outlines) and connected by tracks and intersections. This can be helpful for drivers with, for example, the milk run application.
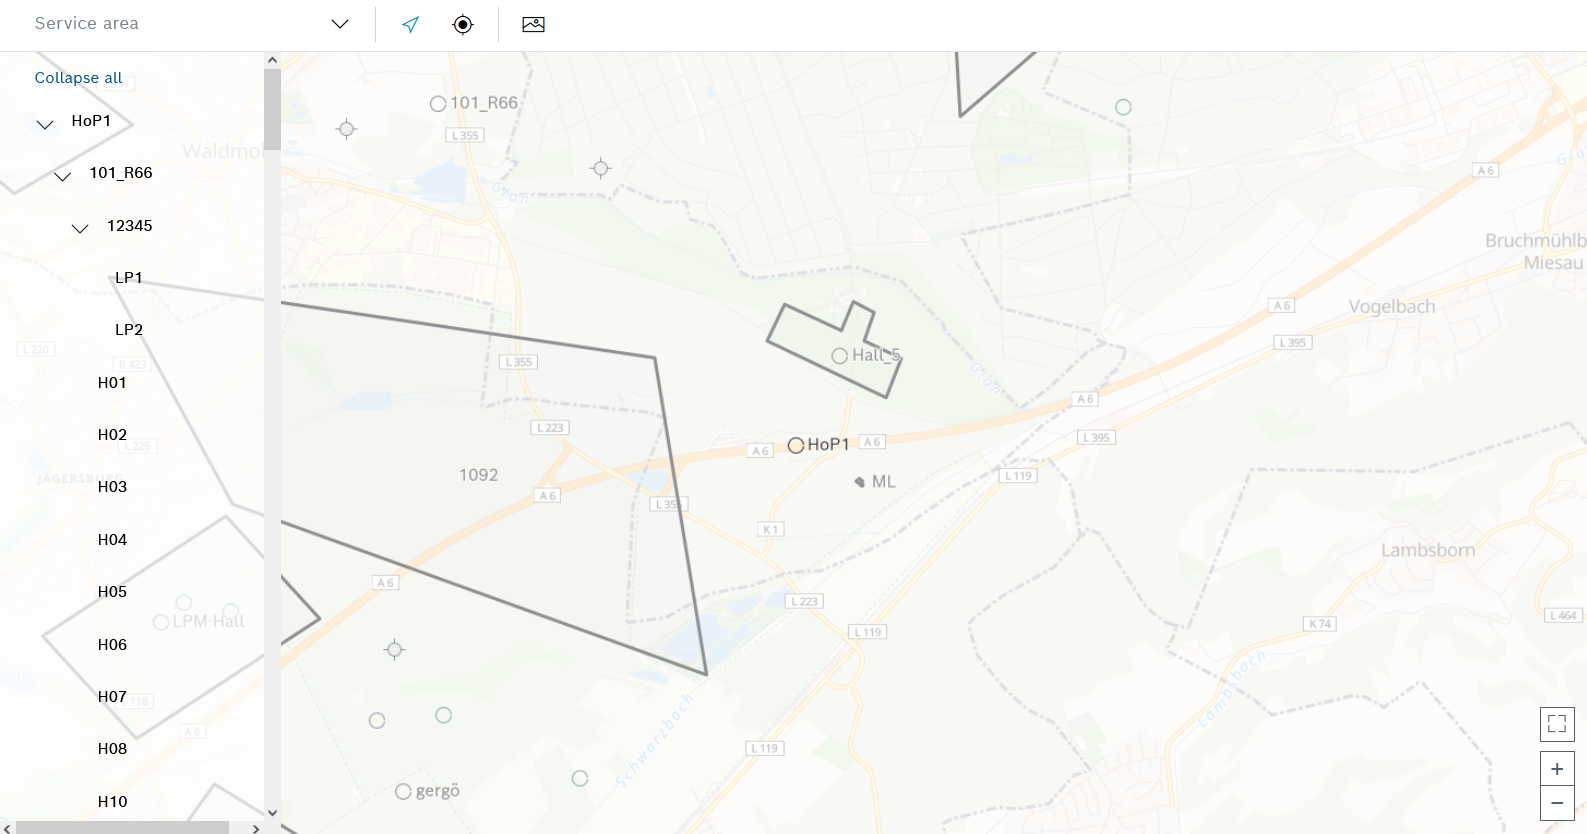
To the left of the map view, the hierarchy of locations is shown in the following order:
-
Location
Provided by the Master Data Management ( Topology ) module. -
Building
-
Hall
-
Station
-
Storage location
Move the map within the map view while holding down the left mouse button.
| Element/icon | Description |
|---|---|
Coverage area |
Select service areas to be displayed with colored lines in the map view. |
|
Center the view in the map on the selected location in the hierarchy.
|
|
Insert intersection. |
|
Activate or deactivate image editing. |
|
Switch to full screen mode or exit full screen mode. |
|
Zooming |
|
Expand or collapse hierarchy level. |


-
To edit the details of a location, continue with Editing a Location.
-
To add a building to a location, continue with Add or edit a building for a location.
-
To add a hall to a building, continue with Add or edit a hall for a building.
-
To add a station to a hall, continue with Adding a Station to a Hall.
-
To add a storage location to a station, continue with Adding a Storage Location to a Station.
Uploading and Editing Images in the Map View
Images can be uploaded separately to the map view at any position or added to locations, buildings, halls, stations and storage locations. Adjusting the image to the map view can help drivers navigate their way around individual locations, such as a hall.
Prerequisite
Transport management administrator or Transport management logistics planner role
Procedure
-
Call up the Maps > Locations menu.
-
If necessary, select the required location in the hierarchy of locations to which you want to add the image.
An image can also be uploaded to the map view without being added to a location.
-
Activate the image editing in the header by clicking
 .
.The image editing tool appears in the header.
-
Select the file manager in the header with the
 image editing tool.
 -
Select the required image in the file manager and open it.
Images must be in *.png or *.jpg file format. The image size is limited to 1 MB.
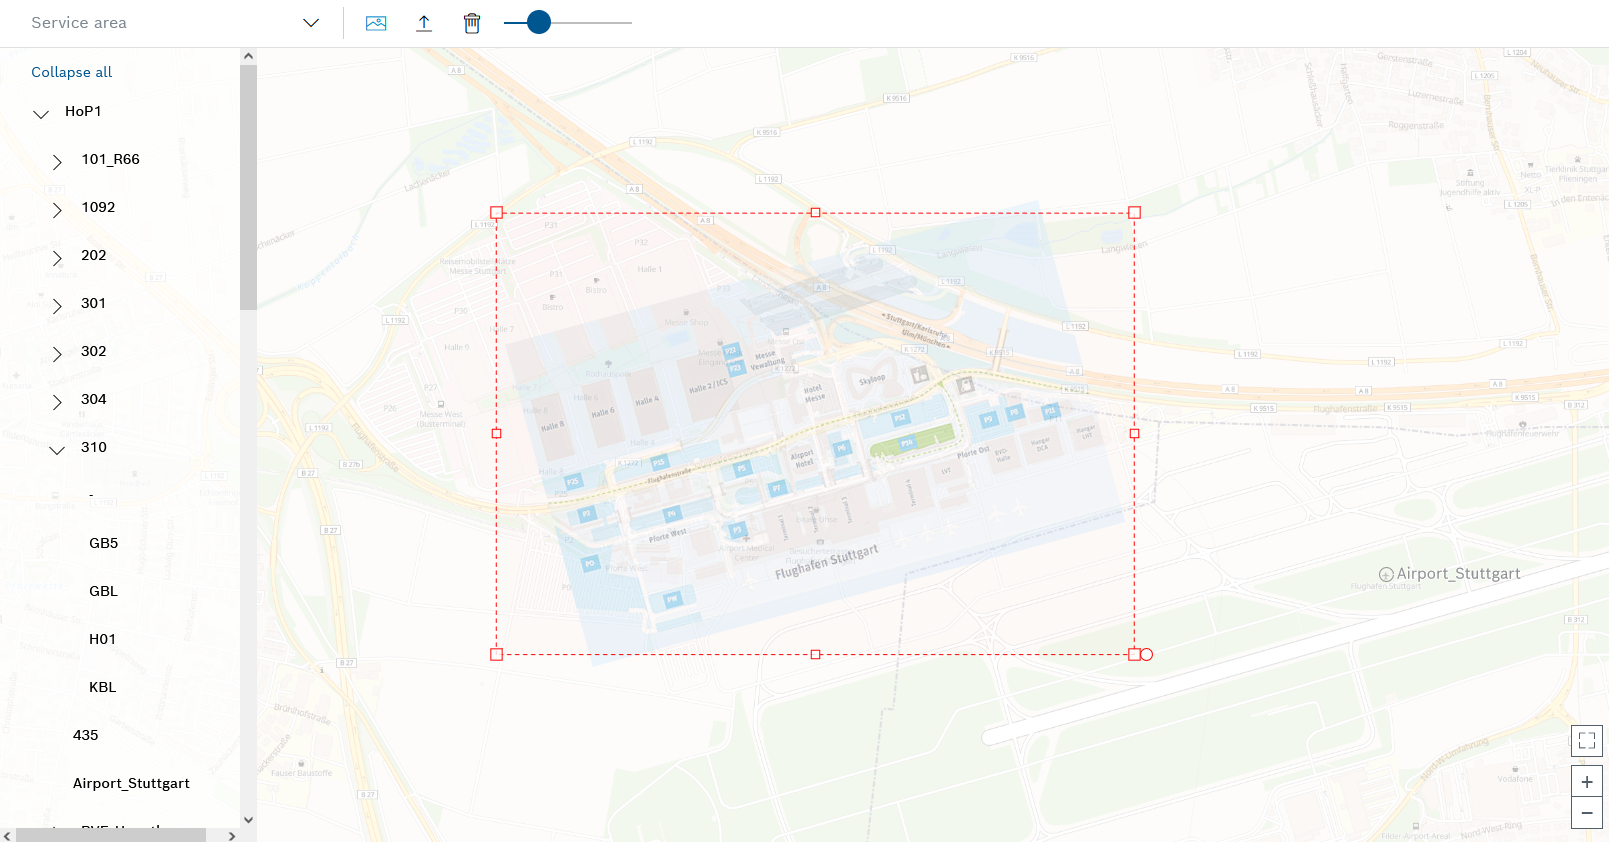
The uploaded image appears in the map view.
-
Select a new image in the map view.
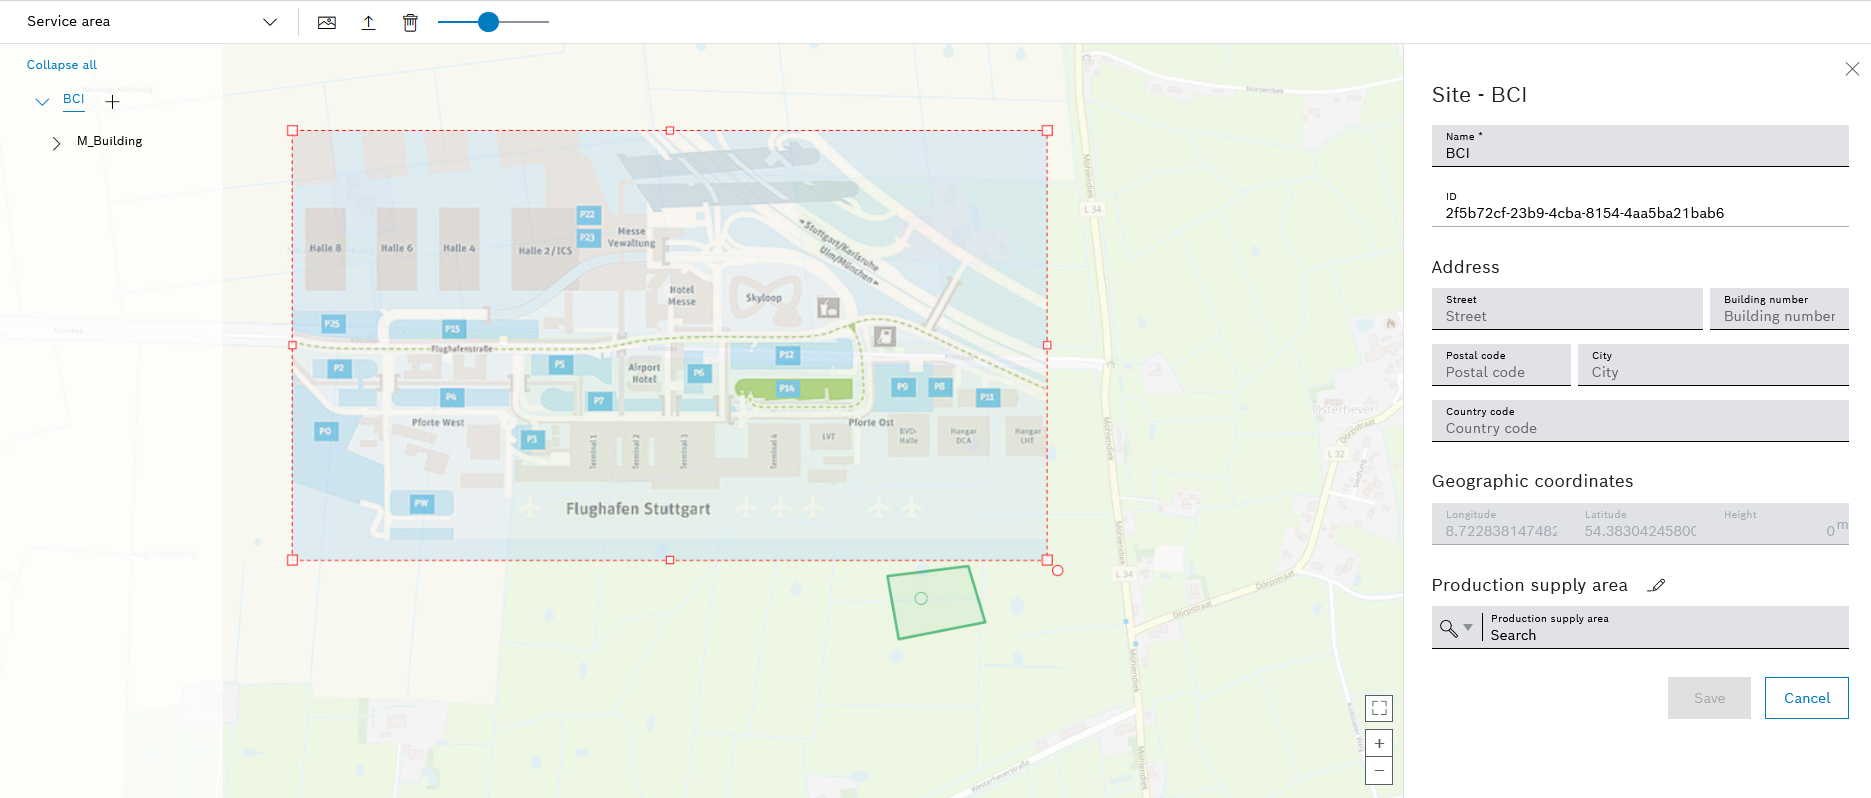
The selected image is outlined in red.
-
Adjust the size of the image using the red handles.
To scale the height and width of the image proportionally to each other, hold down the [SHIFT] key while dragging the image larger or smaller.
-
Rotate the image using the red circle at the bottom right corner.
The image rotates around its center.
-
Use the slider in the header to adjust the opacity of the image.
-
To save and close the image editing, click
 in the header.
|
The image can be edited again if necessary: |
|
The image can be deleted: |
The image is added to the map view and, if applicable, the location and fitted.
Editing a Location
|
The location is provided by the Master Data Management ( Topology ) module. |
The name, address and geographical coordinates of the location can be edited.
Assign or remove geographic coordinates for a location
Adding or Editing a Boundary for a Location
Prerequisites
-
Transport management administratororTransport management logistics plannerrole -
At least one location is provided by the Master Data Management ( Topology ) module.
Procedure
-
Call up the Maps > Locations menu.
-
Select the required location in the hierarchy of locations.
The detail view of the location appears on the right.
-
If necessary, change the Name of the location in the detailed view.
-
Change the following details under Address :
-
Road
-
Building number
-
Postal code / zip code
-
Town
-
Country code
-
-
Accept the changes in the detailed view with Save.
The name and address of the location are changed and appear in the detailed view of the location.
-
To add a building to the location, continue with Add or edit a building for a location.
Assign a production supply area (PSA) to a location
If a transport order is not created by the SAP system, but rather by a third-party system, the SAP system does not detect the transport movement from one production supply area (PSA) to another. To make the production supply areas recognizable for the SAP system, they can be assigned to the locations in Transport Management using the data from the SAP system in Transport Management. This enables the SAP system to detect and book the transport movements of these assigned production supply areas.
A production supply area consists of a storage type and an SAP system storage location contained therein.
|
A production supply area cannot be assigned to a location. The production supply area of a building, hall or station is inherited by the respective hierarchy level below it. |
Prerequisite
Transport management administrator or Transport management logistics planner role
Procedure
-
Call up the Maps > Locations menu.
-
Select the desired location in the hierarchy of locations to which you want to add the production supply area.
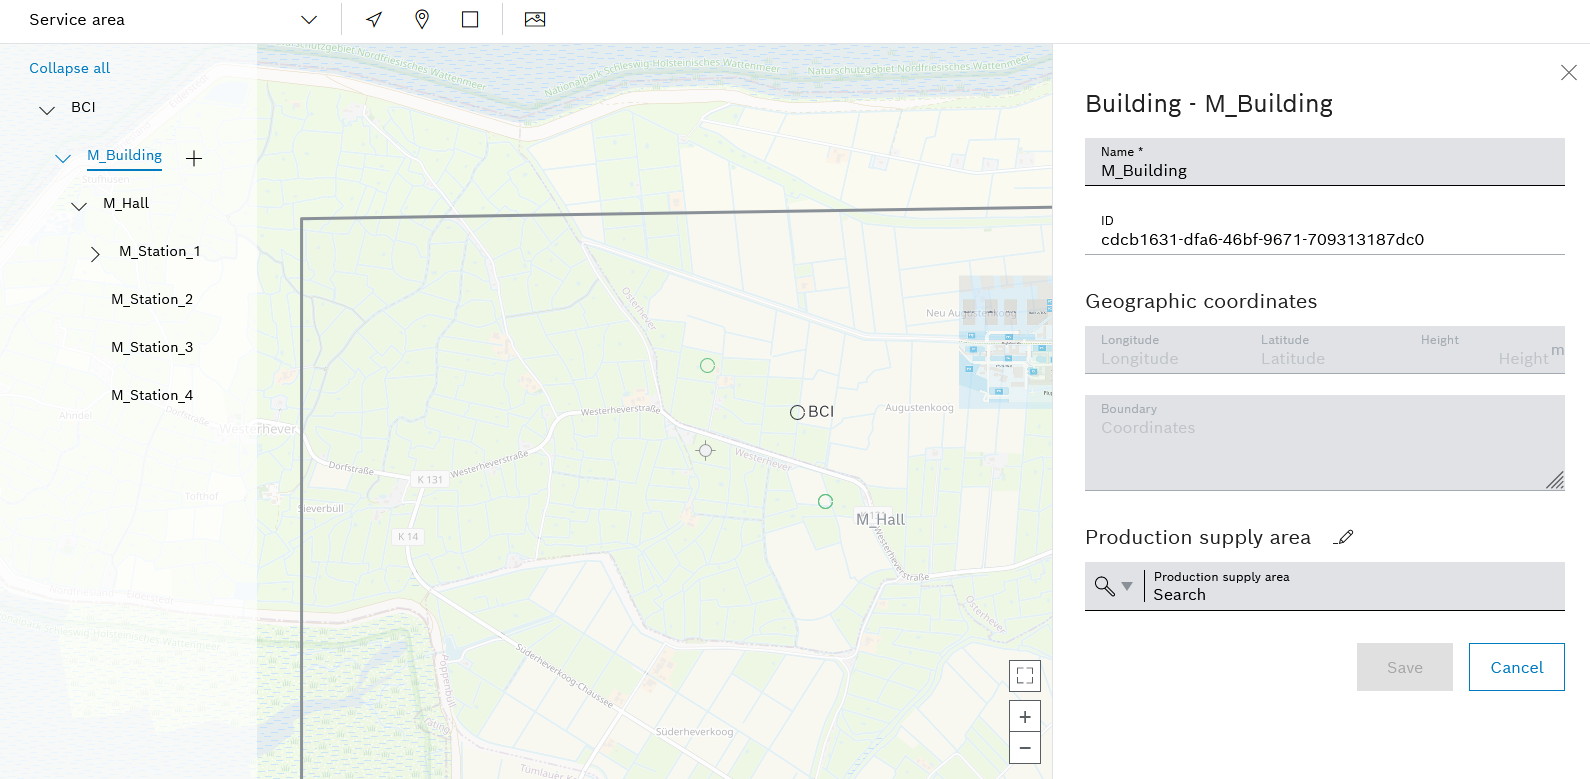
The detailed view of the location appears on the right-hand side.
-
Click
 in the Production supply area drop-down list in the detailed view of the selected location.
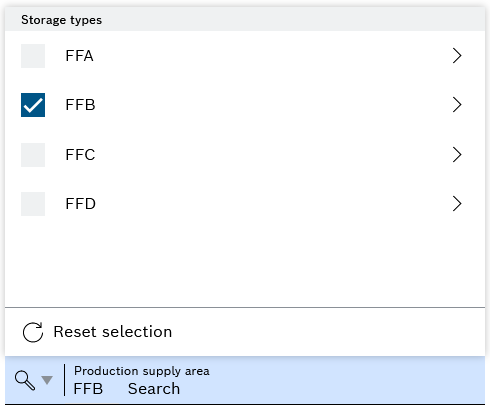
-
Select a storage type.
If the desired storage type is not available in the drop-down list, continue with Create production supply areas.
-
Press to
 go to the storage position selection.
All storage positions that are available under the selected storage type appear.
-
Select a storage location.
Press
 to deselect.
 -
In the file view, click Save to confirm the assignment of a production supply area.
The production supply area is displayed in the production supply area drop-down list and is inherited by the hierarchy levels of the locations below it.
Create production supply areas
If a transport order is not created by the SAP system, but rather by a third-party system, the SAP system does not detect the transport movement from one production supply area (PSA) to another. To make the production supply areas recognizable for the SAP system, they can be assigned to the locations in Transport Management using the data from the SAP system in Transport Management. This enables the SAP system to detect and book the transport movements of these assigned production supply areas.
A production supply area consists of a storage type and an SAP system storage location contained therein.
|
A production supply area cannot be assigned to a location. The production supply area of a building, hall or station is inherited by the respective hierarchy level below it. |
Prerequisite
Transport management administrator or Transport management logistics planner role
Procedure
-
Call up the Maps > Locations menu.
-
Select the desired location in the hierarchy of locations to which you want to add the production supply area.
The detailed view of the location appears on the right-hand side.
-
Use Production supply area
 to open the Manage production supply areas dialog window.
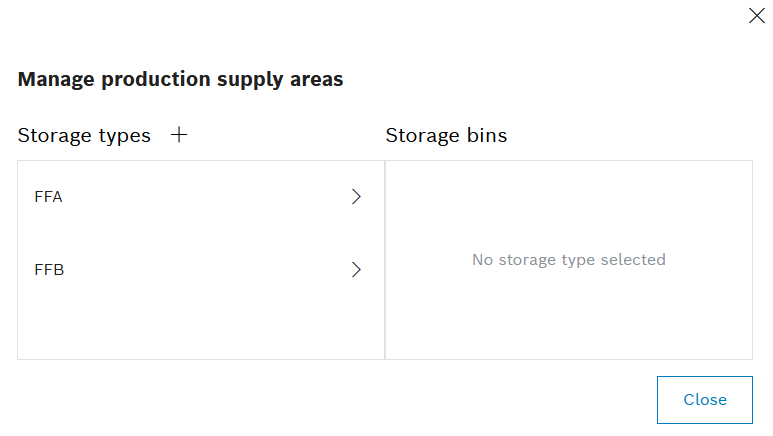
-
Use Storage types
 to create a storage type and a storage location.
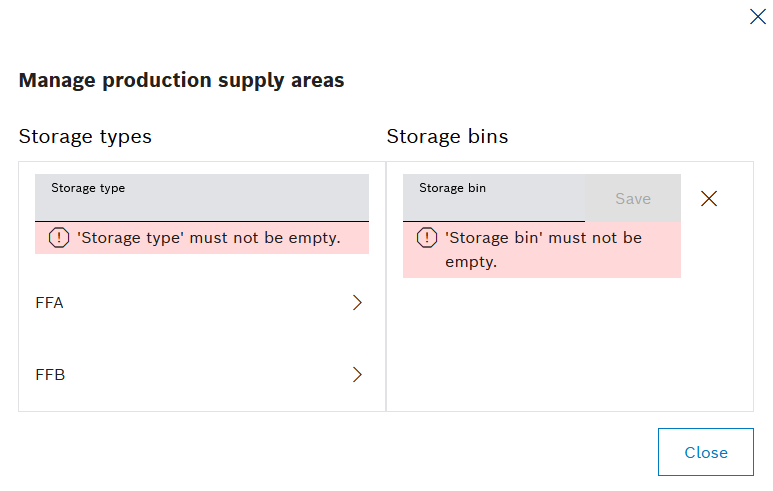
-
Enter the storage type of the SAP system in the Storage type text field.
-
Enter the storage location of the SAP system in the Storage location text field.
-
Click Save next to the Storage location text field.
The new storage type appears in the list of storage types. If the storage type is selected, the storage location associated with it appears in the list of storage locations.
-
-
To add additional storage locations to a storage type, select the storage type and click on Storage locations
.-
Enter a storage location of the SAP system in the Storage location text field.
-
Click Save next to the Storage location text field.
Any number of storage locations can be added to a storage type.
If the storage type is selected in the list of storage types, all storage locations belonging to it appear in the list of storage locations.
-
-
Click Close to complete the creation of production supply areas.
In the detailed view of a selected location, the created production supply areas can also be searched for and assigned using .
Assign a production supply area (PSA) to a location
Assign or remove geographic coordinates for a location
Geographic coordinates can be assigned to each location, building, station and storage location. The geographical coordinates can be removed at any time.
Prerequisite
Transport management administrator or Transport management logistics planner role
Procedure
-
Call up the Maps > Locations menu.
-
Select the required location (location, building, hall, station or storage location) in the hierarchy of locations.
Example: Hall
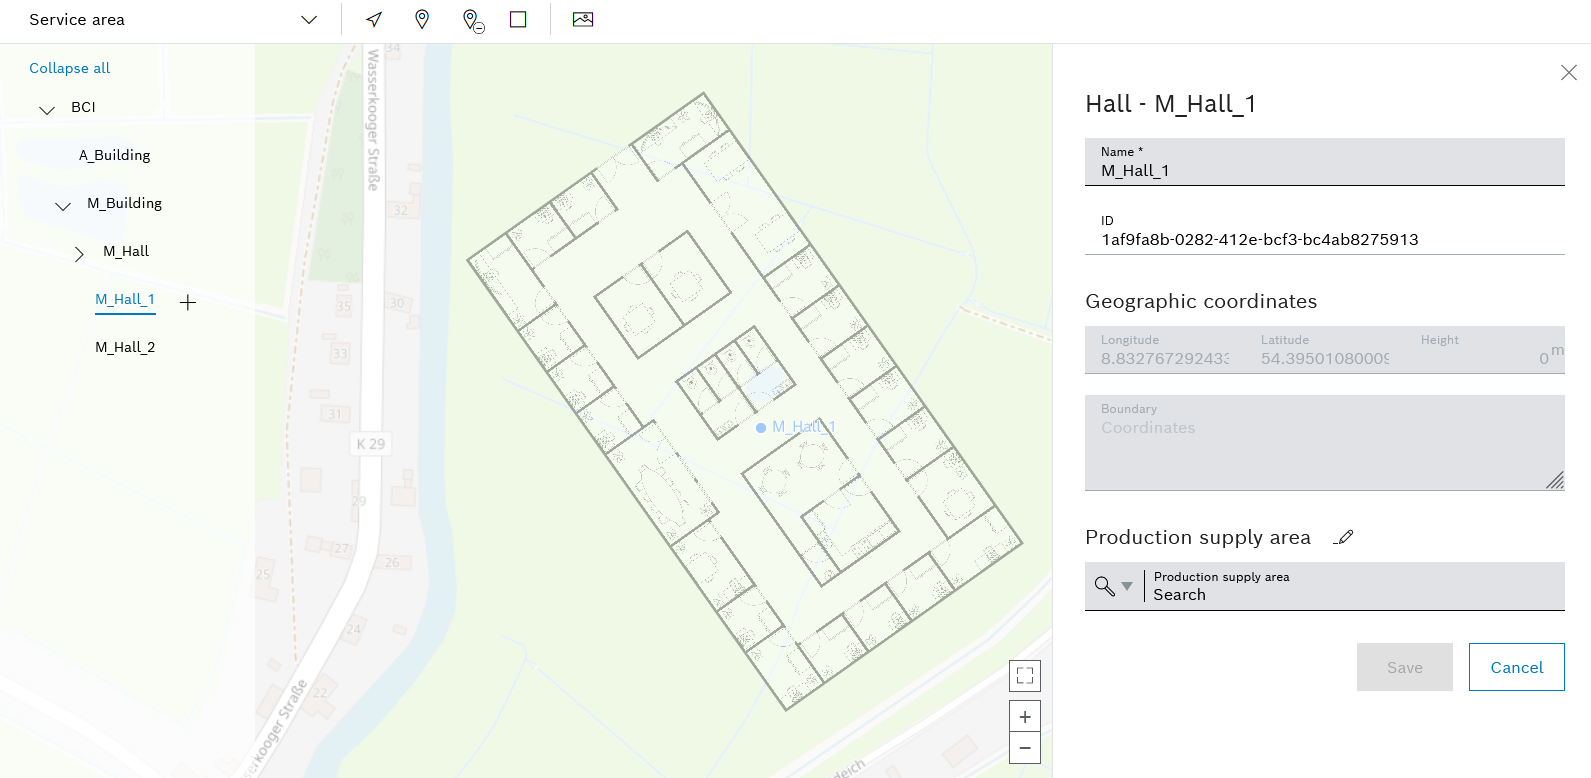
The detailed view of the location appears on the right-hand side.
-
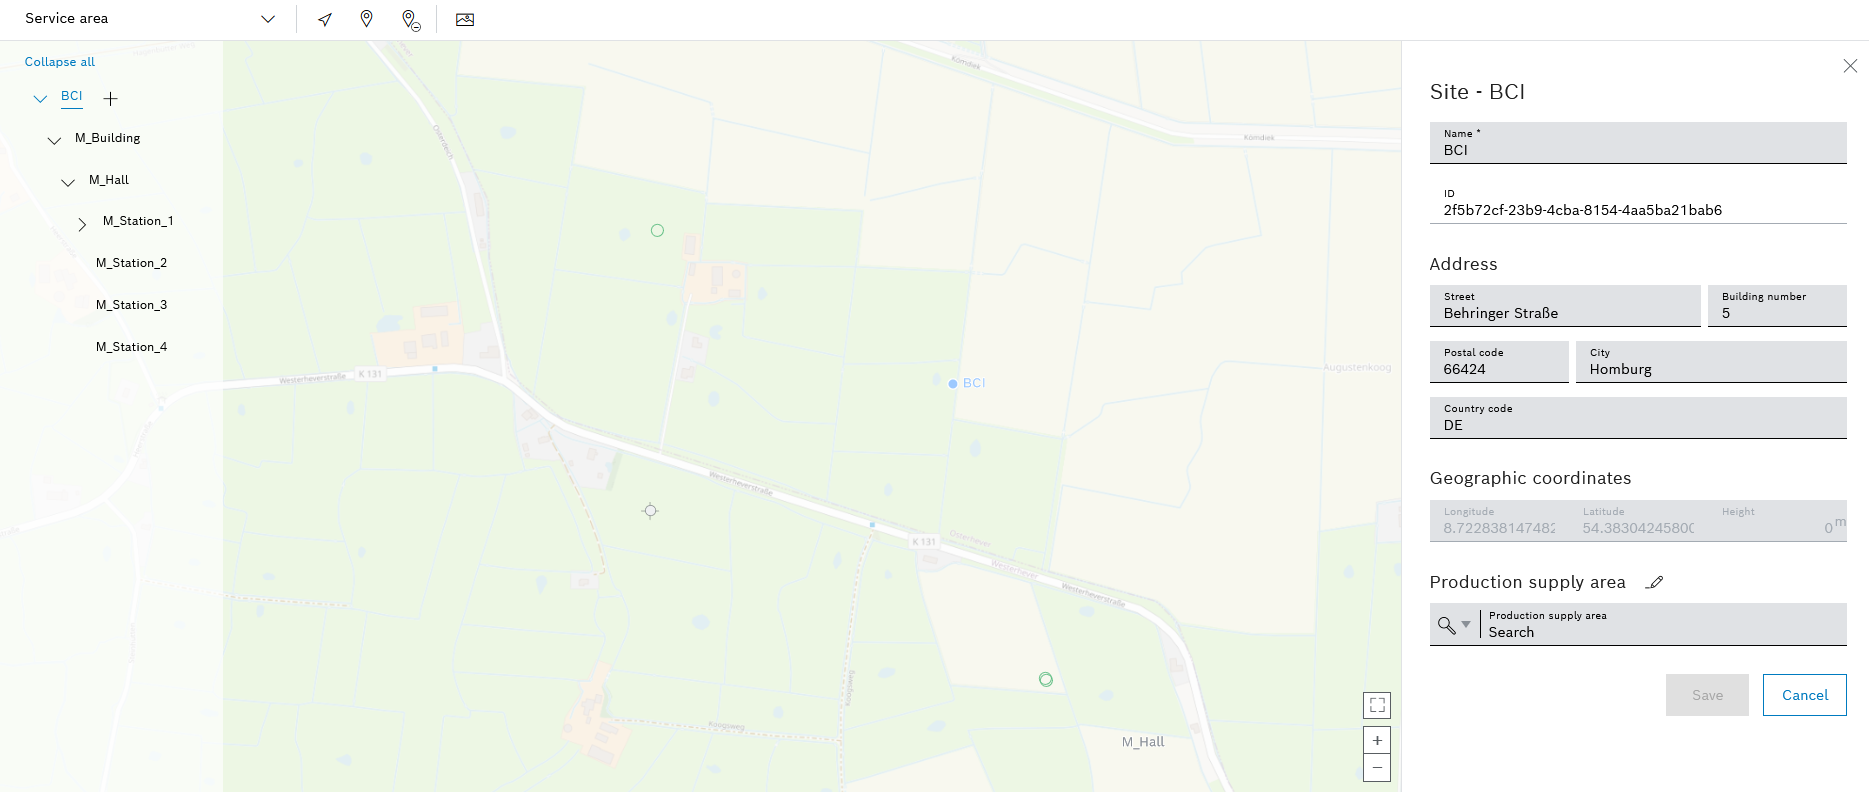
To assign geographical coordinates to the location, click
 in the header.
 -
In the map view, click the required location whose coordinates you want to apply.
The location is marked with a blue dot. The geographic coordinates are automatically entered in the detailed view under Geographic coordinates.
-
To assign other geographical coordinates to the location, click
again in the header and select the required point. -
To remove the geographic coordinates of the location, click
 in the header. does not appear until geographic coordinates have been selected.
The geographical coordinates are deleted in the detailed view.
-
Accept the changes in the detailed view with Save.
The customized data appears in the detailed view of the location under Geographical coordinates.
-
To add a boundary (outline) to a location, continue with Adding or Editing a Boundary for a Location.
-
To add an image to a location, continue with Uploading and Editing Images in the Map View.
Add or edit a building for a location
Any number of buildings with geographic coordinates and boundaries (outlines) can be added to a location.
Requirements
-
Transport management administratororTransport management logistics plannerrole -
At least one location is provided by the Master Data Management module.
Procedure
-
Call up the Maps > Locations menu.
-
In the hierarchy of locations, select the required location to which you want to add the building.
A
appears next to the selected location in the hierarchy. The detail view of the location appears on the right. -
Use
to add a new building to the location.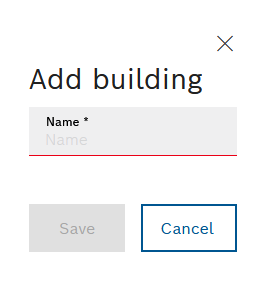
-
In the Add building dialog window, enter the Name.
-
Click Save to add the new building to the location.
The new building is listed in the hierarchy of locations under the selected location. The detailed view of the new building appears on the right-hand side.
-
The following data can be changed in the detailed view:
-
Change the Name of the building.
-
Create or modify Geographic coordinates.
Assign or remove geographic coordinates for a location -
Add a Boundary.
Adding or Editing a Boundary for a Location -
Assign a Production supply area.
Assign a production supply area (PSA) to a location
-
-
Accept the changes in the detailed view with Save.
The new building is added to the location and the data is amended if necessary. The building appears in the hierarchy of locations under the parent location.
-
To assign geographic coordinates to the building, continue with Assign or remove geographic coordinates for a location.
-
To add a boundary (outlines) to the building, continue with Adding or Editing a Boundary for a Location.
-
To add a hall to the building, continue with Add or edit a hall for a building.
-
To assign a production supply area (PSA) to the building, continue with Assign a production supply area (PSA) to a location.
Adding or Editing a Boundary for a Location
Boundaries can be added to each building, hall, station and storage location. Boundaries represent the outlines of the location in the map view.
|
A location cannot have boundaries. |
Requirements
-
Transport management administratororTransport management logistics plannerrole -
At least one hall is added to a location.
Procedure
-
Call up the Maps > Locations menu.
-
Select the required location (building, hall, station or storage location) in the hierarchy of locations.
Example: Hall
The detailed view of the location appears on the right-hand side.
-
To add a boundary to the location, click
 in the header.
 -
In the map view, click to create the boundary in the form of a polygon:
-
Connect the first point of the boundary to the last point.
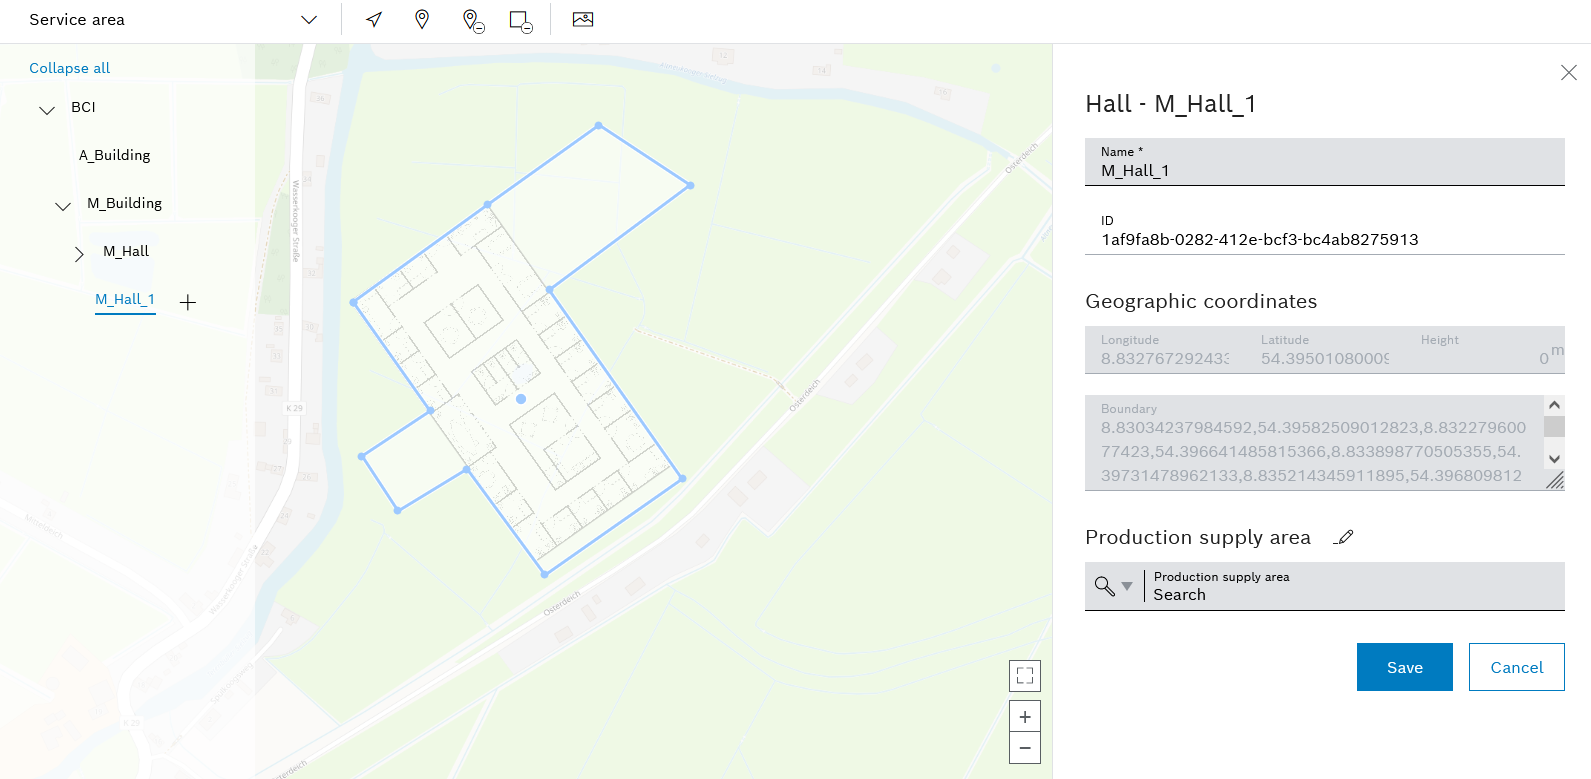
The boundary is represented by blue outlines and handles at each corner.
-
To edit the boundary, move the handles while holding down the mouse button.
-
-
To remove the boundary, click
 in the header. only appears when a boundary has been created.
 -
Click Save to apply the boundary to the location.
The boundary is added to the location and adjustments are saved. In the detailed view, the coordinates of the individual handles of the boundary are automatically saved under Geographic coordinates in the Boundary text field. The boundary is visible in the map view.
-
To assign geographical coordinates to the location, continue with Assign or remove geographic coordinates for a location.
Add or edit a hall for a building
Any number of halls with geographic coordinates and boundaries (outlines) can be added to a building.
Requirements
-
Transport management administratororTransport management logistics plannerrole -
At least one location is provided by the Master Data Management module.
Procedure
-
Call up the Maps > Locations menu.
-
In the hierarchy of locations, select the building to which you want to add the hall.
A
appears next to the selected building in the hierarchy. The detailed view of the building appears on the right-hand side. -
Use
to add a new hall to the building.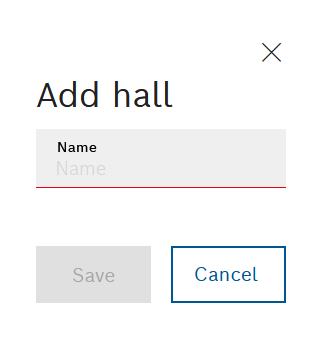
-
In the Add hall dialog window, enter the Name.
-
Click Save to add the new hall to the building.
The new hall is listed in the hierarchy of locations under the selected building. The detailed view of the new hall appears on the right-hand side.
-
The following data can be changed in the detailed view:
-
Change the Name of the hall.
-
Create or modify Geographic coordinates.
Assign or remove geographic coordinates for a location -
Add a Boundary.
Adding or Editing a Boundary for a Location -
Assign a Production supply area.
Assign a production supply area (PSA) to a location
-
-
Accept the changes in the detailed view with Save.
The new hall is added to the building and the data is amended if necessary. The hall appears in the hierarchy of locations under the parent building.
-
To assign geographical coordinates to the hall, continue with Assign or remove geographic coordinates for a location.
-
To add a boundary (outline) to the hall, continue with Adding or Editing a Boundary for a Location.
-
To add a station to a hall, continue with Adding a Station to a Hall.
Adding a Station to a Hall
Any number of stations with geographical coordinates and boundaries (outlines) can be added to a hall.
Requirements
-
Transport management administratororTransport management logistics plannerrole -
At least one hall is added to a location.
Procedure
-
Call up the Maps > Locations menu.
-
Select the desired hall in the hierarchy of locations to which the new station should be added.
A
appears next to the selected hall in the hierarchy. The detail view of the location appears on the right. -
Add a new station to the hall with
.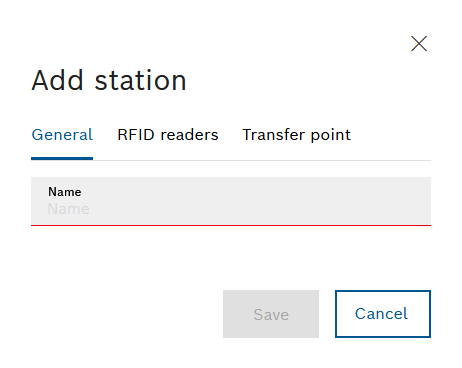
The Add station dialog box has three tabs.
-
In the General tab, enter the Name of the station.
-
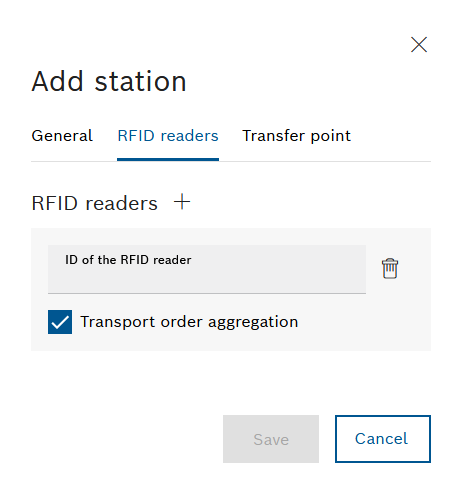
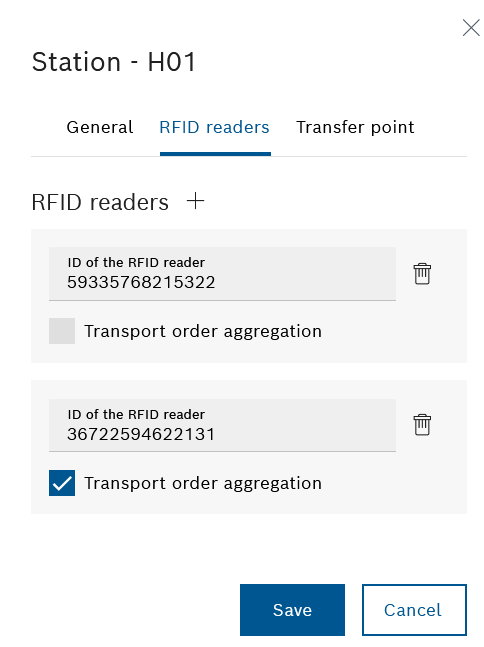
To add an RFID reader that is located at the station, in the Add station dialog window, call up the RFID readers tab.
-
Add as many RFID readers as required using RFID readers
. -
Enter the desired RFID reader in the text field RFID reader ID.
The RFID reader is assigned to the station.
Transport orders can be combined:
 Aggregation of transport orders : Transport orders from this station with the same destination are automatically combined in a new transport order.
 Aggregation of transport orders : Save transport jobs that are scanned with this RFID reader individually.
Use
 next to the ID of the RFID reader text field to delete individual RFID readers. Apply the changes using Save.
-
-
To use the station as a transfer point, open the Transfer point tab in the dialog window.
Different coverage areas meet at a transfer point and goods can be exchanged.
Coverage areas must be created under Maps > Coverage areas in order to be able to select them for a transfer point.
Supply Areas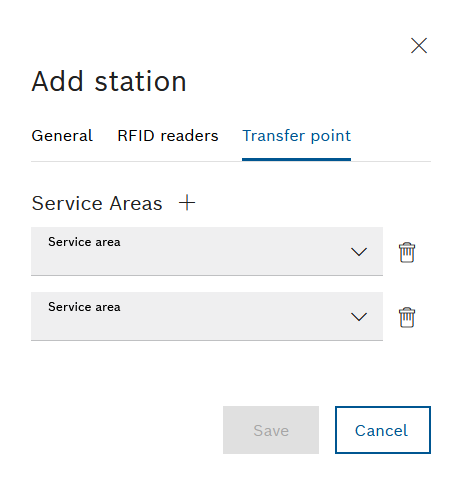
-
Use Coverage areas
to add at least two coverage areas. -
In the Coverage area drop-down lists, select the desired coverage area.
-
To delete a service area, click
next to the relevant drop-down list.
-
-
Apply the changes using Save.
The new station is added to the hall and it appears in the hierarchy of locations below the hall in question.
-
To add a storage location to the station, continue with Adding a Storage Location to a Station.
-
To assign a production supply area (PSA) to the station, continue with Assign a production supply area (PSA) to a location.
Editing a Station
Any number of stations can be added to a hall. In the detailed view of the station, stored data, geographical coordinates and boundaries (outlines) can be changed.
Requirements
-
Transport management administratororTransport management logistics plannerrole -
At least one station is added to a hall.
Procedure
-
Open the Maps > Locations menu.
-
Select the desired station in the hierarchy of locations.
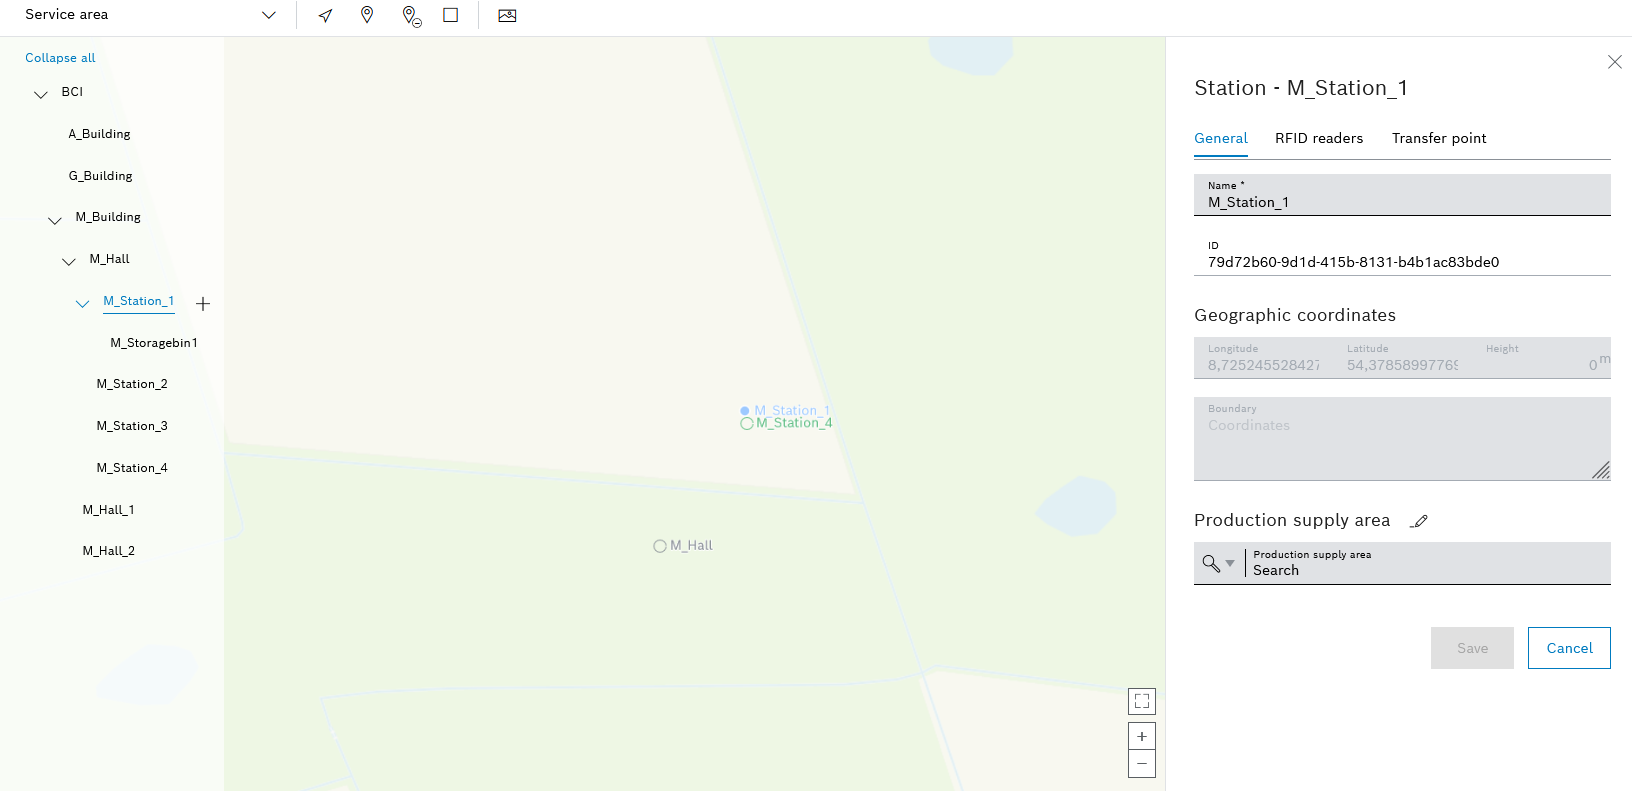
The detailed view of the station appears on the right-hand side and has three tabs.
-
The following data can be changed in the detailed view of the General tab:
-
Change the Name of the station.
-
Create or modify Geographic coordinates.
Assign or remove geographic coordinates for a location -
Add a Boundary.
Adding or Editing a Boundary for a Location -
Assign a Production supply area.
Assign a production supply area (PSA) to a location
-
-
In the detail view of the RFID readers tab, change the details of the RFID readers located at the station:
-
Add as many RFID readers as required using RFID readers
. -
If necessary, adjust the ID in the RFID reader ID text box.
Transport orders can be combined:
Aggregation of transport orders : Transport orders from this station with the same destination are automatically combined in a new transport order.
Aggregation of transport orders : Save transport jobs that are scanned with this RFID reader individually.Use
next to the ID of the RFID reader text field to delete individual RFID readers. Apply the changes using Save.
-
-
To use the station as a transfer point where necessary, open the Transfer point tab in the detailed view.
Different coverage areas meet at a transfer point and goods can be exchanged.
Coverage areas must be created under Maps > Coverage areas in order to be able to select them for a transfer point.
Supply Areas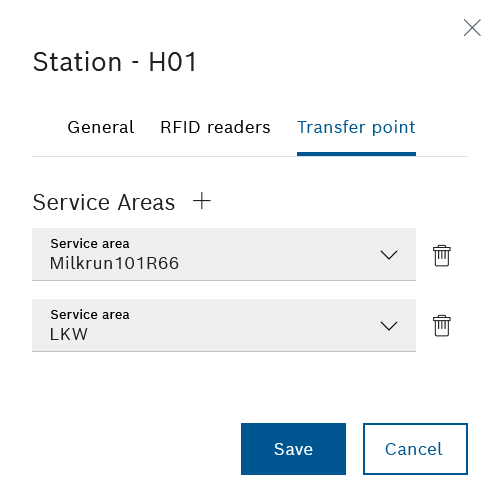
-
Add coverage areas with Coverage areas
.At least two coverage areas must be specified for a transfer point.
-
In the Coverage area drop-down lists, select the desired coverage area.
-
To delete a service area, click
next to the relevant drop-down list.
-
-
Accept the changes in the detailed view with Save.
The station data is updated in the detail view.
-
To add a storage location to the station, continue with Adding a Storage Location to a Station.
Adding a Storage Location to a Station
Any number of storage locations with geographic coordinates, boundaries (outlines) and production supply areas can be added to a station.
Assign or remove geographic coordinates for a location
Adding or Editing a Boundary for a Location
Assign a production supply area (PSA) to a location
Requirements
-
Transport management administratororTransport management logistics plannerrole -
At least one station is added to a hall.
Procedure
-
Call up the Maps > Locations menu.
-
Select the required stop in the hierarchy of locations to which the new storage location is to be added.
A
appears next to the selected station in the hierarchy. The detailed view of the station appears on the right. -
Use
to add a new storage location to the station.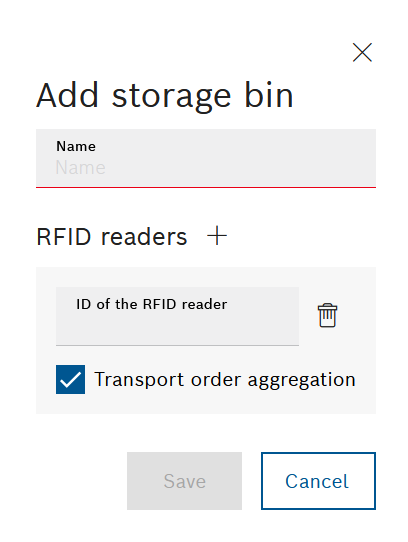
-
Enter the Name of the storage location in the Add storage location dialog window.
-
To add an RFID reader located at the storage location, click RFID readers
.Any number of RFID readers can be added to the storage location.
The ID of the RFID reader text box appears.
-
Enter the desired RFID reader in the text field RFID reader ID.
The RFID reader is assigned to the station.
Transport orders can be combined:
Aggregation of transport orders : Transport orders from this station with the same destination are automatically combined in a new transport order.
Aggregation of transport orders : Save transport jobs that are scanned with this RFID reader individually.Use
next to the ID of the RFID reader text field to delete individual RFID readers. Apply the changes using Save.
The new storage location is added to the station and appears in the hierarchy of locations under the relevant station.
-
To edit the storage location data, continue with Editing a Storage Location.
Editing a Storage Location
Any number of storage locations can be added to a station. In the detailed view of the storage location, stored data, geographical coordinates and boundaries (outlines) can be changed.
Requirements
-
Transport management administratororTransport management logistics plannerrole -
At least one storage space is added to a station.
Procedure
-
Select Maps > Locations from the menu.
-
Select the required storage location in the hierarchy of locations.
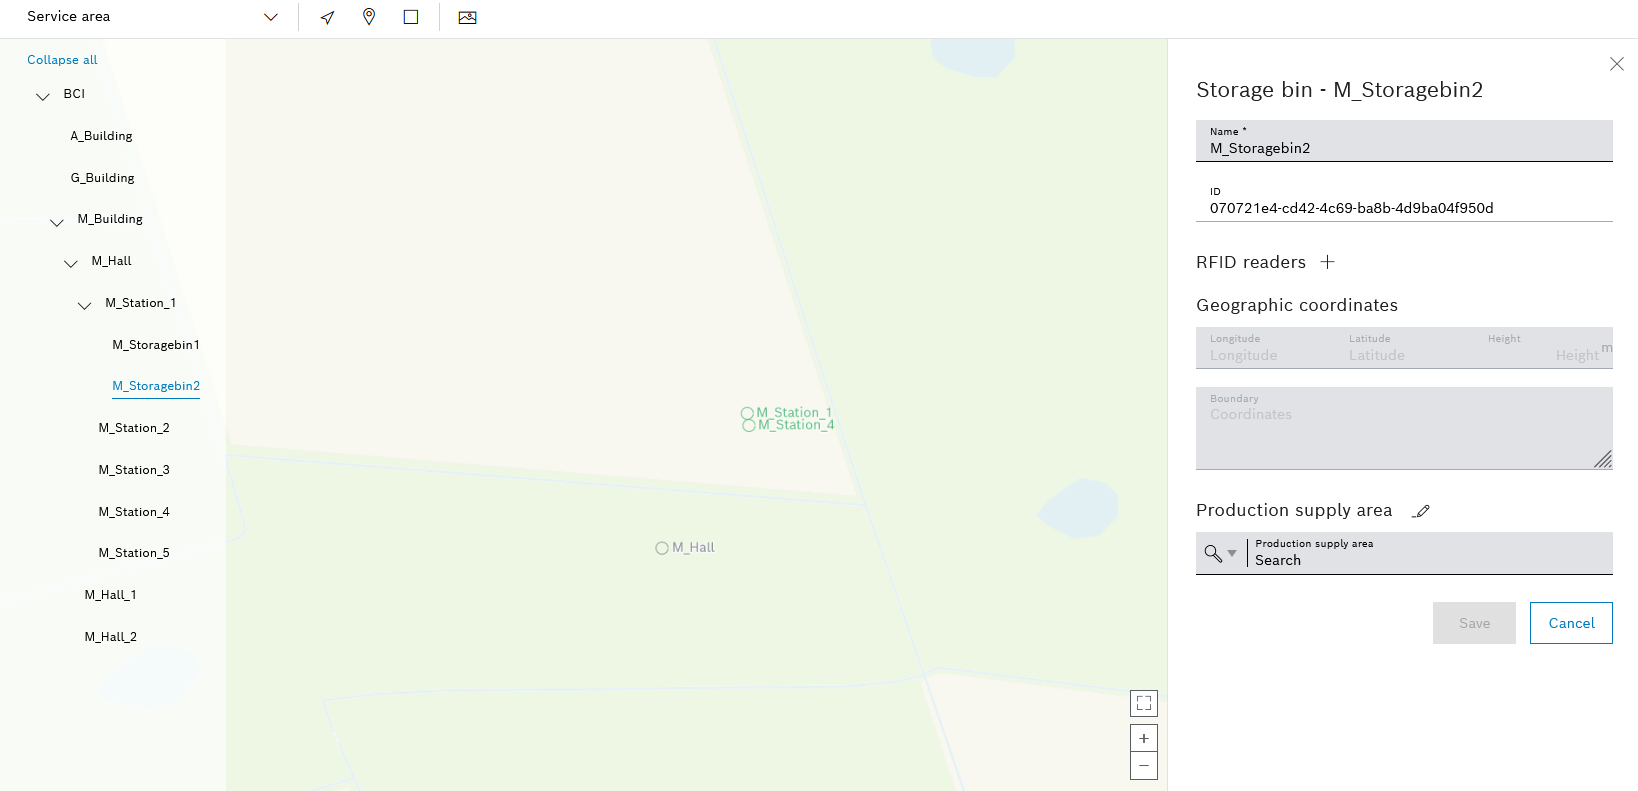
The detailed view of the storage location appears on the right-hand side.
-
To edit the name of the storage location, amend the Name in the detailed view.
-
Click RFID readers
to add further RFID readers.-
Enter the required RFID reader in the ID of the RFID reader text box or amend existing data.
The RFID reader is assigned to the storage location.
Transport orders can be combined:
Aggregation of transport orders : Transport orders from this station with the same destination are automatically combined in a new transport order.
Aggregation of transport orders : Save transport jobs that are scanned with this RFID reader individually.Use
next to the ID of the RFID reader text field to delete individual RFID readers. Accept the data with Save. Accept the changes in the detailed view with Save.
-
-
Additional data can be changed in the detailed view if necessary:
-
Change the Name of the storage location.
-
Create or modify Geographic coordinates.
Assign or remove geographic coordinates for a location -
Add a Boundary.
Adding or Editing a Boundary for a Location -
Assign a Production supply area.
Assign a production supply area (PSA) to a location
-
The storage location data is updated in the detailed view.
-
To add a track network for service areas in the map view, continue with Inserting Intersections and Paths of a Coverage Area into the Map View.
Inserting Intersections and Paths of a Coverage Area into the Map View
To enable correct routing, e.g. by the milk run application, a track network must be defined in each service area. Path networks can be inserted for one or more service areas and consist of individual tracks. Multiple tracks can be connected by intersections.
Prerequisites
-
Transport management administratororTransport management logistics plannerrole -
At least one service area must be created.
Creating a New Coverage Area
Procedure
-
Call up the Maps > Locations menu.
-
In the header, select the service area for which a path network is to be defined in the Service area drop-down list. Multiple selections are possible.
The tools for creating intersections and paths appear in the header.
Paths already defined for the selected service areas are shown in color in the map view. A coverage area and the paths assigned to it are each shown in a color.
To display the tools for creating intersections and paths, no location must be selected in the hierarchy of locations.
-
Use
 to create an intersection in the header:
-
In the map view, click the required location where an intersection is to be created.
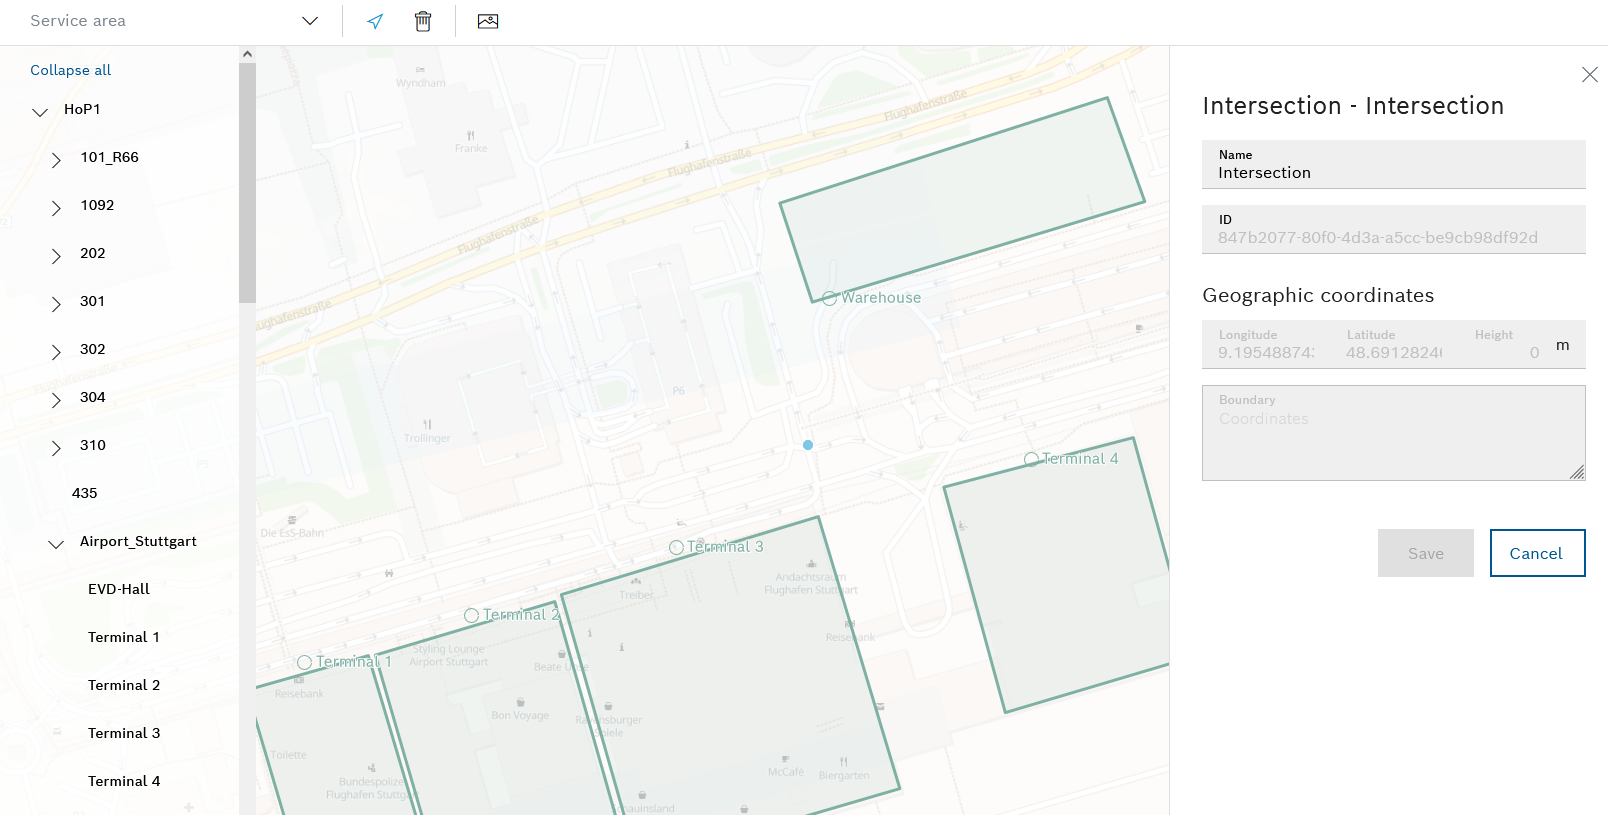
The new intersection is marked with a blue dot and the detailed view of the new intersection appears on the right-hand side.
-
If necessary, amend the Name at the intersection and accept the change by clicking Save.
-
-
To create any necessary additional intersections or paths, click in the map view.
The tools for creating intersections and paths appear in the header.
-
In the header, use
 to create a simple path between two creative points:
The simple path leads in one direction only.
Created points can be geographical coordinates, intersections or handles of boundaries (outlines) of a location.
Adding or Editing a Boundary for a Location-
Use the mouse to select the created point from which the path is to start.
-
Use the mouse to select the created point where the simple path is to end.
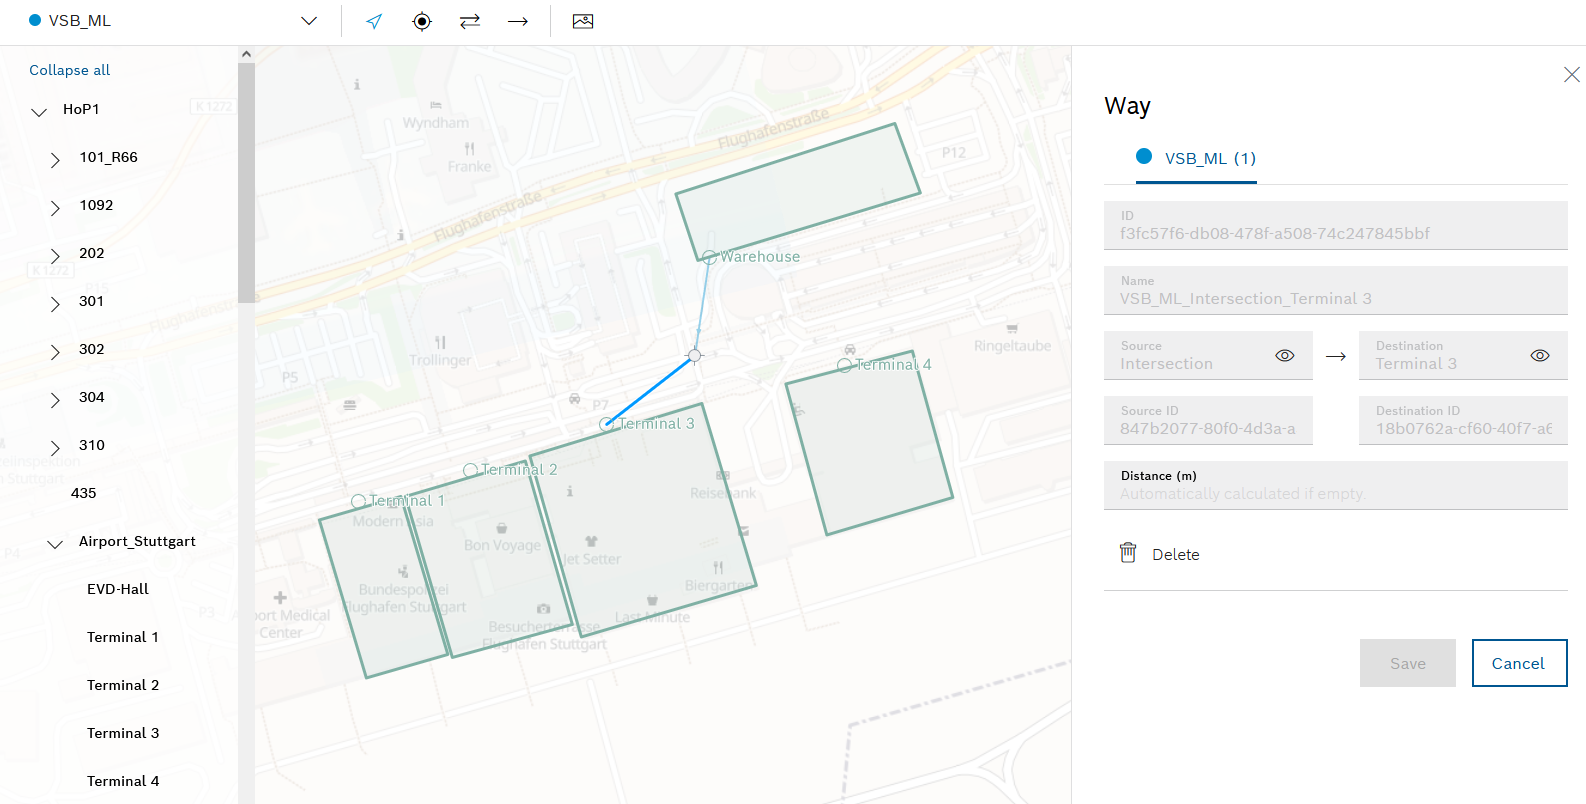
The newly created path shown as a blue line in the map view. For simple paths that are not selected, the direction of the path is indicated by a small arrow pointer.
The detailed view of the newly created path appears on the right-hand side. -
If necessary, enter the distance between the created points that the path connects in the Distance text box and accept the change with Save.
If no distance is specified, the distance is calculated automatically.
-
-
To create any necessary additional intersections or paths, click in the map view.
The tools for creating intersections and paths appear in the header.
-
Use
 to create a path between two points in the header that leads in both directions.
-
Use the mouse to select the two created points that are to be connected by a path in both directions.

The newly created path is shown as a blue line in the map view. For tracks in both directions that are not selected, small arrow pointers indicate that both directions of the path are valid.
The detailed view of the newly created path appears on the right-hand side. In the detailed view, the path in both directions is divided into two paths: One path from A to B and one path from B to A. -
If necessary, enter the distances between the created points that connect the paths in the Distance text field.
If no distance is specified, the distance is calculated automatically.
-
If necessary, accept changes with Save.
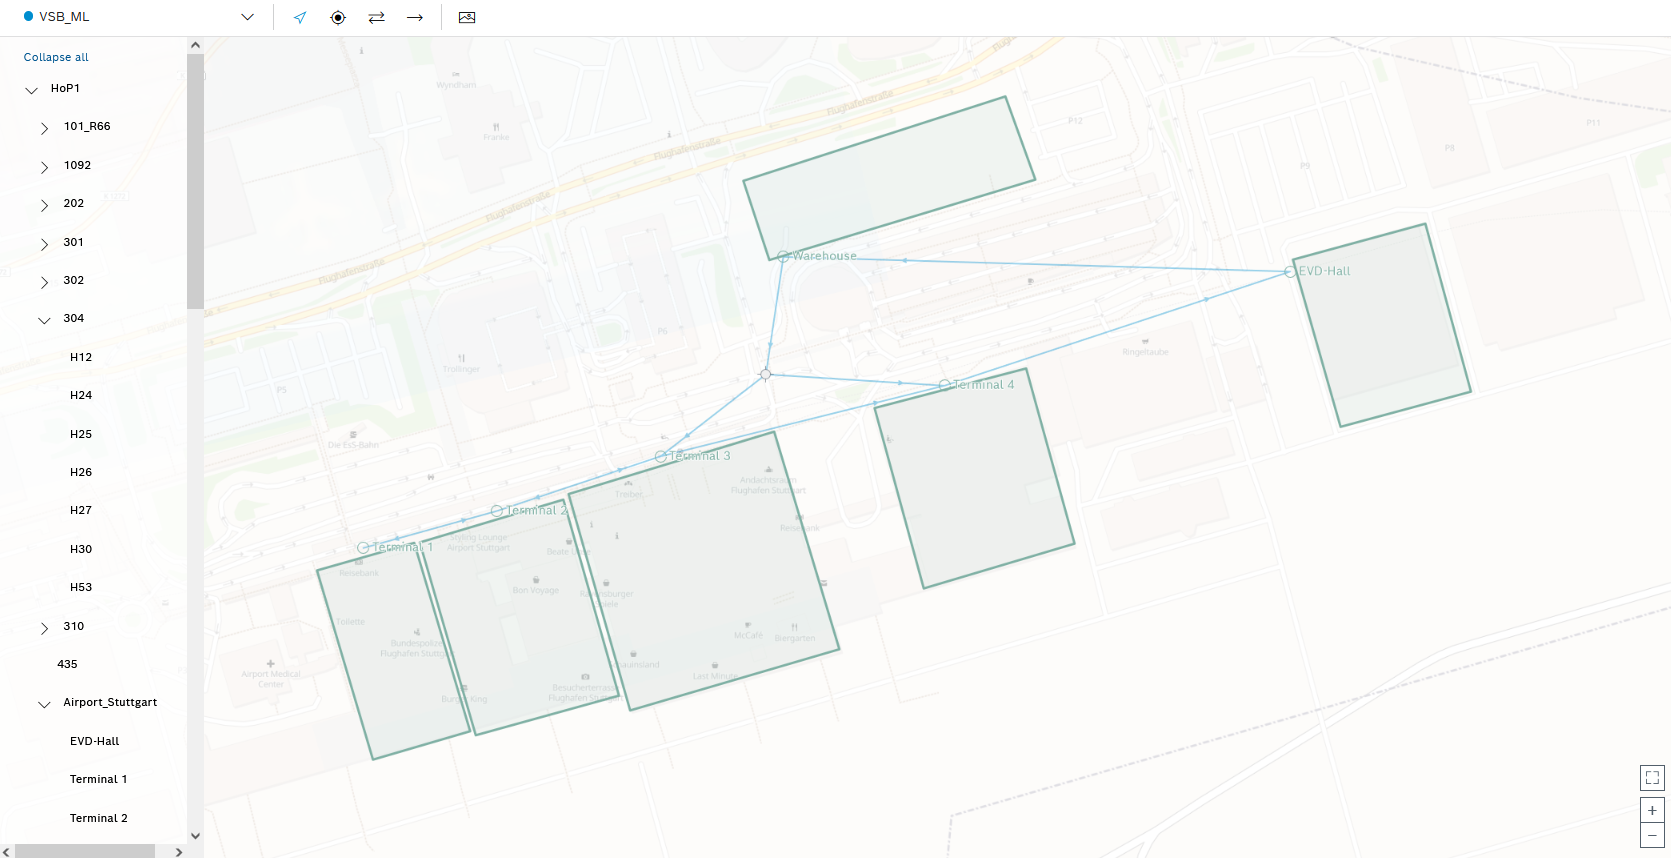
Example of a network of paths for a service area:
-
Intersections and paths are inserted in the map view for the selected service areas. If the respective service areas are selected in the header, the intersections and paths are shown in the map view in the corresponding color.
-
To delete intersections from the map view, continue with Deleting an Intersection.
-
To edit or delete paths of a service area from the map view, continue with Editing or Deleting a Path of a Service Area in the Map View.
Editing or Deleting a Path of a Service Area in the Map View
Paths are parts of a path network that belong to one or more service areas and are displayed in the map view. The distances of individual paths of service areas can be edited. Individual paths can be deleted.
Prerequisites
-
Transport management administratororTransport management logistics plannerrole -
At least one supply area has been created.
Creating a New Coverage Area -
At least one path has been created for at least one service area.
Inserting Intersections and Paths of a Coverage Area into the Map View
Procedure
-
Call up the Maps > Locations menu.
-
In the header, in the Service area drop-down list, select the service area for which the required path is defined. Multiple selections are possible.
The tools for creating intersections and paths appear in the header. Paths already defined for the selected service areas are shown in color in the map view. A coverage area and the paths assigned to it are each shown in a color.
To display the tools for creating intersections and paths, no location must be selected in the hierarchy of locations.
-
Select the required path in the map view that is to be edited or deleted.
The selected path is highlighted in blue in the map view. The detailed view of the path appears on the right-hand side. For paths in both directions, the path is divided into two paths in the detailed view: one path from A to B and one path from B to A.
Edit path
-
To adjust the distance between the created points that the path connects, adjust the value in the detailed view in the Distance text field.
If no distance is specified, the distance is calculated automatically.
-
Apply the changes with Save.
The path of the selected service area has been edited and changes updated in the detailed view.
Delete path
-
To delete a route, click
under the required path in the detailed view. -
To delete the path permanently, click Delete in the Delete path? dialog window.
The path of the selected service area has been edited and changes updated in the detailed view. The path no longer appears in the map view.
-
To delete an intersection, continue with Deleting an Intersection.
Deleting an Intersection
Intersections connect multiple routes of a coverage area in map view.
Prerequisites
-
Transport management administratororTransport management logistics plannerrole -
At least one intersection has been created.
Inserting Intersections and Paths of a Coverage Area into the Map View
Procedure
-
Call up the Maps > Locations menu.
-
In map view, select the intersection.
The intersection is highlighted with a blue dot and the detail view of the intersection appears on the right.
-
In the header, use
to delete the intersection. -
In the dialog box, click Delete to permanently delete the intersection.
The intersection is deleted and no longer appears in the map.
-
To delete paths from a coverage area, proceed with Editing or Deleting a Path of a Service Area in the Map View.