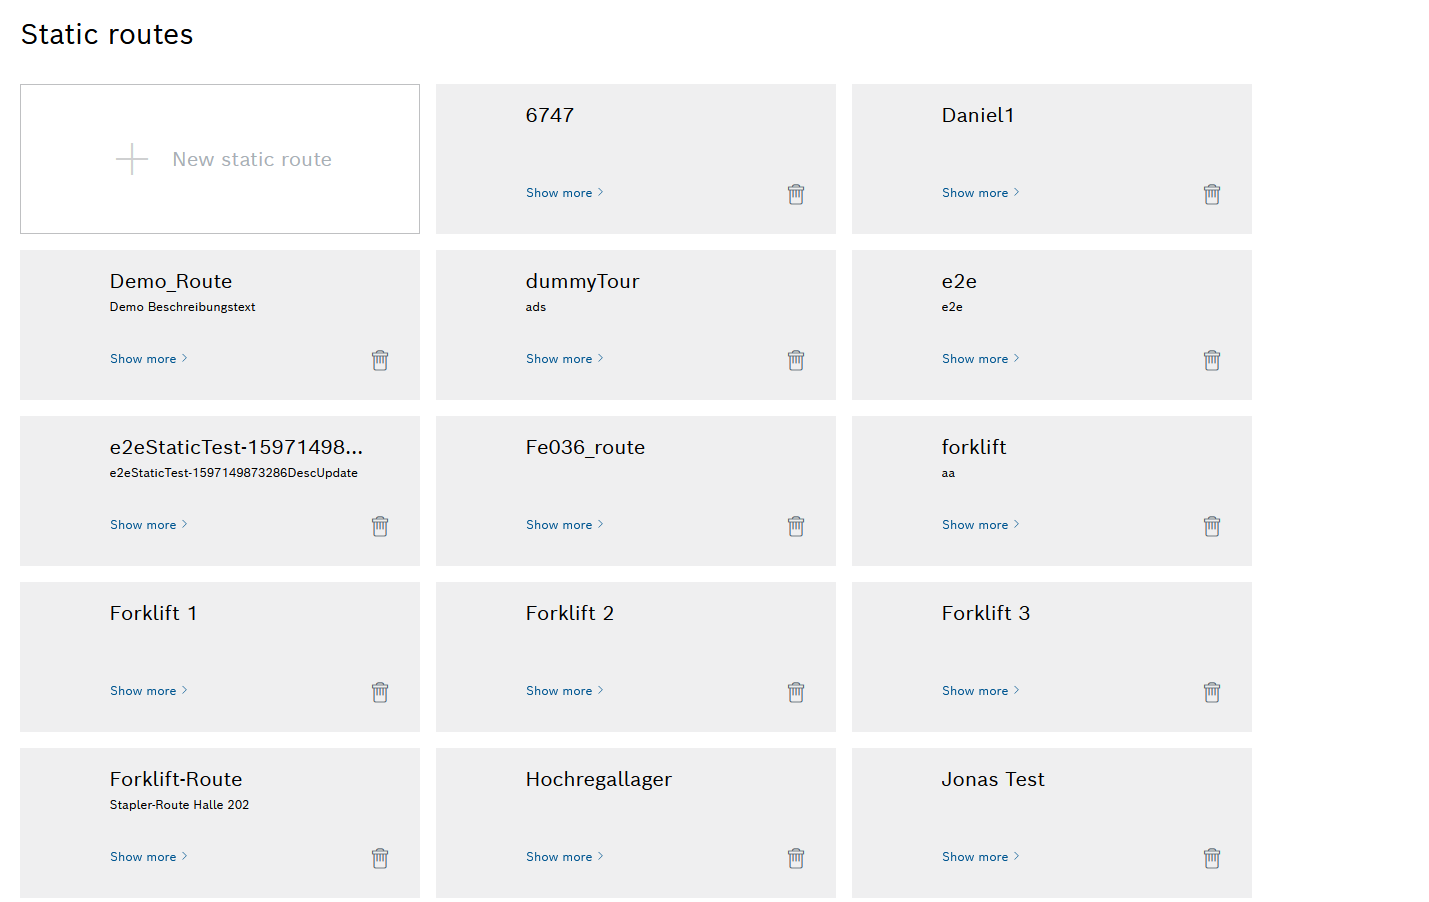
Tour planning
All available static options are managed under Material flow > Tour planning.
Static tours can be created, activated, deactivated, edited, and deleted.
Creating or Editing a Static Route for Tours
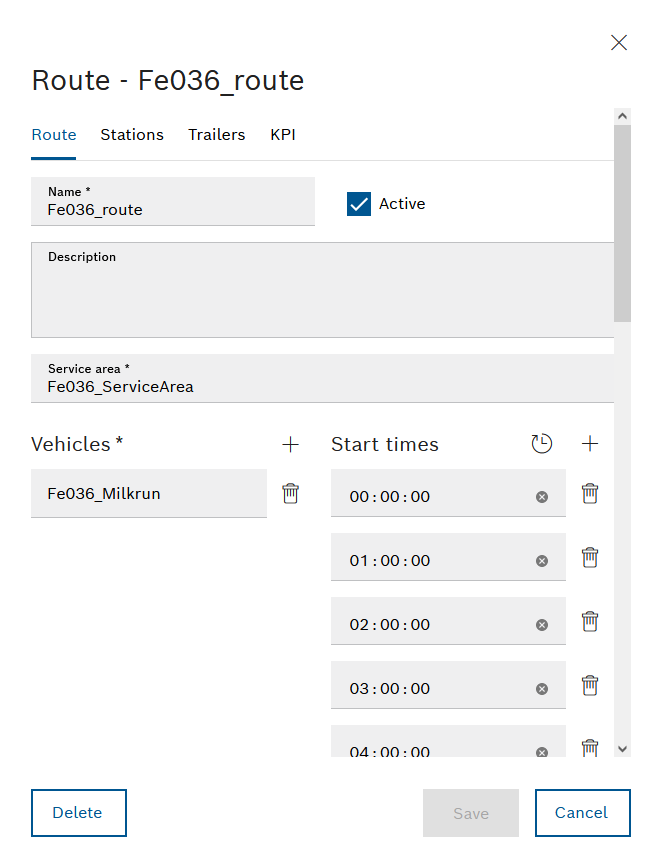
Static routes are timetables that can be drawn up for regular tours. In a static route, vehicles and trailers are defined and stations to be served are specified. Several start times of the route can be defined.
Preconditions
-
Role
Transport Management AdministratororTransport Management Logistik Planer -
At least one service area has been created.
Creating a New Coverage Area -
At least one vehicle has been created.
Creating a New Vehicle -
At least one station has been created.
Adding a Station to a Hall
Procedure
|
The maximum number of trailers x corresponds to the maximum number of trailers for the vehicle being used. |
-
Call up the Material flow > Tour planning menu.
-
To create a new static route, click
 New Static Route.
Or:
To edit a static route, click the required route.
There are four tabs in the New static route or Route - <Name> dialog window.
-
In the Route tab, enter the name of the route in the Name text box.
-
Activating or deactivating a route:
 Active : Tours are planned for the route.
 Active : No tours are planned for the route.
 -
If necessary, fill in the Description text box.
-
Select a service area from the Service Area drop-down list.
The supply area defines which vehicle types may be used on which routes. -
In the drop-down list under Vehicles , select a vehicle that is available for this route.
-
To specify additional vehicles for the route, use Vehicles
to add another drop-down list for a vehicle and select a vehicle.Individual vehicles can be deleted with
 .
. -
To set the start time of the route, use Start times
to add a drop-down list for a time.
Multiple start times can be specified for the route. -
Enter the start time.
-
To define consecutive start times with a specified interval, use
 to open the Generate tour start times dialog window.
-
Enter the start time in the First start time text box.
-
Enter the interval between the start times in the Interval text box.
-
Use Generate to create the interval.
Start times within a period of 24 hours from the first start time are created.
Individual start times can be deleted with
.
-
-
In the New static route dialog window or Route - <Name> dialog window, select the Stations tab.
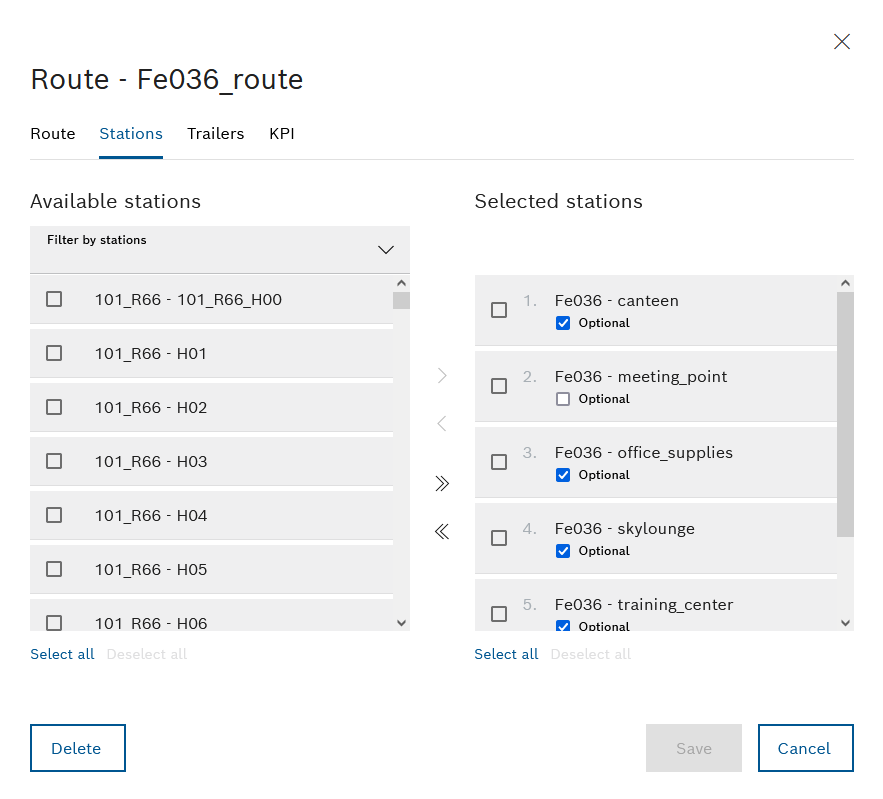
The stations of the route are defined in the Stations tab. All of the available stations are listed in the Available stations area. The stations served within the route are listed in the Selected stations area.
-
To limit the stations displayed to one hall or several halls, click in the Filter by station drop-down list.
The halls are displayed. In the Filter by station drop-down list, activate the checkbox of the halls whose stations are to be displayed. Multiple selections are possible. To close the Filter by station drop-down list, click outside the drop-down list.
The Available stations area displays only those stations that are assigned to the activated halls.
-
Setting up stations:
-
 : Move all stations to the Selected stations area.
 -
 : Move all stations to the Available stations area.
 -
Select all : Activate the checkboxes of all stations in the Selected stations or Available stations area.
-
Deselect all : Deactivate the checkboxes of all stations in the Selected stations or Available stations area.
-
 : Move activated stations to the Selected stations area.
 -
 : Move activated stations to the Available stations area.
-
-
In the Selected stations area, activate or deactivate the Optional checkbox within the individual stations:
The station is only scheduled for the route if loading activities exist for that station. The station is always scheduled for the route. -
In the New static route dialog window or Route - <Name> dialog window, select the Trailers tab.
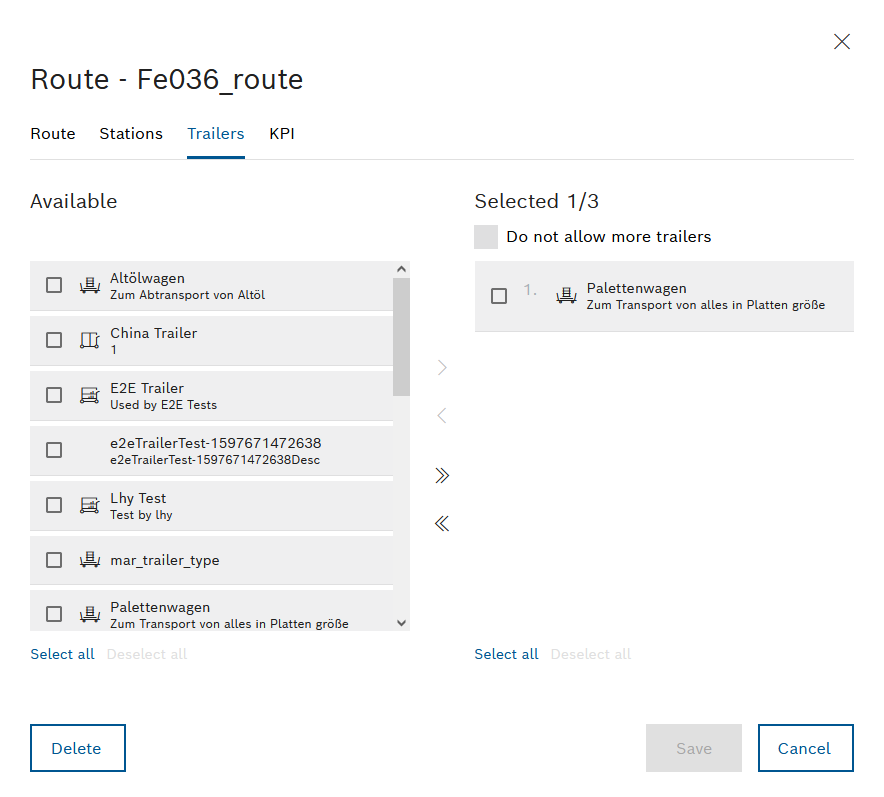
In the Trailers tab, you can specify which trailers are connected to the vehicle when starting the route. The available trailers are listed in the Available area. The trailers that must be connected to the vehicle when starting the route are listed in the Selected <n>/<n> area.
The first number in the Trailers <n>/<n> designation indicates the number of added trailers in the Trailers tab. The second number indicates the maximum number of trailers allowed for the scheduled vehicle.
If all transport movements can be scheduled on these trailers, the Couple trailers step is bypassed in a Milk run tour. If an additional trailer is required and it does not exceed the maximum number of trailers for the vehicle, the driver will be asked to couple the additional trailer.
-
Drag and drop trailers or use the checkboxes to move them between the Available and Selected <n>/<n> areas.
-
Activate or deactivate the Do not allow additional trailers checkbox:
No trailers other than the selected trailers are scheduled by Transport Management for the route, even if the capacity of the vehicle would allow for more trailers. Depending on the maximum towing length and the maximum number of trailers for the vehicle, trailers may be scheduled by Transport Management in addition to those selected.
* Example: Maximum number of trailers for the vehicle: 4. When creating the static route, two trailers are selected. During tour planning, up to two additional trailers can be scheduled for the route. -
Apply the changes using Save.
The static route is created or edited and appears in the Material flow Data > Tour planning menu.
Deleting a Static Route
Prerequisite
Role Transport Management Administrator or Transport Management Logistik Planer
Procedure
-
Call up the Material flow > Tour planning menu.
-
Delete the static route with
.Or:
Select the static route and delete it in the Route - <Name> dialog box by clicking Delete.
-
In the dialog window, click Delete to permanently delete the static route.
The static route is deleted and no longer appears in the Material flow > Tour planning menu.