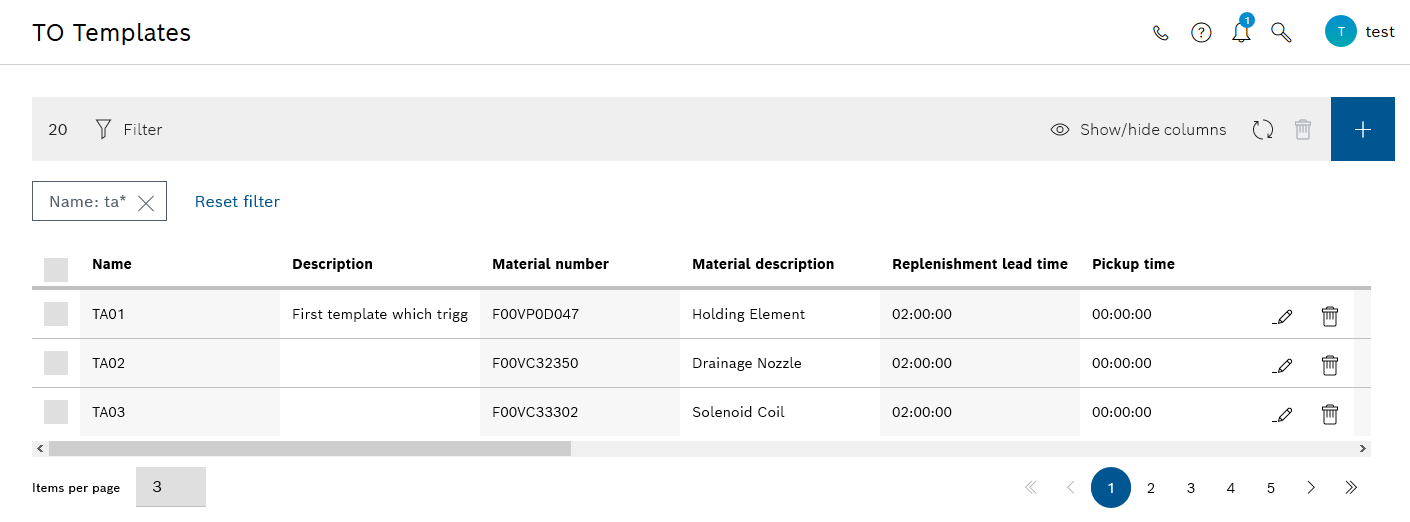
TO templates
All available transport order templates are managed in the Material flow data > Transport order templates menu. Transport order templates can be used when creating transport orders.
Create transport order in the overview tab
Description of the Interaction Elements: TO templates
The following table describes the icons and functions in the dialog box.
| Icon/function | Description |
|---|---|
Replenishment time |
The maximum time in which the transport order must be completed. When the transport order is created, the replenishment time is added to the current time. |
Quantity |
Number of parts |
Number of unit loads |
Number of unit loads to transport the material |
Setting Up Table Columns of TO (Transport Order) Templates
The columns of the table of transport order templates can be individually hidden or displayed.
-
Open the Material flow data > TA templates menu.
-
In the header, use
 Select columns to open the Select columns dialog window.
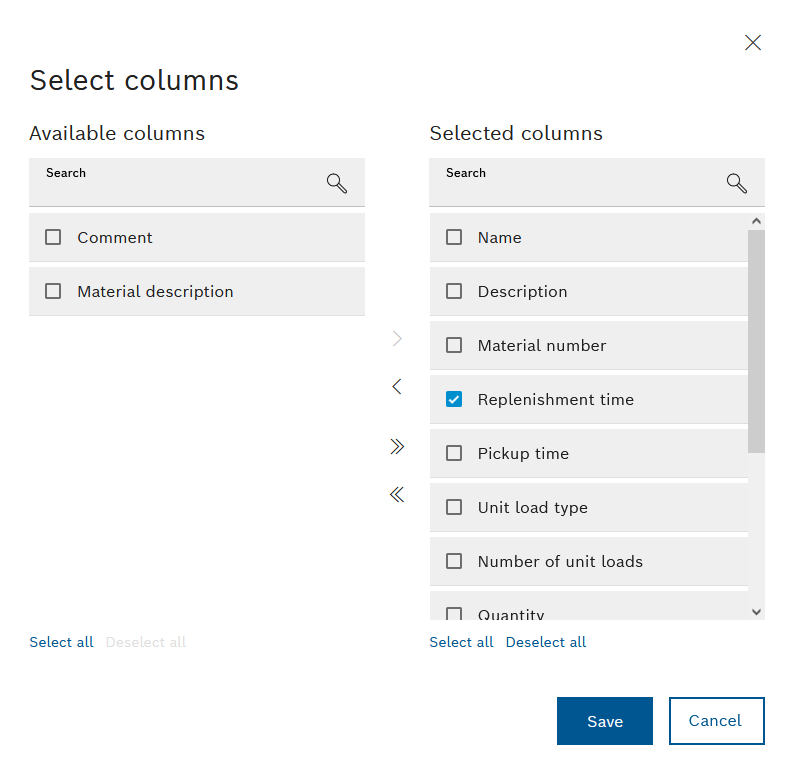
The column names displayed in the table are listed in the Available columns area. The column titles displayed in the table are listed in the Selected columns area.
-
Setting up TO templates:
-
 : Move all column titles to the Selected columns pane.
 -
 : Move all column titles to the Available columns pane.
 -
Select all : Activate the check boxes of all column titles in the Selected columns pane or in the Available columns pane.
-
Deselect all : Clear the check boxes of all column titles in the Selected columns pane or in the Available columns pane.
-
 : Move checked column titles to the Selected columns pane.
 -
 : Move checked column titles to the Available columns pane.
The horizontal arrangement of the columns in the Selected columns pane can be sorted by dragging and dropping. The column title at the top appears in the table on the left.
-
-
Apply the changes with Save.
The table of TO templates is displayed with the required columns.
Organizing the View of the Table of TO Templates
The table can be sorted by desired columns and the table columns can be moved horizontally. The width of the table columns can be changed.
|
Changes are not saved. |
-
Open the Material flow data > TA templates menu.
-
To move the table columns, use the mouse to move the required column title horizontally.
The table column appears in the desired position.
-
To adjust the width of a table column, place the mouse over the column boundary between the column headings concerned.
The mouse pointer appears as a double arrow.
-
Move the column boundary by holding down the left mouse button.
The width of the desired column is adjusted.
-
To sort the table contents by a column, click the desired column title.
An up arrow indicates that the table is being sorted by ascending alphabetical order or ascending numbering.
An down arrow indicates that the table is being sorted by descending alphabetical order or descending numbering.
The table layout is optimized for the respective view.
Filtering the Contents of the Table of TO Templates
The contents of the table can be filtered by the name or description of the transport order template.
-
Call up the Material flow > TO templates menu.
-
In the header, click
 Filter to open the Filter dialog window.
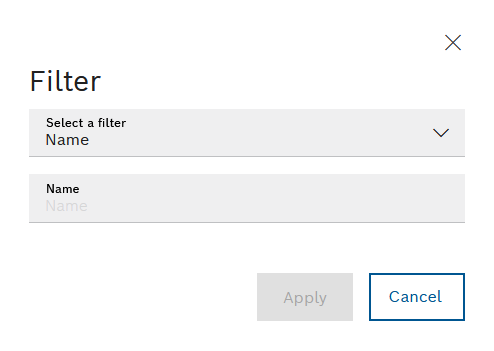
-
In the Select filter drop-down list, select the required column title to which the filter is to apply.
A specific text box for filter details appears below the drop-down list.
-
Enter in the text box for filter details the text by which you wish to filter.
-
Activate the filter with Apply.
Only the transport order templates that contain the filtered text appear in the table. The filter criteria appear below the header.
|
Use |

Updating the Table of TO Templates
If changes are made to transport order templates, the view of the table of transport order templates can be reloaded.
-
Open the Material flow data > TA templates menu.
-
To reload the table view, click
 in the header.
The table view is current and contains all changes.
Creating or Editing a New TO Template
New transport order templates are created so that they can be selected from the list of transport order templates when creating a transport order.
Prerequisite
Transport management administrator or Transport management logistics planner role
Procedure
-
Open the Material flow data > TA templates menu.
-
Press
 to open the New template for transport order dialog window.
Or:
In the row containing the required transport order template, press
 to open the New template for transport order dialog window.
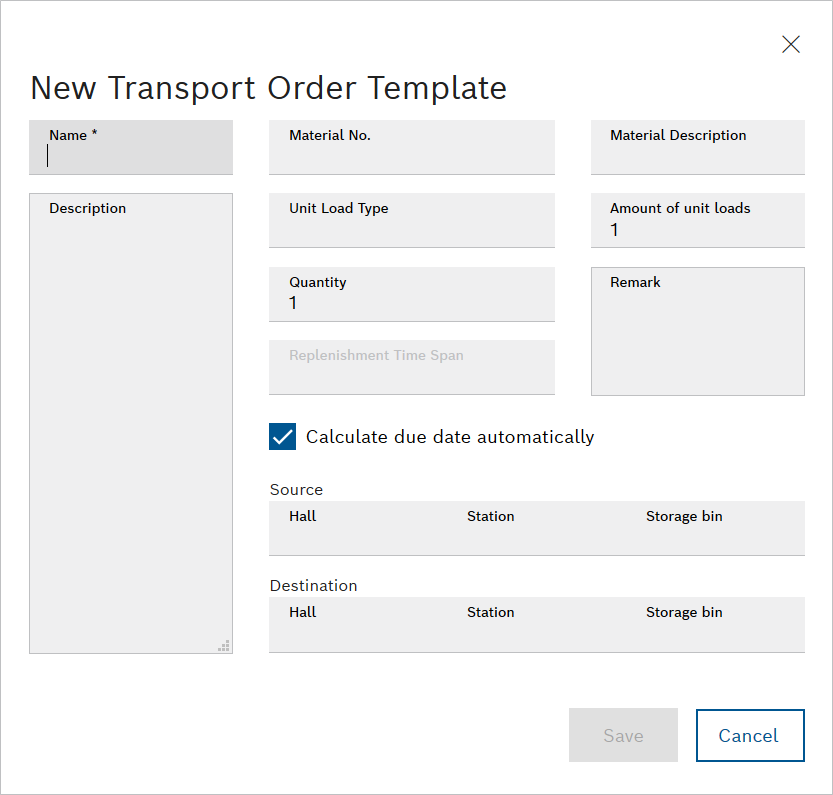
-
In the New template for transport order dialog window, specify the following details:
-
Name
-
Description
-
Material number
In the selection list, select a material number to be transported.
-
Unit load type
In the drop-down list, select a unit load type with which the material is to be transported.
-
Quantity
Number of materials
-
Replenishment time
The maximum time in which the transport order must be completed. When the transport order is created, the replenishment time is added to the current time.
If the Calculate deadline automatically checkbox is activated, the Replenishment lead time does not have to be specified.
-
Material description
Select a material description from the drop-down list.
-
Number of unit loads
-
Comments
-
Calculating the deadline automatically
 The Replenishment time span does not have to be specified.
 The Replenishment time span must be specified.
 -
Start
Select from the drop-down lists the hall, station and storage location where the transport order is to start.
-
Goal
Select from the drop-down lists the hall, station and storage location where the transport order is to end.
To use the drop down lists, select the start and destination in the sequence hall, station, storage location. It is possible not to specify a storage location or a station.
-
-
Save the changes with Save.
The transport order template has been created or edited and appears in the table of Transport order templates. The transport order template appears in the list of transport order templates for the creation of a new transport order.
-
To create a transport order, continue with Create transport order in the overview tab.
Delete transport order template
Prerequisite
Transport management administrator or Transport management logistics planner role
Procedure
-
Open the Material flow data > TA templates menu.
-
If necessary, filter by a transport order.
-
Delete transport order template:
-
To delete a transport order template, click
 in the row corresponding to the transport order template.
 -
To delete multiple transport order templates, activate the checkboxes for these transport order templates and click
in the header. -
To delete all the transport order templates displayed, activate the checkbox in the title bar of the list and click
in the header.
-
-
In the dialog window, press Delete to permanently delete the transport order template.
The transport order template is deleted and removed from the list of transport order templates.