Performing a tour on a mobile device
The following sections systematically describe how to perform a tour on a mobile scanner.
Each tour consists of the following steps:
-
Carry out the necessary sequence of steps for the activities at the starting station:
The current step and its name are shown in blue. Steps still to be performed at this station are shown in light blue with black text. Steps not required at this station are grayed out and skipped.
-
Preparation
Performing Preparatory Special Activities -
Unloading
Unloading Material -
Decoupling
Decoupling a Trailer -
Coupling
Coupling a Trailer -
Load
Loading Material -
Follow-up
Performing Final Special Activities
-
-
Carry out the necessary sequence of steps for the activities at the next station.
The driver will only see the steps necessary at the current stop. Steps not required are skipped.
-
Pre-processing
-
Unloading
-
Decoupling
-
Coupling
-
Load
-
Follow-up
-
-
Go to step 3. Travel to the next station. Repeat steps 3 and 4 until all the steps have been completed at the last stop.
The tour has been carried out and successfully completed.
Starting the Tour
Depending on the transport requirement (Transport orders) and tour planning (Tour planning), one of the following two scenarios is shown under Material delivery :
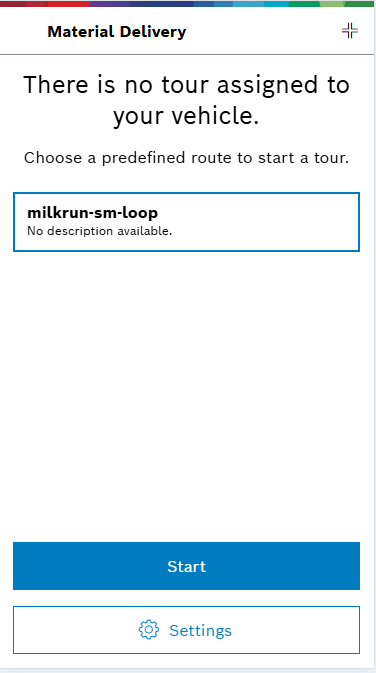
No tour available
No tour is available for the selected vehicle at the time of logging on.
-
To select another vehicle for a tour, continue with Select a vehicle and set the tour display.
Alternatively, to start a tour by selecting a predefined route:
To start a tour anyway, select a predefined route.
Predefined routes are only displayed when On-demand tour is enabled in the vehicle’s tour settings. See Select a vehicle and set the tour display.
A new tour is calculated using the transport orders available in the system.
-
To carry out the tour, tap Start.
An alternative tour will start.
-
To follow the sequence of steps at the starting station, continue with Perform Preparatory Special Activities.
Tour available
A tour with an immediate start time or a future start time is planned at the time of logging on.
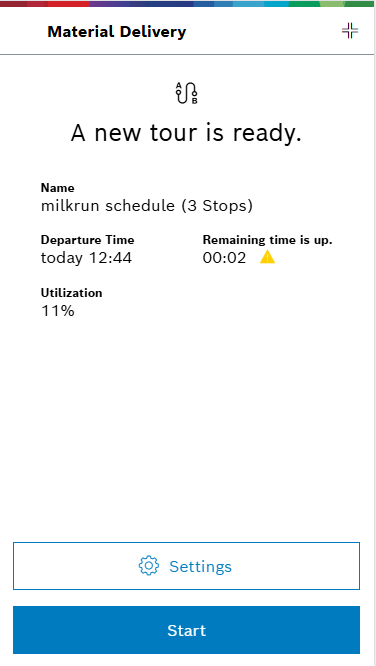
The Name, Departure time, and Time remaining before the tour must be completed are displayed. As KPIs, you will see:
-
Utilization: Average percentage utilization of the vehicle and trailers.
-
To complete the tour, tap Start.
-
The tour will start at the starting station.
-
To follow the sequence of steps at the starting station, continue with Perform Preparatory Special Activities.
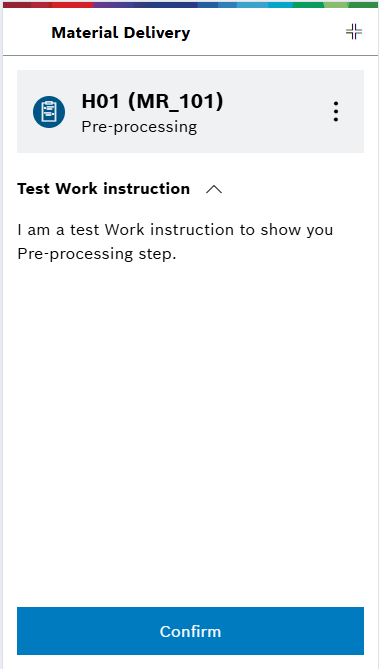
Performing Pre-processing Work Instructions
In this step, work instructions are performed at the current station. Each work instruction provides a brief description of the task to be performed. For more details on how to specify work instructions, see Work Instructions.
-
Use
 to view the following options:
-
Press Report problem to report complications. Continue with Reporting a Problem.
-
Press Settings to view the tour display settings. See Select a vehicle and set the tour display.
-
Implement the work instructions.
-
After successfully implementing the work instruction, press Confirm.
-
-
The tour will continue, and the next step will appear.
Unloading Material
During this step, material must be unloaded at the current station.
|
Depending on the configuration, either the Material description or the Transport order column (display of the transport order numbers as bar codes) is displayed. |
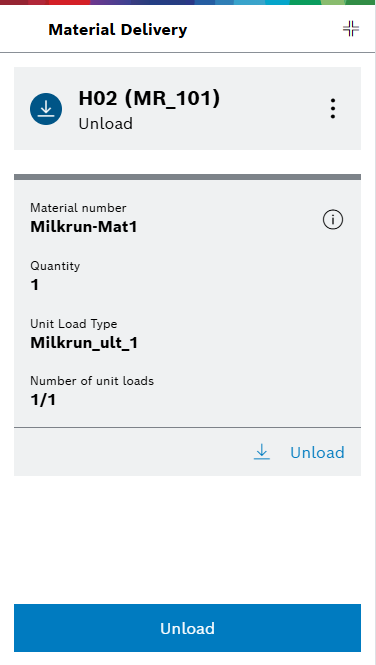
The individual materials that need to be unloaded are displayed in a table.
-
Use
to view the following options:-
Press Report problem to report complications. Continue with Reporting a Problem.
-
Press Settings to view the tour display settings. See Select a vehicle and set the tour display.
-
-
To display details of the individual order, use
 .
.-
Unload materials and confirm individually.
Materials that have already been unloaded and confirmed may disappear from the list if the tour display is set to do this. To show all materials (unloaded and not unloaded) in the list again, click View all. See Select a vehicle and set the tour display.
-
After unloading the materials, continue the tour with Unloaded.
-
The tour will continue, and the next step will appear.
Decoupling a Trailer
During this step, trailers must be decoupled from the vehicle at the current station.
|
Decoupled trailers can contain material or be empty. The digits of the step indicator indicate how many of the existing transport orders are already present on the trailer. |
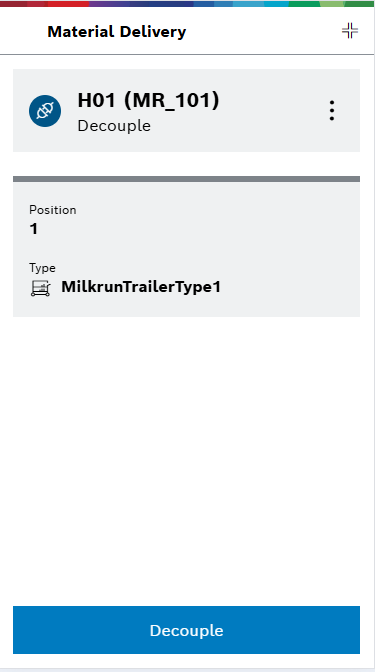
The individual trailers that must be decoupled from the vehicle are displayed in a table.
-
Use
to view the following options:-
Press Report problem to report complications. Continue with Reporting a Problem.
-
Press Settings to view the tour display settings. See Select a vehicle and set the tour display.
-
Decouple the trailers.
-
After decoupling the trailers, continue the tour with Decoupling.
-
Confirm the step.
-
-

Coupling a Trailer
During this step, trailers must be coupled to the vehicle at the current station.
|
Coupled trailers may contain material or be empty. |
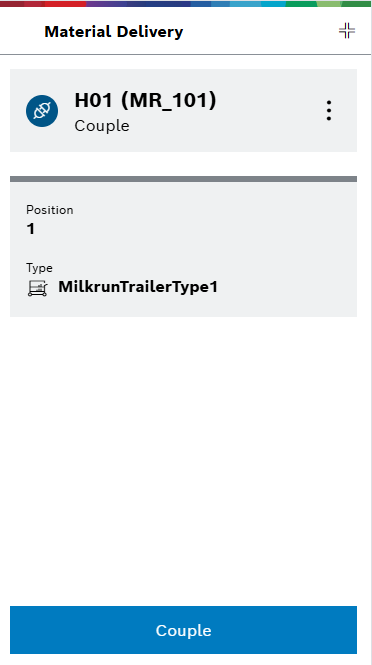
The individual trailers that need to be coupled to the vehicle are displayed in a table.
-
Use
to view the following options:-
Press Report problem to report complications. Continue with Reporting a Problem.
-
Press Settings to view the tour display settings. See Select a vehicle and set the tour display.
-
Couple trailers to the vehicle.
-
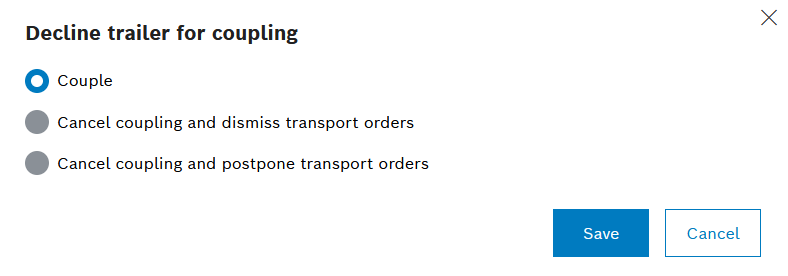
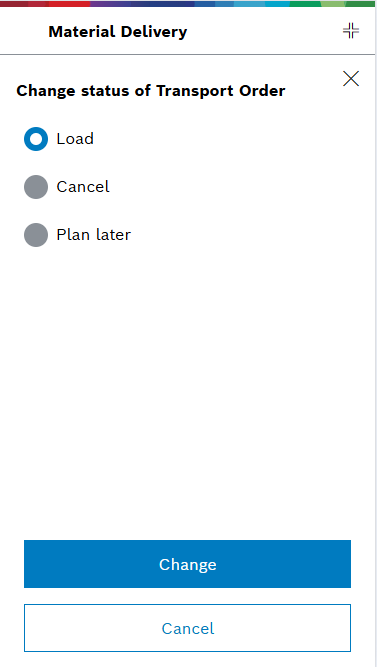
To reject a transport order or schedule it for later, change the status of the transport order using
 .
.
-
Select the desired status and confirm with Save.
-
After coupling the trailers, continue the tour with Coupling.
-
-
The tour will continue, and the next step will appear.
Loading Material
During this step, material must be loaded at the current station.
|
Depending on the configuration, either the Material description or the Transport order number column (display of the transport order numbers as bar codes) is displayed. All columns and their order can be configured. See Customization overview_system_management. |
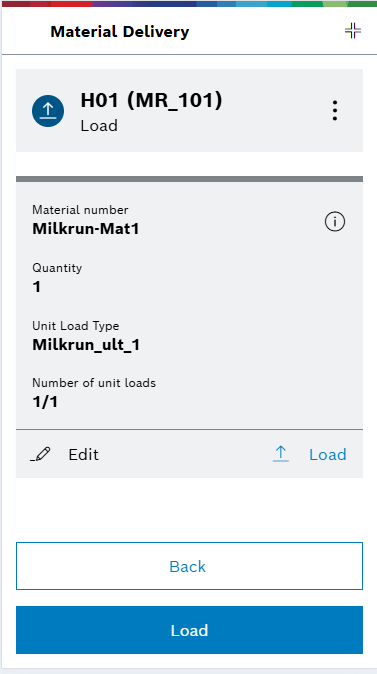
The individual materials that need to be loaded are displayed in a table.
-
Use
to view the following options:-
Press Report problem to report complications. Continue with Reporting a Problem.
-
Press Settings to view the tour display settings. See Select a vehicle and set the tour display.
-
-
To display details of the individual order, use
.-
Load materials.
-
To reject a transport order or schedule it for later, change the status using
.
-
-
 Load: The material is loaded as planned.
 -
Cancel: The material is rejected and remains at the station.
-
Schedule later: The material will be loaded and transported on the next available tour. Transport Management automatically reschedules the transport order.
-
After loading the materials, continue the tour with Load.
-
The tour will continue, and the next step will appear. This step should be confirmed.
Performing Final Special Activities
In this step, special activities must be carried out before leaving the current station. Operating instructions specify these activities with a brief description of the task to be performed.
-
Use
to view the following options:-
Press Report problem to report complications. Continue with Reporting a Problem.
-
Press Settings to view the tour display settings. See Select a vehicle and set the tour display.
-
Once the special activities have been performed successfully, press Confirm to continue the tour.
-
-
The tour will continue, and the next step will appear.
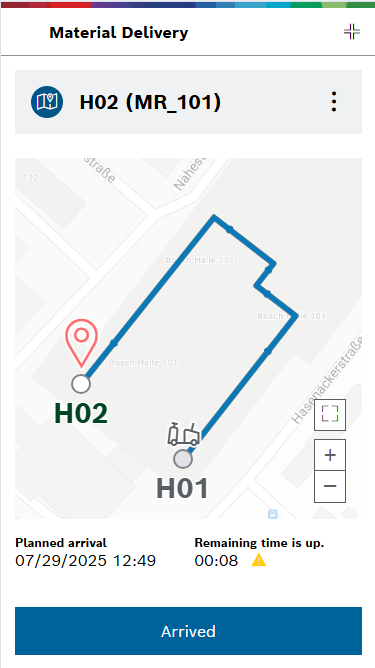
Traveling to the Next Stop
The instruction for the driver to travel to the next station may include different information, depending on the administrator’s settings.
Personal injury caused by vehicle entering (with trailer). People can be crushed or run over by the moving vehicle, possibly with a trailer. Only tap Arrived when the vehicle has come to a standstill.
|
Damage to the vehicle (with trailer). Lack of attentiveness on the part of the driver while driving may result in damage to the vehicle and trailer. Only tap Arrived when the vehicle has come to a standstill. |
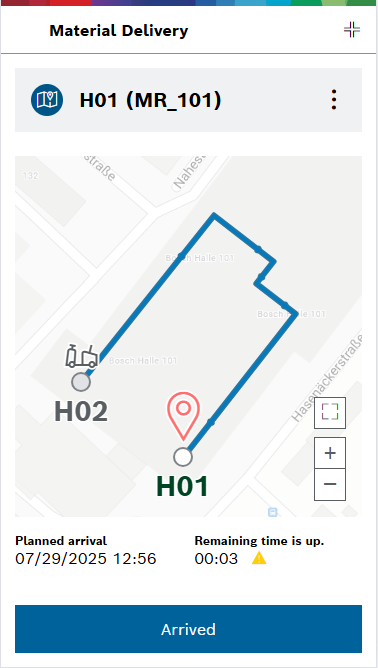
The following information is displayed while driving to the next station:
-
Station name
-
Planned arrival time
-
Time remaining until latest possible arrival
-
Time since leaving the last station
-
Use
to view the following options:-
Press Report problem to report complications. Continue with Reporting a Problem.
-
Press Settings to view the tour display settings. See Select a vehicle and set the tour display.
-
-
Drive to the next station on the tour.
-
Once you have reached the next station, tap Arrived. The first step of the sequence of activities to be performed at the station is displayed. Once the tour is finished and no further stations need to be traveled to, a message indicating that the tour has been completed is displayed.