Tool Administration: Tools & Components
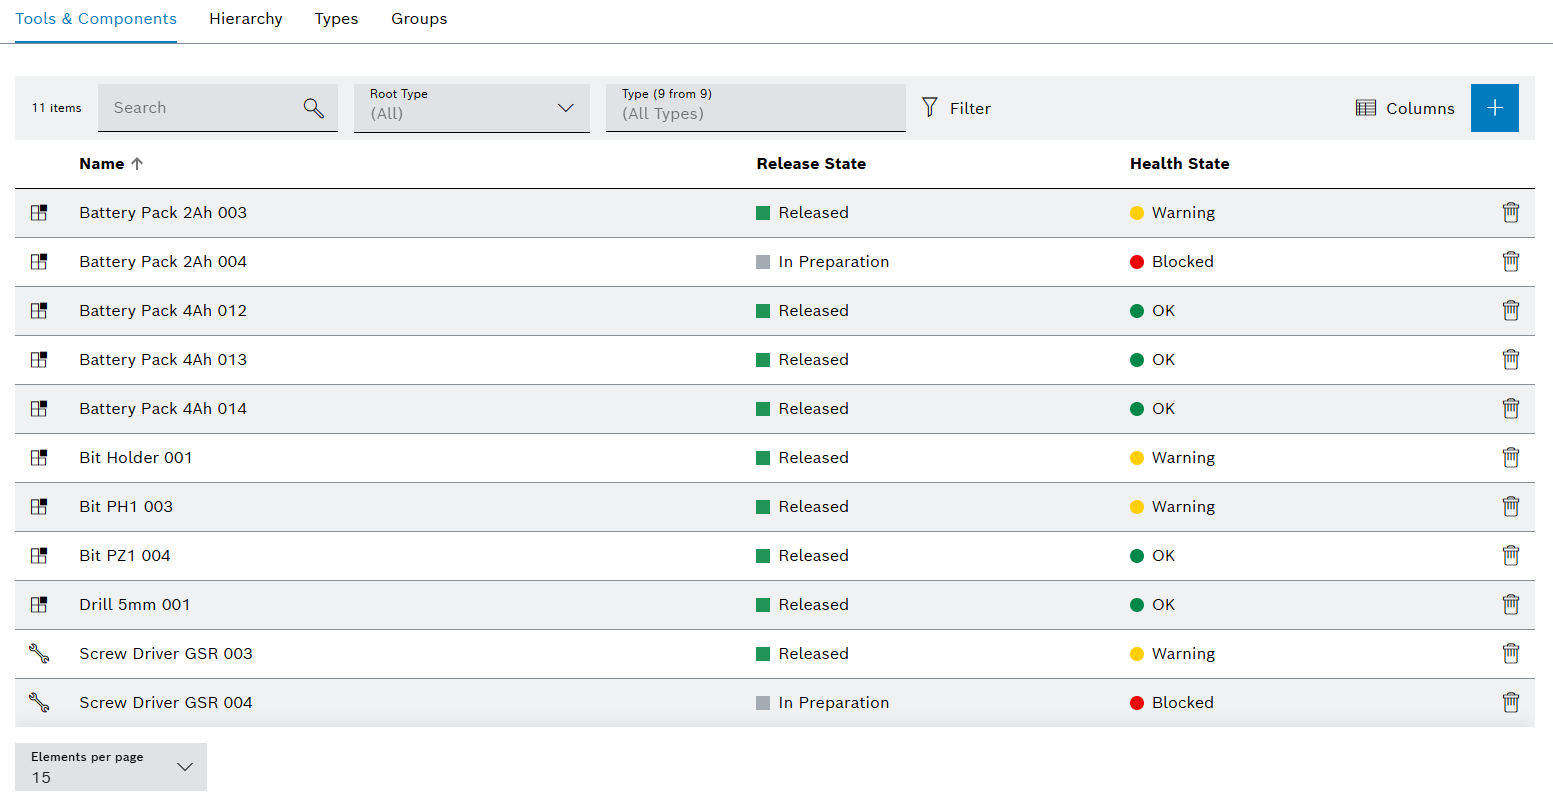
Tools and components are created and configured on the Tool Administration > Tools & Components tab. Tools and components can be displayed filtered. Tools or components with the release status Scrapped and Deleted are not displayed, but can be displayed and restored using the filter function.
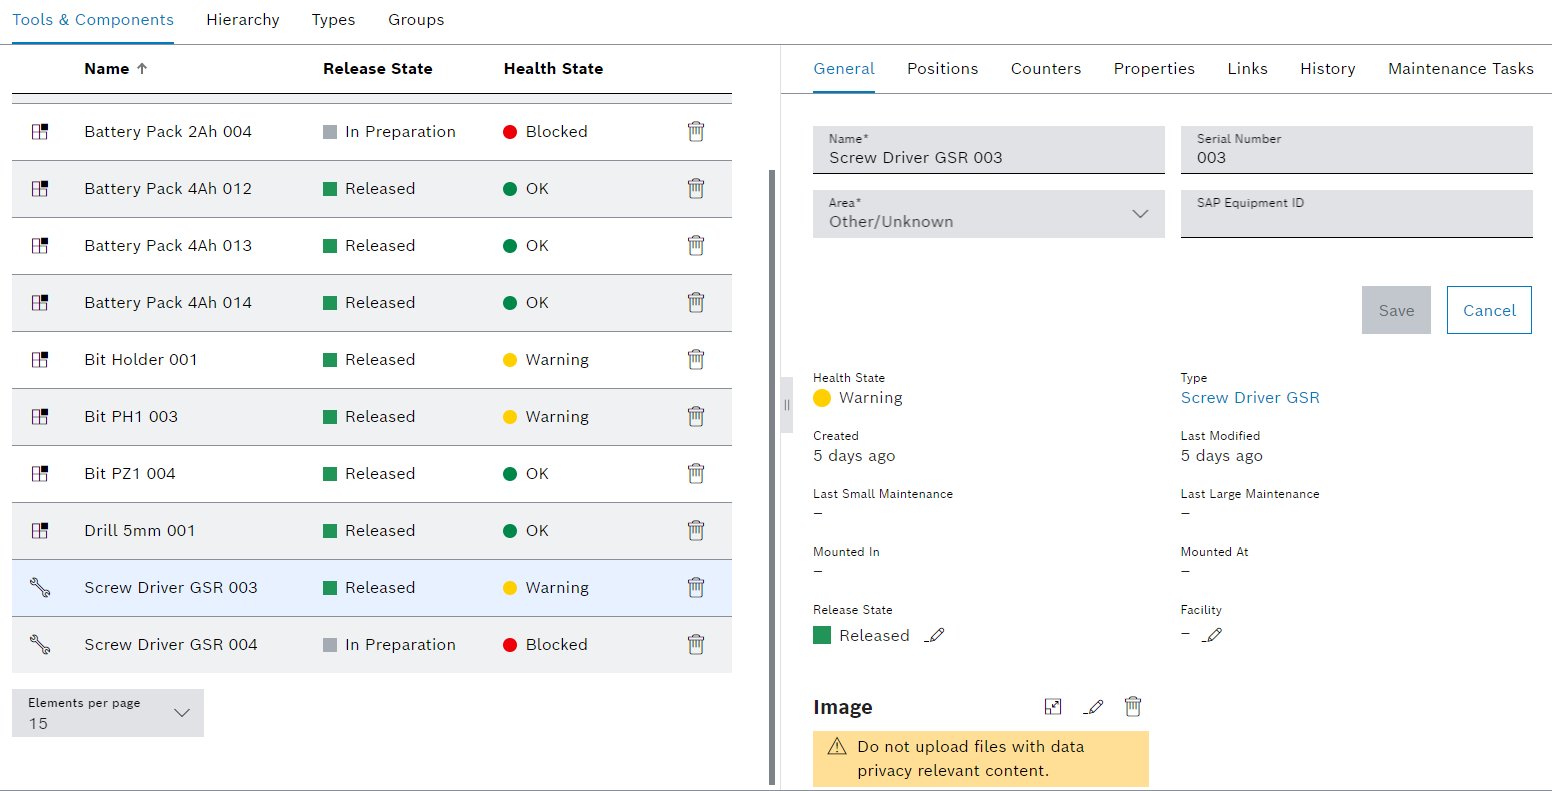
The Tools & Components tab contains two areas: a tools and components display, and a detailed view, where general information, positions, counters and properties are displayed and can be edited.
The detail view opens when an entry in the table is selected.
Display of tools and components
| Element / Icon | Description |
|---|---|
XX items |
Number of available tools and components. |
Search |
Search for a tool or component by entering in full or in part. |
Root Type |
Filter by tool or component:
All Tools Components |
Type (X of X) |
Filter by type. Type name or part of name. |
|
Filter the display by criteria. |
|
Select visible columns. |
|
Hide or show filters. Click for switching the view. |
Kind of type |
Indicator for tool or component:
Name relates to a tool.
Name relates to a component. |
Name |
Name of the tool or component. |
Release State |
Release status of the tool or component. |
Health State |
Health status of the tool or component |
|


Detailed view
The detailed view contains the following tabs:
General
Positions
Counters
Properties
Links
History
Maintenance Tasks
|
If the Maintenance Management module is integrated in the system, the Maintenance Tasks tab is shown. |
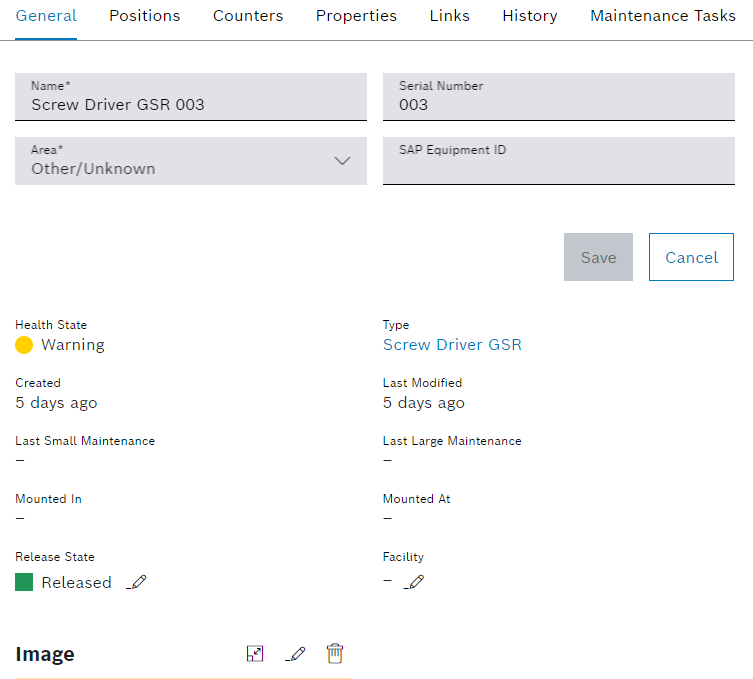
Tool Administration: Tools & Components - General
If a tool or component is selected in the Tool Management > Tool Administration > Tools & Components tab, the detail view opens. The data of the tool and the component can be changed in the detailed view on the General tab.
| Element / Icon | Description | ||
|---|---|---|---|
Name |
Name of the tool or component. |
||
Serial Number |
Serial number of the tool or component. |
||
Area |
Physical location of the tool or component. |
||
SAP Equipment ID |
SAP equipment ID of the tool or component.
|
||
Health State |
Health status of the tool or component. |
||
Type |
Type with which the tool or component was created. |
||
Created |
Date on which the tool or component was created. |
||
Last Modified |
Date the tool or component was modified. |
||
Last Small Maintenance |
Date of the last small maintenance of the tool or component. |
||
Last Large Maintenance |
Date of the last large maintenance of the tool or component. |
||
Mounted In |
Name of the device in which the tool is mounted. |
||
Mounted At |
Date on which the tool was mounted or unmounted. |
||
Release State |
Change release status of the tool or component. |
||
Facility |
Assigned facility of the tool. The tool can only be mounted in devices of this facility. To change the facility:
|
||
Assembled In |
The parent tool or component. |
||
|
View image. |
||
|
Select image and upload. |
||
|
Delete image. |
||
View In Tool Information Tool Information |
Navigate to Tool Management > Tool Information > Tools & Components for the selected tool or component. |
||
View In Hierarchy Hierarchy |
Navigate to Tool Management > Tool Administration > Hierarchy for the selected tool or component. |

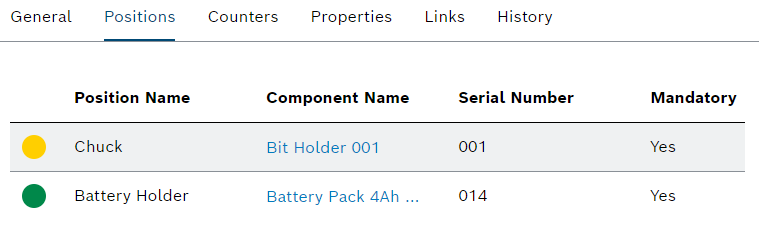
Tool Administration: Tools & Components - Positions
If a tool or component is selected in the Tool Management > Tool Administration > Tools & Components tab, the detail view opens. The detailed view on the Positions tab displays the positions of the tool or the component along with their associated health status. The positions can be changed in the type of the tool or component.
| Element / Icon | Description |
|---|---|
Health status in the form of a colored circle |
Health status of the attached component:
Grey indicates that no component is attached to the position. |
Position Name |
Name of the position. |
Component Name |
Name of the component that is currently attached to this position. |
Serial Number |
Serial number. |
Mandatory |
Shows whether the position is required or not for the operation of the tool or component. If the position is required, a component must be installed in this position. |
View In Hierarchy Hierarchy |
Navigate to Tool Management > Tool Administration > Hierarchy for the selected tool or component. |
View In Type X Position Definitions |
View position definitions in Tool Management > Tool Administration > Types for the type of the selected tool or component. |
Tool Administration: Tools & Components - Counters
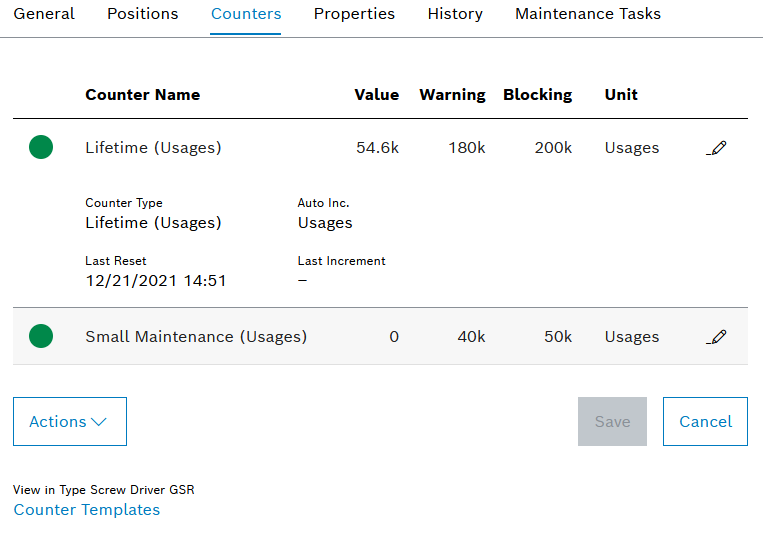
If a tool or component is selected in the Tool Management > Tool Administration > Tools & Components tab, the detail view opens. The detailed view on the Counters tab displays the counters of the tool or component along with their associated warning and blocking limits. The limits of the counters can be adjusted. The counters are used when the tool or component of the type is created. Selecting a counter displays more information about the counter.
| Element / Icon | Description | ||
|---|---|---|---|
Health status in the form of a colored circle |
|||
Counter Name |
Name of counter. The following types of counters exist:
Lifetime (Usages) Remaining usages until the warning or blocking limit.
Lifetime (Good Parts) Good parts produced until the warning or blocking limit. Lifetime (Bad Parts) Bad parts produced until the warning or blocking limit. Large Maintenance (Usages) Remaining usages until the next large maintenance. Large Maintenance (Good Parts) Good parts produced until the next large. Large Maintenance (Bad Parts) Bad parts produced until the next large maintenance. Small Maintenance (Usages) Remaining usages until the next small maintenance. Small Maintenance (Good Parts) Good parts produced until the next small maintenance. Small Maintenance (Bad Parts) Bad parts produced until the next small maintenance. Days Since Last Maintenance Time remaining in days until the next maintenance. If the counter for small maintenance or large maintenance is reset, the Days Since Last Maintenance counter is also reset. Custom Counter Any counter having a custom name. |
||
Value |
Current value of the counter. For example, the remaining usages of the tool or component, or the elapsed time. |
||
Warning |
Warning limit value. |
||
Blocking |
Blocking limit value. |
||
Unit |
Counter unit. |
||
|
|||
Actions |
Actions that can be performed on the counters:
Synchronize With Type The counters of the associated type are not automatically synchronized with the counters of the tool or component. The Synchronize With Type action can be used to synchronize the counters of the tool or component with the counters of the associated type. The action is disabled in case there is nothing to be synchronized. Increase Counter Manually |
||
View In Type X Counter Templates |
Display the counter templates in the type of the selected tool or component. |
Tool Administration: Tools & Components - Properties
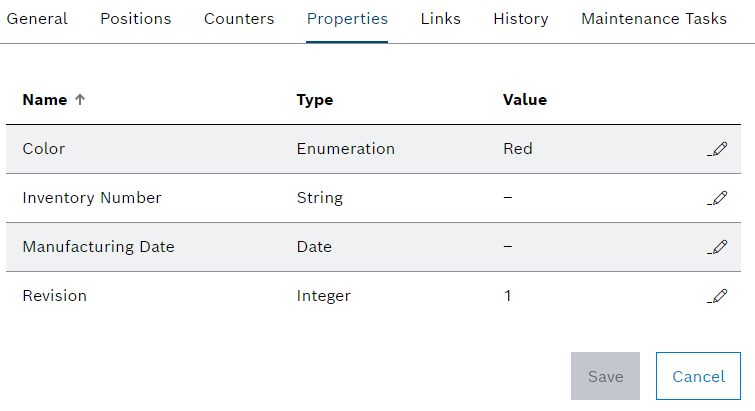
If a tool or component is selected in the Tool Management > Tool Administration > Tools & Components tab, the detail view opens. The properties of the tool or component, along with the associated values, are displayed in the detailed view on the Properties tab. The properties are adopted when the tool or component of the type is created and automatically synchronized during operation when changes are made to the type.
| Element / Icon | Description | ||
|---|---|---|---|
Name |
Name of the property. |
||
Type |
Data type of the property. |
||
Value |
Value of the property.
|
||
|
Enter or select the value of a property in the tool or component |
||
View In Type X Type Properties |
Display the type properties of the selected tool or component. |
Tool Administration: Tools & Components - Links
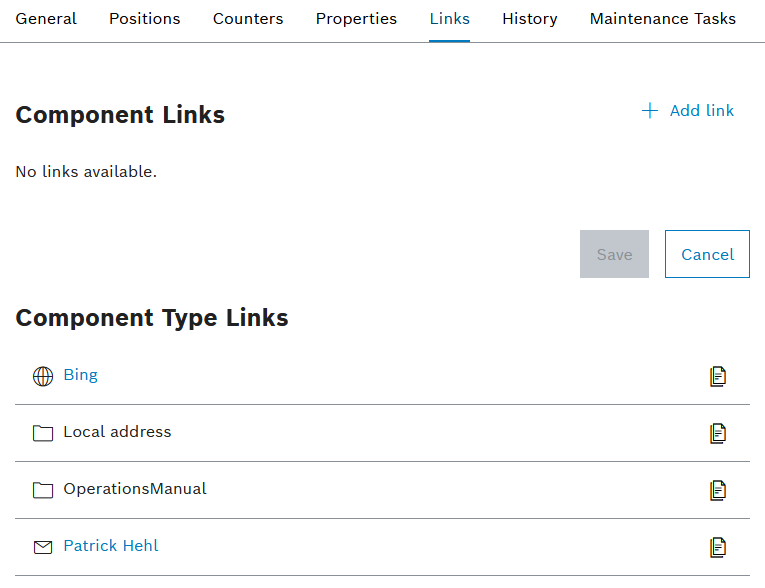
If a tool or component is selected in the Tool Management > Tool Administration > Tools & Components tab, the detail view opens. The links of the tool and the associated tool type or the component and the associated component type are displayed in the detailed view on the Links tab. Tools or components can be assigned their own links, regardless of the type. Links can be created to link web pages, emails or folders. For example, web pages or folders can contain additional information about the tool, tool type, component or component type. Email addresses can be defined to quickly send emails to responsible personnel.
| Element / Icon | Description |
|---|---|
|
|
|
Link containing an email address. If you click on the link, a new email opens with the stored email address. |
|
Link containing a web page. If you click on the link, the included web page opens. |
|
Link containing a folder path. Due to security reasons the link cannot be clicked. Copy the path to the clipboard with |
|
Copy the link to the clipboard. |
|
Edit link. |
|
Delete link. |


Tool Administration: Tools & Components - History
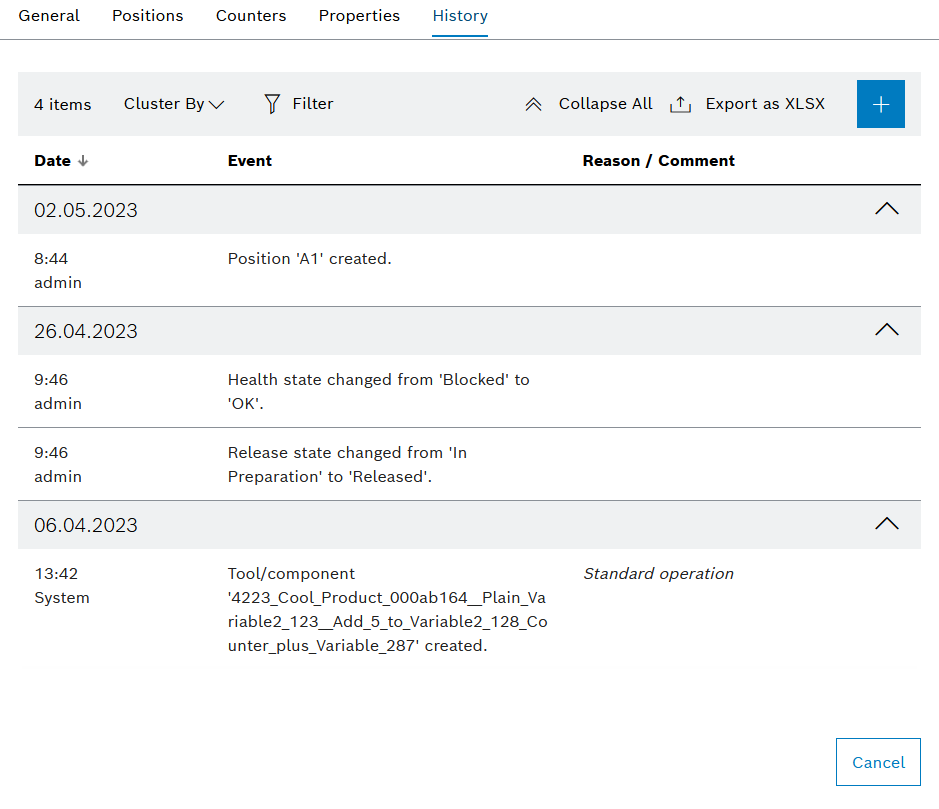
If a tool or component is selected in the Tool Management > Tool Administration > Tools & Components tab, the detail view opens. All changes to the tool or component are documented in the detailed view on the History tab. The history can be filtered and exported according to specific criteria. When exporting, the set filters are applied. When a history entry is selected, further information is displayed.
| Element / Icon | Description |
|---|---|
XX items |
Total number of available history entries. |
Cluster By |
Cluster entries by selected criterion:
Created At Cluster entries by date. Created By Cluster entries by creator. Event Type Cluster entries by event. |
|
Filter by history entries. |
|
Hide or show filters. Click for switching the view. |
|
Expand or collapse cluster. |
|
|
|
|
Date |
Date of the event. |
Event |
Description of the event. |
Reason / Comment |
The reason or comment entered for the event. |


Tool Administration: Tools & Components - Maintenance Tasks
|
If the Maintenance Management module is integrated in the system, the Maintenance Tasks tab is displayed. |
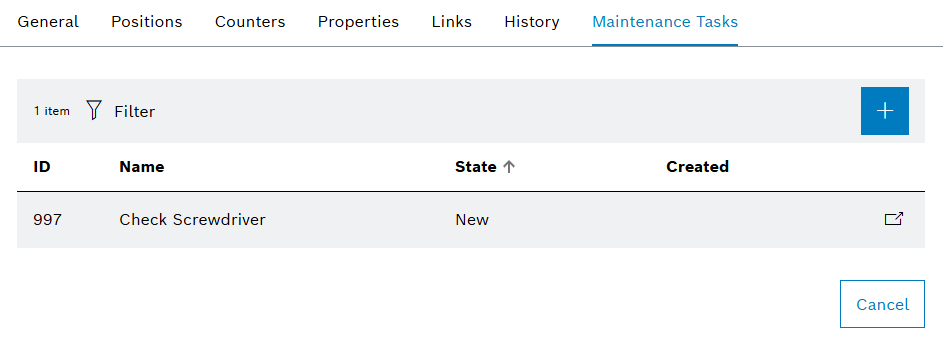
If a tool or component is selected in the Tool Management > Tool Administration > Tools & Components tab, the detail view opens. The detailed view on the Maintenance Tasks tab displays the maintenance tasks for the tool or component with associated status and creation date. The maintenance tasks are created and managed in Maintenance Management module.
| Element / Icon | Description |
|---|---|
XX |
Number of available maintenance tasks. |
|
Filter by status of maintenance tasks. |
|
|
ID |
The ID of the maintenance task. |
Name |
Name of the maintenance task. |
State |
Status of the maintenance task:
New The maintenance task has been newly created and has not yet been processed. Started The maintenance task is being processed. Resolved The maintenance task is resolved. |
Created |
Date on which the task was created. |
|
Open the task in the Maintenance Management module. |

Creating a tool or component
The type selected when creating a tool or component decides whether a tool or component is created. Once created, the type can no longer be changed.
|
A tool or a component can only be created if a type has been created. |
Prerequisite
-
Tool Management ExpertorTool Management Adminrole -
A type has been created and configured.
Creating a type and Configuring a type
Procedure
-
Click on the Tool Management > Tool Administration > Tools & Components tab.
-
Create a tool or component with
 .
.Several tools or components can be created at once.
Importing tools or components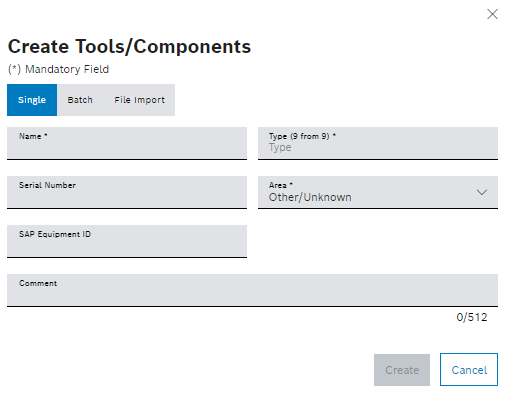
If auto-naming is enabled, the name cannot be changed.
Configuration -
Enter the Name.
-
To select a Type, enter the type name in full or in part and select the type from the drop-down list.
If a tool type is selected, the Facilities field appears. The Facilities field can be used to assign the tool to a facility. If a facility is selected, the created tool can only be mounted in devices of this facility. The facility can be changed in the Tool Management > Tool Management > Tools & Components - General tab
-
Enter the Serial Number.
-
Select Area.
-
Enter SAP Equipment ID.
-
Create a tool or component with Create.
The tool or component is displayed on the tabs Tool Information > Tools & Components and Tool Administration > Tools & Components.
-
To configure the tool or component, continue with Configure the tool or component.
Create multiple tools or components at once
Multiple tools or components can be created at once with the same type. The names of the tools or components are created using the defined naming scheme in the type. If no naming pattern is configured, the tools or components created are numbered consecutively.
To create multiple tools with different types, continue with Creating a tool or component or Importing tools or components.
Prerequisite
-
Tool ManagementExpertorTool Management Adminrole -
A type has been created and configured.
Procedure
-
Click on the Tool Management > Tool Administration > Tools & Components tab.
-
Create tools or components with
. -
Click on the Batch tab in the Create Tools / Components dialog.
-
image::toma_add_several_tools.png[toma_add_several_tools]
-
To select a Type, enter the type name in full or in part and select the type from the drop-down list.
If a tool type is selected, the Facilities field also appears. The Facilities field can be used to assign the tool to a facility. If a facility is selected, the created tool can only be mounted in devices of this facility. The facility can be changed in the Tool Management > Tool Management > Tools & Components - General tab
Tool Administration: Tools & Components - General -
Select Area.
-
Enter the number of tools to be created in Count.
-
Create tools or components with Create.
The tools or components are displayed on the tabs Tool Information > Tools & Components and Tool Administration > Tools & Components.
-
To configure the tools or components, continue with Configure the tool or component.
Importing tools or components
Several tools or components can be created at once.
|
Tools can only be created if a tool type has been created. |
Prerequisite
Tool Management Expert or Tool Management Admin role
-
A type has been created and configured.
Creating a type and Configuring a type
Procedure
-
Click on the Tool Management > Tool Administration > Tools & Components tab.
-
Create tools or components with
. -
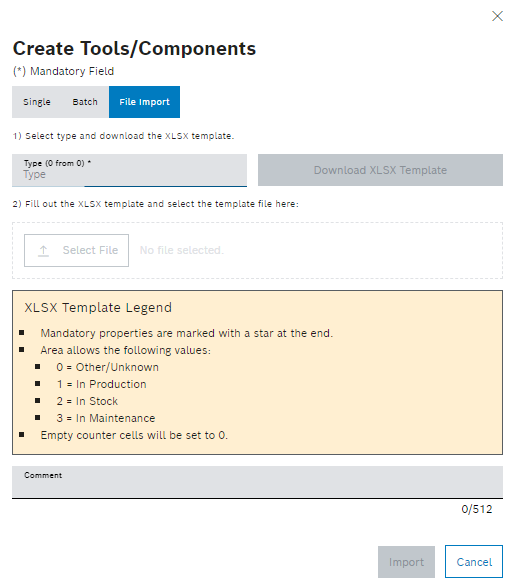
In the Create Tools / Components dialog, click on the File Import tab.
-
Select Type.
Multiple tools or components cannot be created with different types. The selected type applies to all tools or components.
-
Select Download XLSX Zemplate and open template.
A row in the XLSX file corresponds to a tool or a component.
Required columns are marked with an asterisk in the header. -
In the XLSX file, this concerns names, areas and serial numbers.
-
Save the XLSX file.
-
Upload the XLSX file with
 Select File.
 -
Create tools or components with Import.
The tools or components are displayed on the tabs Tool Information > Tools & Components and Tool Administration > Tools & Components.
|
If the import fails, the associated error message is displayed above the bell in the upper right border. |
-
To edit the tools or components, continue with Configure the tool or component.
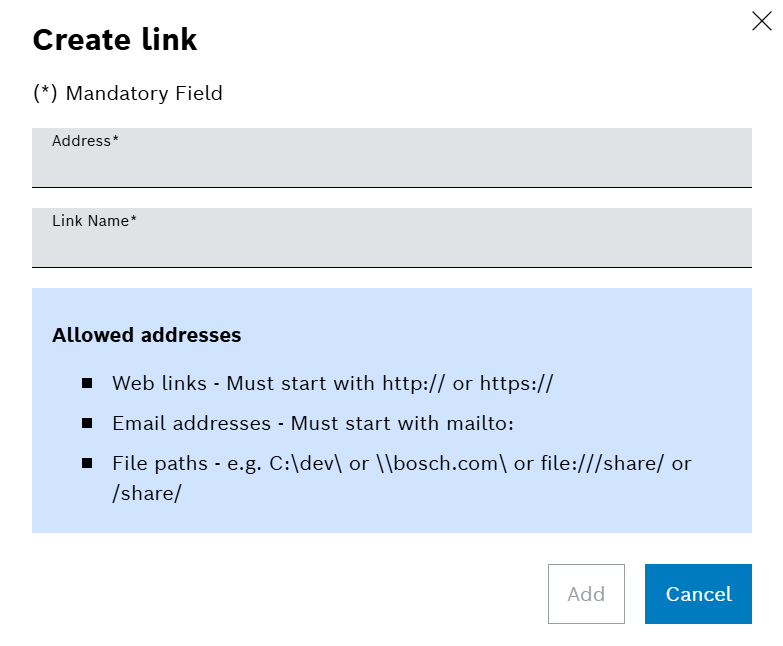
Create a link for a tool or component
Links can be created for tools and components. Links of a type are also shown at the tool or component.
Prerequisite
Tool Management Expert or Tool Management Admin role
Procedure
-
Click on the Tool Management > Tool Administration > Tools & Components tab.
-
Select a tool or component.
-
In the detailed view, click on the Links tab.
-
Click
 .
.
-
Enter Address.
-
Enter Link Name.
-
Create the link with Add.
-
Confirm changes with Save.
The link is displayed in the tool or component.
Configure the tool or component
General data for the tool or component, such as the name and the release status, can be changed.
Prerequisite
-
Tool Management ExpertorTool Management Adminrole -
A tool or component has been created.
Creating a tool or component and Importing tools or components
Procedure
-
Click on the Tool Management > Tool Administration > Tools & Components tab.
-
Select a tool or component.
-
In the detailed view, click on the General tab.
If auto-naming is enabled, the name cannot be changed.
Configuration-
Enter the Name.
-
Enter the Serial Number.
-
Select Area.
-
Enter the SAP Equipment ID.
-
Accept changes with Save.
-
Depending on configuration, enter Comment.
-
Confirm changes with Save.
-
-
To change the Release State, continue with Configure the release status of the tool or component.
-
Insert image by drag and drop onto the image field.
Or:
Change image via
 .
.Or:
Delete image via
 .
.
The tool or component is configured.
-
To adjust the limits of the tool or component counter, continue with Configuring limits for tool or component counters.
-
To add a history entry to the history of a tool or component, continue with Creating an entry in the tool or component history.
-
To export the history of the tool or component, continue with Exporting the history of the tool or component.
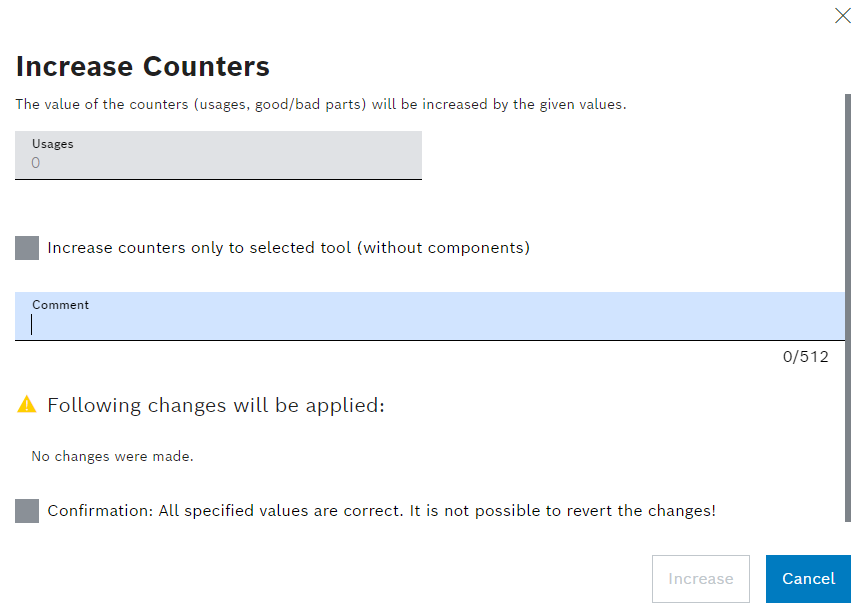
Manually increase the counter of a tool or component
Counters can be increased manually to record unrecorded good or bad parts or usages. Individual counters cannot be increased. Usages, good parts or bad parts are increased in all counters, based on the type of counter. If usages are increased, all counters based on usages increase.
Prerequisite
-
Tool Management ExpertorTool Management Adminrole -
A tool or component has been created.
Creating a tool or component and Importing tools or components -
The tool or component has counters assigned by type.
Tool Administration: Types - Counters
Procedure
-
Click on the Tool Management > Tool Administration > Tools & Components tab.
-
Select a tool or component.
-
In the detailed view, open the Counters tab.
-
Select Action.
-
In the drop-down list, select Increase Counter Manually.
-
Enter value for Usages, Good Parts or Bad Parts depending on the configured counters.
-
If only the counters of the selected tool or component are to be increased, activate the Increase Counters Only To Selected Tool (Without Components) checkbox.
-
Depending on configuration, enter Comment.
-
Check the entries and activate the Confirmation checkbox.
-
Confirm increase with Increase.
The counters are increased by the entered usages, good parts or bad parts.
|
If the increase exceeds the defined warning and blocking limit, the health status of the tool or component changes. |
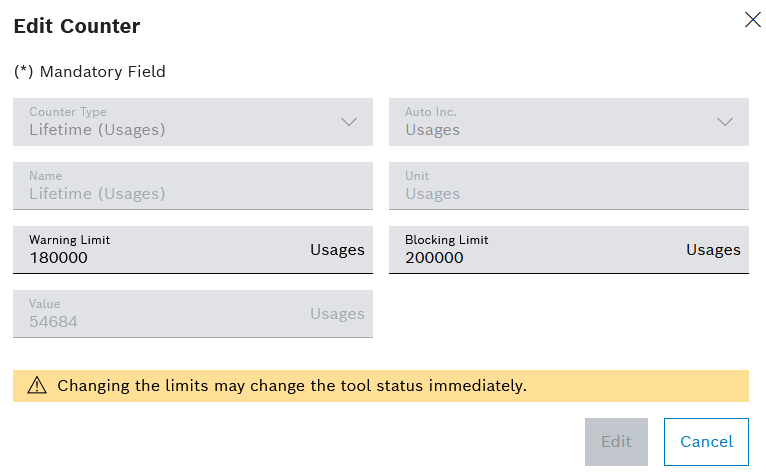
Configuring limits for tool or component counters
By default, the warning and blocking limits of the tool or component counters are automatically taken from the type. The warning and blocking limits of the counters can be set individually for each tool and component. The warning and blocking limits of the counters are used to determine the health status of the tool or component. For example, if the wear of a tool or component is lower than expected, the warning and blocking limits can be increased.
Prerequisite
-
Tool Management ExpertorTool Management Adminrole -
A tool or component has been created.
Creating a tool or component and Importing tools or components -
The tool or component has counters assigned by type.
Tool Administration: Types - Counters
Procedure
-
Click on the Tool Management > Tool Administration > Tools & Components tab.
-
Select a tool or component.
-
In the detailed view, open the Counters tab.
-
Edit counter with
.
-
Enter value for Warning Limit and Blocking Limit.
-
Save warning and blocking limits with Edit.
-
Accept changes wirh Save.
-
Depending on configuration, enter Comment.
-
Confirm changes with Save.
The counter limits are configured.
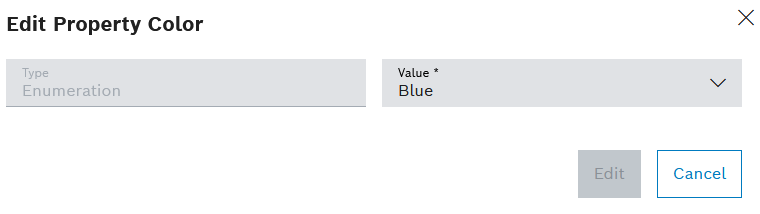
Enter or select the value of a property in the tool or component
The value for a property can be entered or selected in the tool or in the component.
Prerequisite
-
Tool Management ExpertorTool Management Adminrole -
A tool or component has been created.
Creating a tool or component and Importing tools or components -
The tool or component has properties assigned by the type.
Tool Administration: Types - Properties
Procedure
-
Click on the Tool Management > Tool Administration > Tools & Components tab.
-
Select a tool or component.
-
In the detailed view, open the Properties tab.
-
Edit property with
.
-
Enter a Value.
Or:
Open the drop down list with
 and select a Value.
 -
Save the value of the property with Edit.
-
Accept the changes with Save.
-
Depending on configuration, enter Comment.
-
Confirm changes with Save.
The value of the property is set for the tool or component.
Creating an entry in the tool or component history
All changes to the tool or component are saved in the history. History entries can be created manually.
Prerequisite
-
Tool Management ExpertorTool Management Adminrole -
A tool or component has been created.
Creating a tool or component and Importing tools or components
Procedure
-
Click on the Tool Management > Tool Administration > Tools & Components tab.
-
Select a tool or component.
-
In the detailed view, click on the History tab.
-
Create history entry with
.
-
Enter Comment.
-
Create history entry with Create.
The history entry is displayed in History tab of the tool or component.
Exporting the history of the tool or component
The history of a tool or component can be exported to an XLSX file. The filters on the History tab are applied when the history is exported.
Prerequisite
-
Tool Management GuestorTool Management UserorTool Management ExpertorTool Management Adminrole -
A tool or component has been created.
Creating a tool or component and Importing tools or components
Procedure
-
Click on the Tool Management > Tool Administration > Tools & Components tab.
-
Select a tool or component.
-
In the detailed view, click on the History tab.
-
Export history with
 Export As XLSX.
The history is saved to an XLSX file based on the set of filters.
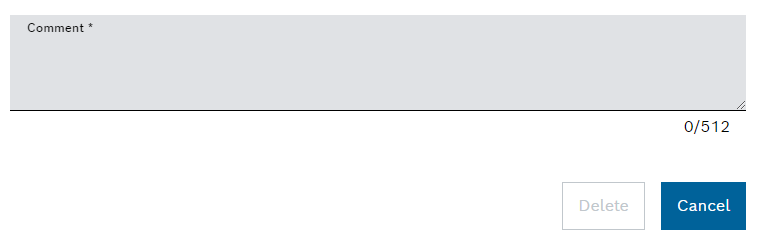
Deleting a tool or component
Deleted tools or components are no longer displayed. If a tool cannot be deleted, but is no longer permitted to be used, the release status of the tool can be changed.
|
Deleted tools or components remain in the system. Creating a tool or component will fail in case the same name is used as a deleted tool or component. |
Prerequisite
-
Tool Management ExpertorTool Management Adminrole -
A tool or component has been created.
Creating a tool or component and Importing tools or components
Procedure
-
Click on the Tool Management > Tool Administration > Tools & Components tab.
-
Delete a tool or component with
.
-
Remove a tool or component with Delete.
The tool or component is no longer displayed. Deleted tools and components can be viewed and restored via a filter.
-
To restore the tool or component, continue with Restoring a tool or component
Restoring a tool or component
Deleted tools or components can be restored.
Prerequisite
-
Tool Management ExpertorTool Management Adminrole -
A tool or component has been created.
Creating a tool or component and Importing tools or components
Procedure
-
Click on the Tool Management > Tool Administration > Tools & Components tab.
-
Select
 .
.
-
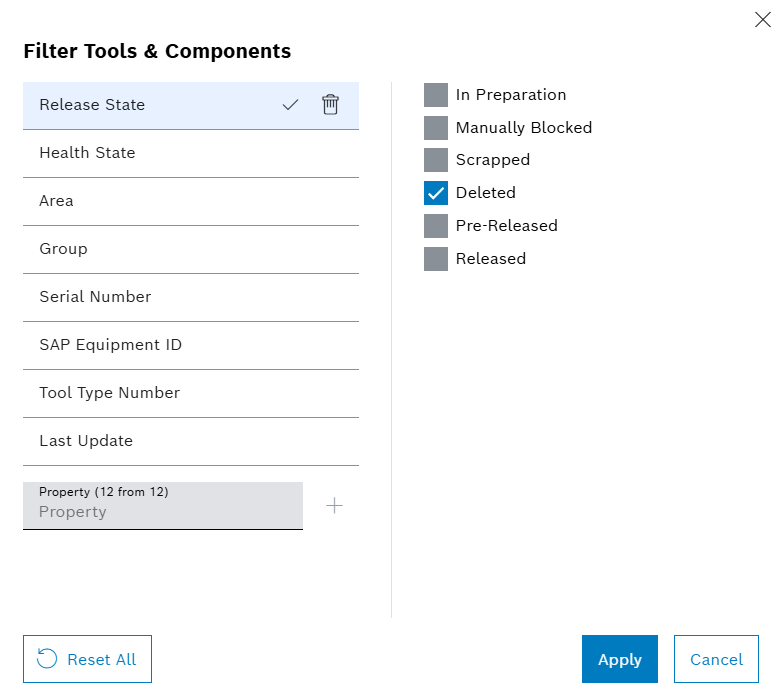
Set Release State filter to Deleted.
-
Apply filter with Apply-
-
-
Select a tool or component.
-
In the detailed view, click on the General tab.
-
Select
for changing the Release State.
-
Select release status to Released.
-
Confirm with Update.
The tool or component is restored.