Tool Administration: Hierarchy
Tools and components are displayed hierarchically with their positions on the Tool Management > Tool Administration > Hierarchy tab. Using the hierarchy, tools and components can be assembled and disassembled.
|
Components can be attached to or removed from the positions of their parent component or tool. A tool cannot be attached to any position since a tool is always the root level.
When the health or release status of an attached component is invalid, the block is inherited by the tool. The health status is indicated by the color at the edge of the tool.
To use the hierarchy, the following must be done:
-
At least a tool type and a component type must be created.
-
At least a position with allowed component types must be defined in the tool type.
-
At least a tool and a component must be created from each type.
-
The component must be attached to the tool in the hierarchy.
Example:
The tool is a GSR003 Screwdriver with the Battery Holder and Clamp positions. The Battery Holder and Clamp positions are required to operate the GSR003 Screwdriver. Therefore, components must be attached to the positions. When all positions of the GSR003 Screwdriver are filled by attaching components and the health status is OK (green) or Warning (yellow), the GSR003 Screwdriver can be used.
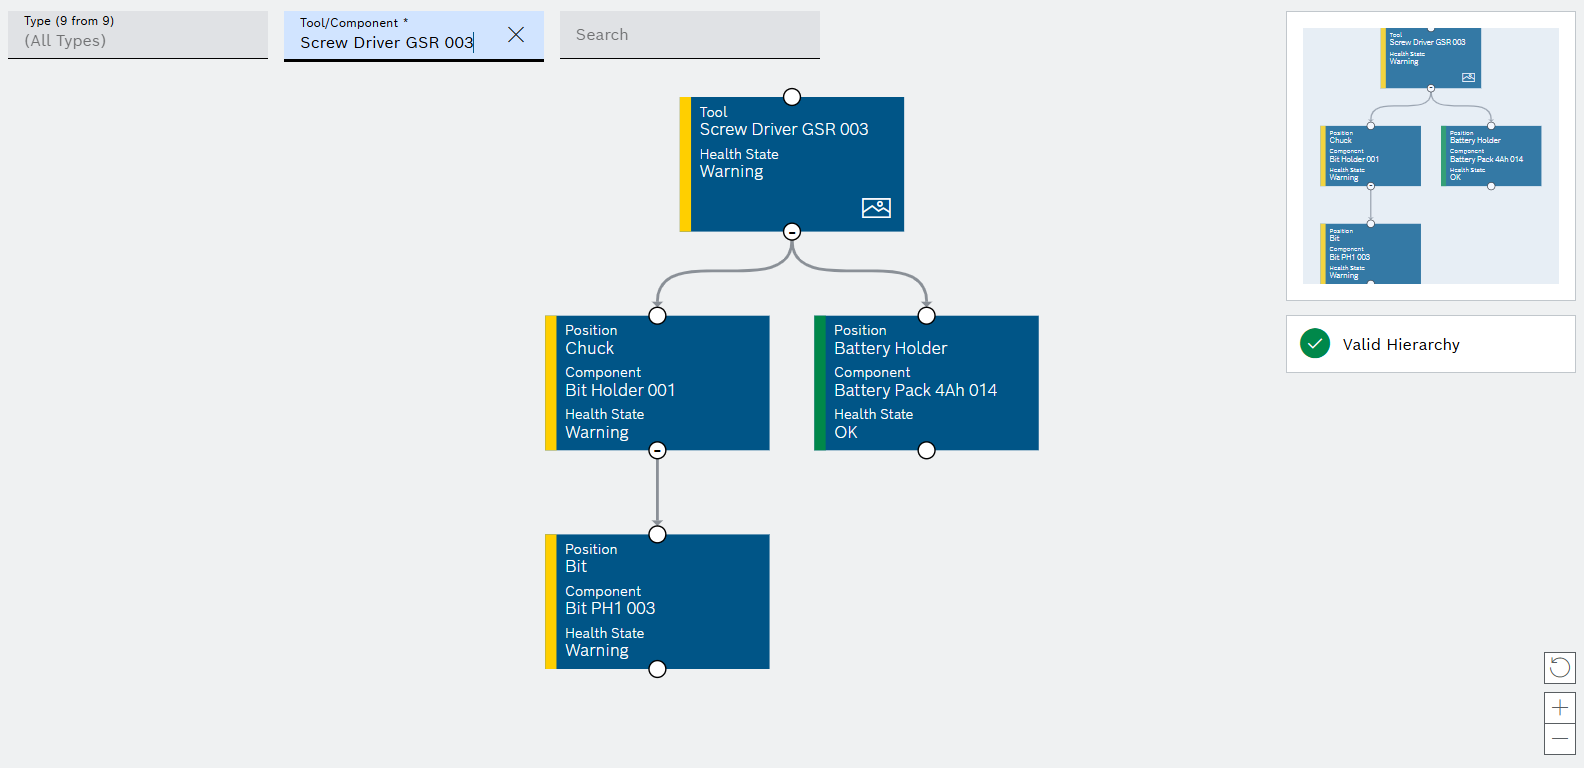
There are two areas in the Tool Management > Tool Administration > Hierarchy tab: The display of the hierarchy and the detail view of the position in which components are attached and removed.
The detailed view of the position opens when you select a position in the hierarchy.
Hierarchy
| Element / Icon | Description |
|---|---|
Type |
Filter tool / component by type. Type name or part of name. |
Tool / Component |
Find and select a tool or component. Enter the full tool name or part of it. |
Search |
Search by tool, component, tool type or component type in the hierarchy. Enter the text to be searched for in full or in part. Search texts found are highlighted in the hierarchy. |
View of the tool and component hierarchy |
Selected view of the hierarchy. The view can be moved and positions can be expanded and collapsed: Hold down the left mouse button to move the view.
|
Thumbnail of hierarchy |
Shows the entire hierarchy in reduced form. |
Hierarchy validation |
Displays the health status of the tool and all attached components. The hierarchy is valid Tools or positions are displayed with the |


| Element | Description |
|---|---|
Tool / Position |
Name of the tool or position. |
Component |
Name of the attached component. The Component element is not displayed for a tool. If no component is attached to the position, the Component element is displayed with (empty). The position is also greyed out and displayed with the |
Health State |
The health status of the tool or the attached component. The health status is represented as text and by the color on the left edge. |
|
Opens the positioning image of the tool or component. If the |
Detailed view of a tool
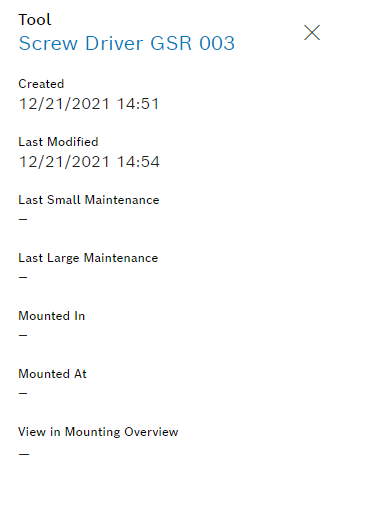
| Element | Description |
|---|---|
Tool |
Name of the tool. |
Created |
Date on which the tool was created. |
Last Modified |
Date on which the tool was modified. |
Last Small Maintenance |
Date of last small maintenance. |
Last Large Maintenance |
Date of last large maintenance. |
Mounted In |
Name of the device in which the tool is mounted. |
Mounted At |
Date on which the tool was mounted or unmounted. |
View in Mounting Overview |
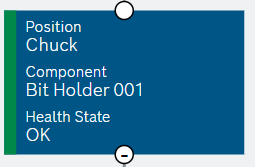
Detailed view of a position
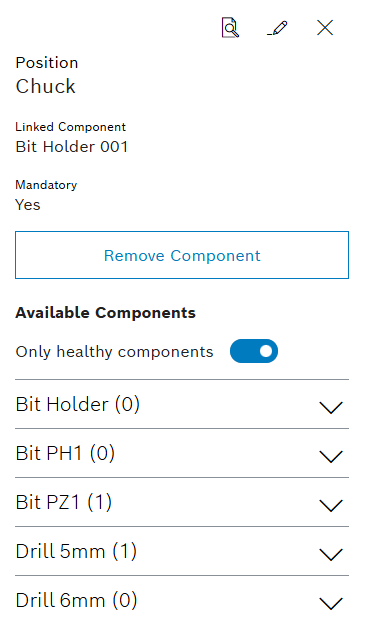
| Element | Description |
|---|---|
Position |
Name of the position. |
Linked Component |
Name of the attached component. |
Mandatory |
Shows whether the position is required. |
Remove Component |
Button to remove the attached component. If no component is attached, the button is disabled. |
Available Components |
Drop-down list of all available components that can be attached to the position. The colored circles next to the components indicate the health state of the component. The available components list can be filtered using the switch for showing healthy components only. |
Attaching and removing components in the hierarchy
In the hierarchy, components can be attached to and removed from the tool’s or component’s positions. Positions and positioning image can be stored in the type.
Prerequisite
-
Tool Management UserorTool Management ExpertorTool Management Adminrole -
At least a tool type and a component type must be created.
-
At least a position with allowed component types must be defined in the tool type.
-
At least a tool and a component must be created from each type.
Procedure
-
Open the Tool Management > Tool Administration > Hierarchy tab.
-
Select Type.
-
Select Tool / Component.
-
Select a Position from the hierarchy.
The Remove Component button is disabled if no component is attached. Components cannot be selected from the Available Components drop-down list if a component is attached to the position.
-
To remove a component from the position, select Remove Component.
-
To attach a component to the position, select a component from the Available Components drop-down list using
 . The available components list can be filtered using the switch for showing healthy components only.
The component is attached to or removed from the position.
Attaching and removing components in the positioning image
In the hierarchy, components can be attached to or removed from the positions of the tool or component in a positioning image. Positions and positioning image can be stored in the type.
Prerequisite
-
Tool Management UserorTool Management ExpertorTool Management Adminrole -
At least two types must be created.
Creating a type -
Types must be connected via positions.
Create position for the type -
A positioning image must be created for the type.
Tool Administration: Types - Positions -
Tools and components must be created with the types.
Creating a tool or component or Importing tools or components
Procedure
-
Open the Tool Management > Tool Administration > Hierarchy tab.
-
Select Type.
-
Select Tool / Component.
-
Select a Position from the hierarchy.
If the
 icon is not present at any position, no positioning image is stored.
 -
At the position, open the positioning image with
. -
Select the position on the positioning image.
The health state of the position is color coded. The selected position is indicated by a blue border.
The Remove Component button is disabled if no component is attached.
-
To remove a component from the position, select the Remove Component button.
-
To attach a component to the position, select a component from the Available Components drop-down list using
. The available components list can be filtered using the switch for showing healthy components only.
The component is attached to or removed from the position.