Corrective Task
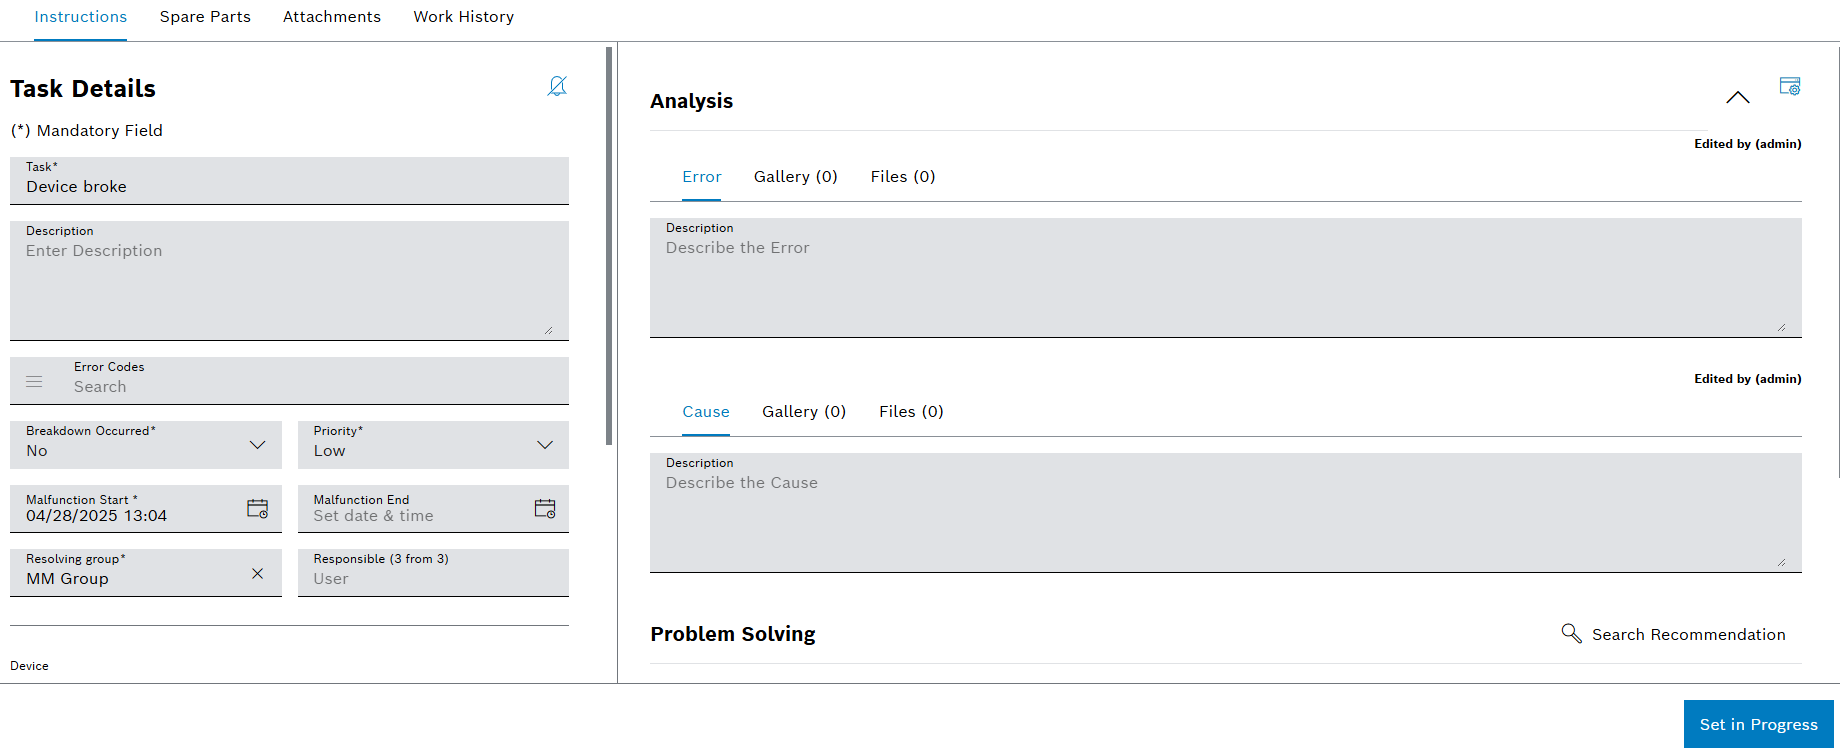
When a corrective task is selected from Machine Maintenance or Tool Maintenance menu entry, the detailed view of the task opens. It contains task details, tabs and a footer. The task details and footer do not change when the various tabs are accessed.
Tabs
The detailed view contains the following tabs:
-
Appraisal of the corrective task as well as descriptions of the problem and solution.
-
Order spare parts for the corrective task.
The Spare Parts tab is only available for devices.
-
Manage attached pictures, videos and documents related to the corrective task.
-
Display of all confirmed working times on the corrective task.
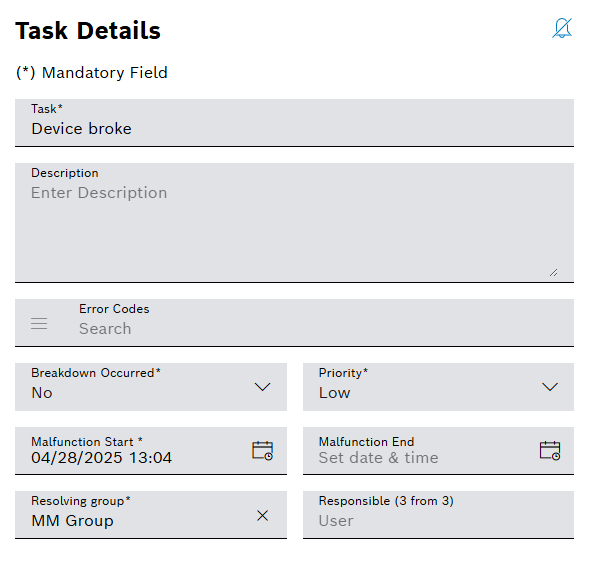
Task details
| Element / Icon | Description | ||
|---|---|---|---|
|
Enable or disable notifications about changes to the status of the corrective task.
|
||
Task |
Name of the corrective task. |
||
Description |
Description of the corrective task. |
||
Error Codes / Failures |
Error codes for the device. Failures for the tool. |
||
Breakdown Occurred |
Indicates whether a breakdown occurred:
|
||
Priority |
Priority of the corrective task:
|
||
Malfunction Start |
Date and time when the malfunction started. |
||
Malfunction End |
Date and time when the malfunction or the corrective task was resolved. |
||
Resolving Group |
Resolving group assigned to the corrective task. |
||
Responsible |
User assigned to the corrective task. Only users of the selected resolving group are displayed in the Responsible field. |
||
Device/Tool |
Name of the device or tool. The device or tool can be clicked to show details. |
||
Created At |
Date and time when the corrective task was created. |
||
Maintenance Type |
Type of task:
Corrective Task that eliminates a defect, such as a fault or failure. |
||
Created By |
User who created the corrective task. |
||
Reorter Phone Number |
Phone number of the user who created the corrective task. |
||
Last Update |
Date and time when the corrective task was updated. |
||
Status |
Status of the corrective task:
|
||
Related Tasks (X) |
List of all related corrective tasks. The task name, resolving group, responsible, status and date of the last update of the related task are displayed. If a related corrective task is selected, the detailed view of the corrective task opens. |
||
|
Create a related task for an existing corrective or preventive task |

Footer
| Element / Icon | Description |
|---|---|
Save |
Save the entered descriptions and changes to the corrective task. |
Cancel |
Dismiss any change to the corrective task. |
Set In Progress/Resolve |
|
Confirm Pending Reservations |
|
Confirm Working Time |
Instructions
If a corrective task is selected in the Maintenance > Machine Maintenance overview or Maintenance > Tool Maintenance overview, the detailed view of the corrective task opens. The appraisal of the corrective task and its solution are displayed in the detailed view in the Instructions tab. The rows must be filled out from top to bottom.
|
The task status must be Started. |
The Instructions tab is divided into the following areas:
| Area / Icon | Description | ||
|---|---|---|---|
|
View options:
The task details are hidden.
The task details are shown.
Images are shown as a gallery below description field instead of displaying a separate gallery tab.
Gallery tab is shown instead of displaying images as a gallery below description field. |
||
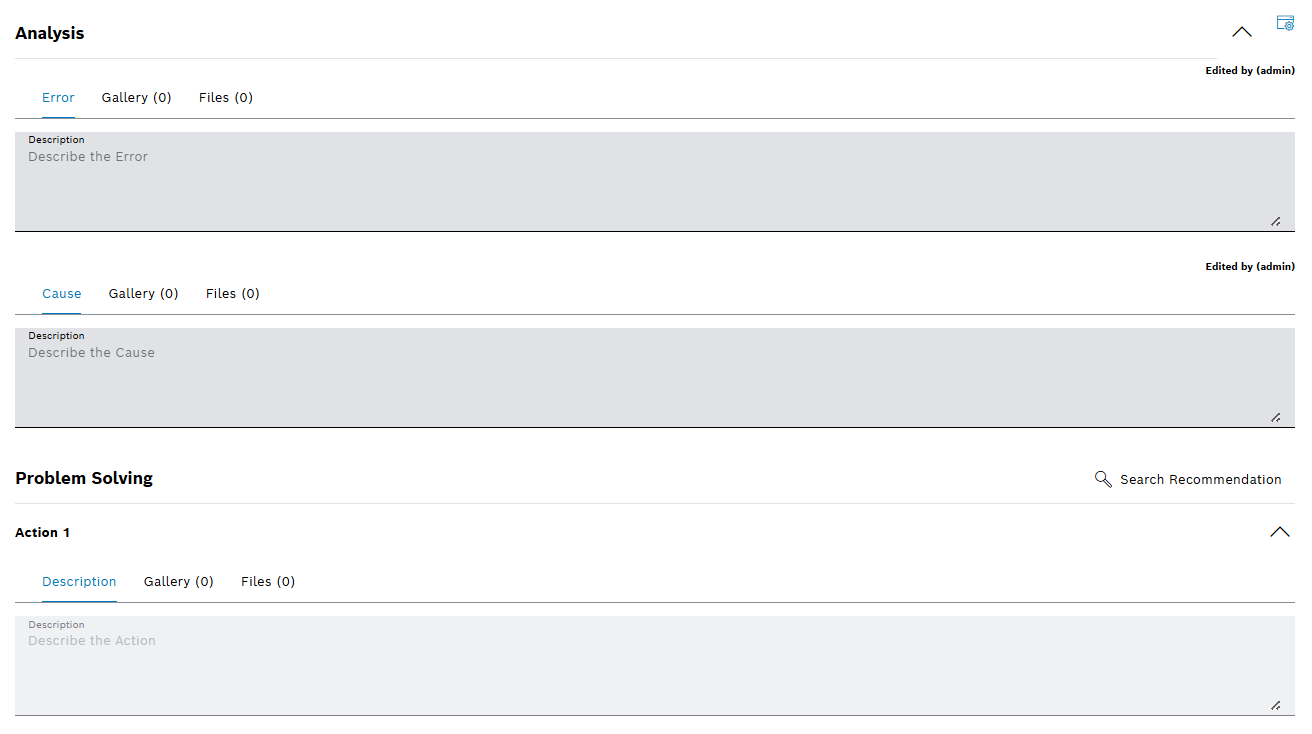
Analysis |
Expand / Collapse row. Error Description of the error. Cause Description of the error cause. |
||
Problem Solving |
Search for a recommendation. Action (X) Description of the executed work for solving the issue.
Expand / Collapse row. Add Action Another action can be added.
|


Each area contains the following elements:
| Element / Icon | Description | ||
|---|---|---|---|
Error / Cause / Description |
Error or cause of the analysis. Description for the action. |
||
Gallery / Files tabs |
Gallery tab Display of attached images as gallery. The order of the images in the Files tab from top to bottom determines the order of the images in the gallery. Files tab Files (images, videos, and documents) that describe the error or show the solution for the issue. The files can also be edited in the Attachments tab of the detailed task view. |
||
|
Delete action.
|

Spare parts
|
The Spare Parts tab is only available for machine tasks. |
If a corrective task is selected in the Maintenance > Machine Maintenance tab, the detailed view of the corrective task opens. All installed spare parts of the device are displayed in the detailed view in the Spare Parts tab. In the Spare Parts tab, the spare parts that are required to solve the corrective task can be reserved. The listed spare parts are loaded from the linked ERP system.
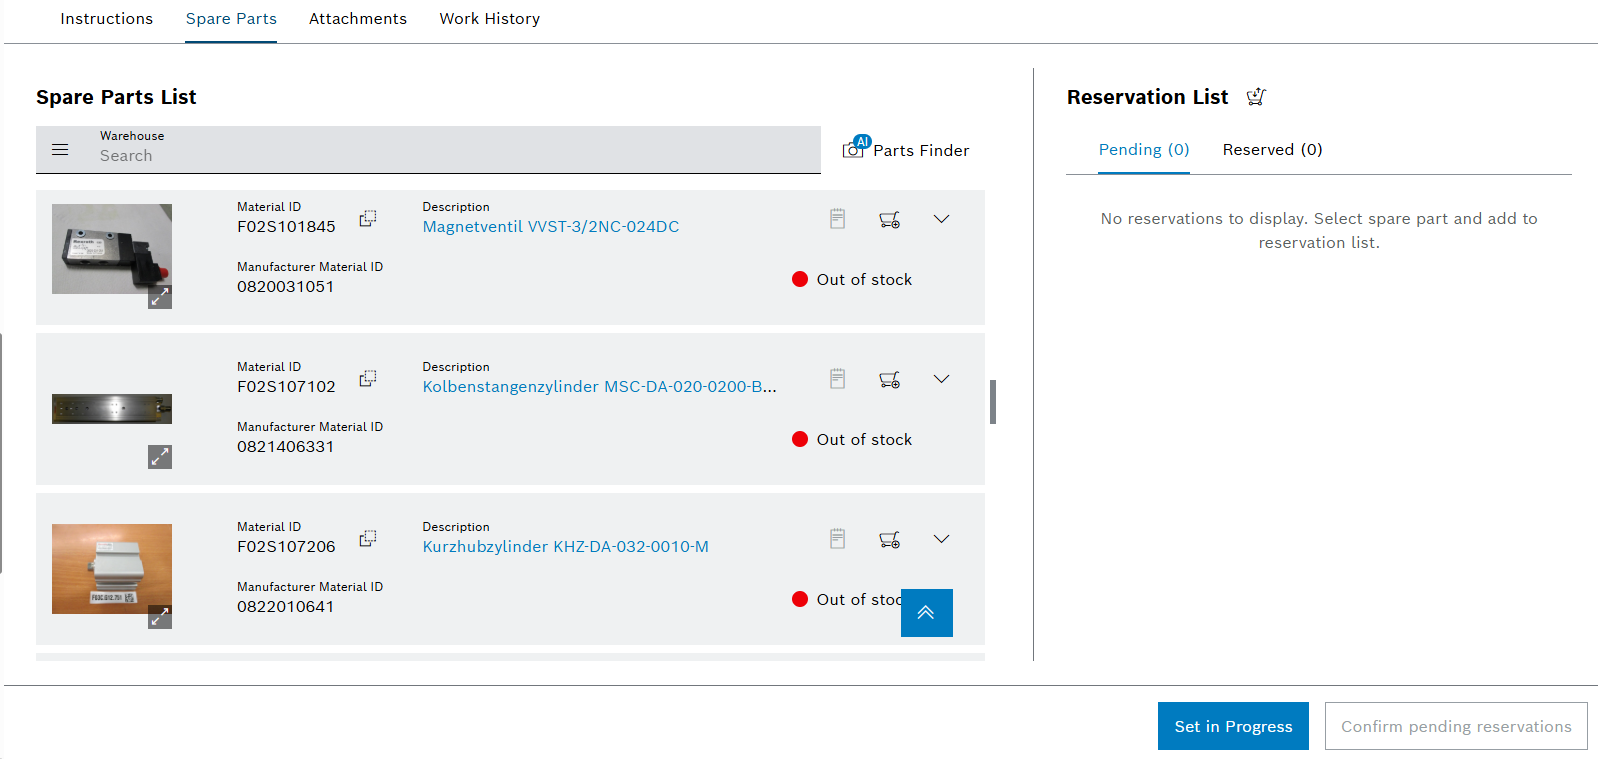
Spare Parts List
| Element / Icon | Description |
|---|---|
Search By |
Bill Of Material Search for spare parts in the bill of material. Warehouse Search for spare parts in the warehouse. All spare parts from the ERP system are displayed in the warehouse. |
Search Search Term |
Enter the name of the spare part in full or in part. |
Material ID |
Material ID from the ERP system. Use |
Description |
Information about the spare part. |
Manufacturer |
Manufacturer of the spare part. |
Manufacturer Material ID |
Material ID from manufacturer. |
Stock |
In Stock The spare part is available in the bill of material or in the warehouse. Out Of Stock The spare part is not available in bill of material or in the warehouse. |
|
Add spare part to the Reservation List. |
|
Expand or collapse details of the spare part |
Type code |
Code of the spare part from the ERP system |
Leading Material ID |
Material ID from the ERP system |
Subsequent Material ID |
Material ID from the ERP system that follows the spare part Use |
Old Material ID |
Old material ID from the ERP system if the material ID of the spare part has changed Use |
Notes |
Note on the spare part from the ERP system |


Reservation list
| Element / Icon | Description |
|---|---|
Outstanding |
All spare parts added using |
Reserved |
The spare parts are reserved for the corrective or preventive task. |
Confirm Pending Reservations |
Order spare parts. |
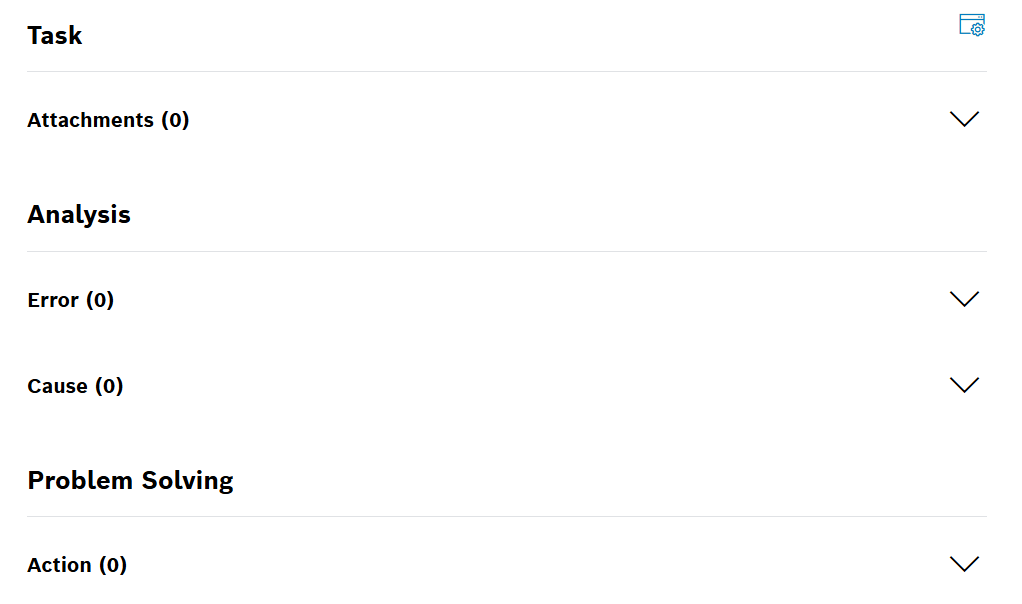
Attachments
If a corrective task is selected in the Maintenance > Machine Maintenance or Maintenance > Tool Maintenance menu entry, the detail view of the corrective task opens. All attached files for the task are displayed in the detailed view in the Attachments tab. The attachments are also divided into their individual usage (error, cause or action). The order of the images from top to bottom determines the order of the images in the gallery in the Attachments area.
| Element / Icon | Description |
|---|---|
|
View options:
The task details are hidden.
The task details are shown. |
Attachments (<nn>) |
Attachments related to task details |
Error (<nn>) |
Attachments related to error |
Cause (<nn>) |
Attachments related to the cause |
Action (<nn>) |
Attachments related to the action |
Row will expand if selected.
Each group contains the following elements:
| Element / Icon | Description |
|---|---|
Gallery / Files tabs |
Gallery tab Display of attached images as gallery. The order of the images in the Files tab from top to bottom determines the order of the images in the gallery. Files tab Files (images, videos, and documents) that describe the error or show the solution for the issue. |
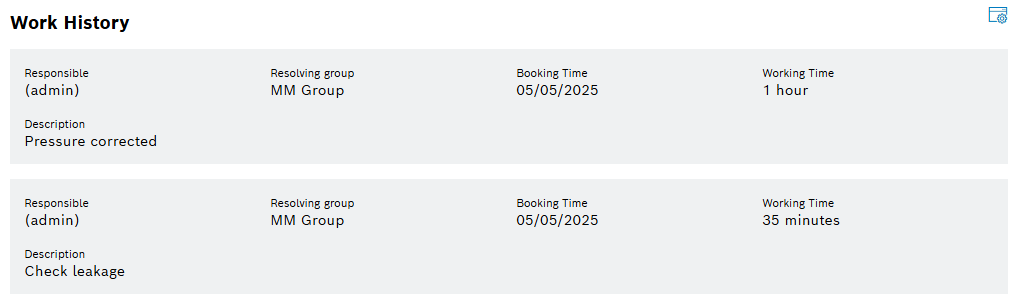
Work history
If a corrective task is selected in the Maintenance > Machine Maintenance or Maintenance > Tool Maintenance tab, the detailed view of the corrective task opens. All work on the task is displayed in the detailed view in the Work history tab.
| Element / Icon | Description |
|---|---|
|
View options:
The task details are hidden.
The task details are shown. |
Responsible |
User who did the work |
Resolving Group |
Resolving group of the user |
Time Posting |
Date and time when the work was executed |
Working time |
Time needed for the work |
Description |
Description of the executed work |
Create task
Prerequisite
User or Administrator role
Procedure
-
Open the Maintenance > Machine Maintenance menu entry.
Or:
Open the Maintenance > Tool Maintenance menu entry.
-
Create creative task with
 .
. -
Select Create Corrective Task from the drop-down list. The create view is shown like this:
Example: Corrective task for machine image::mm_create_corrective_task.png[mm_create_corrective_task]
-
Filter devices by selecting one or more Facilities or scan the QR code.
Or:
Select the Device from the drop-down list.
Or:
Select the Tool Type and Tool or scan the QR code.
-
Enter name of the Task.
-
If a breakdown occurred, activate the Breakdown Occurred checkbox.
Breakdown Occurred is only displayed for devices.
-
If notifications about status changes of the task are required, activate the Notify Me On Changes
 checkbox.
If the status of a task changes, a notification is sent to the Notification Service module. The Notification Service module then processes the notification request, e.g. sending a browser notification.
-
Select Error Codes from list.
-
Enter the Description.
-
Select Resolving Group.
-
Select Responsible.
-
Select Priority.
-
Select Malfunction Start.
-
Enter the Phone number for the responsible person.
-
To add attachments:
Use
 Add Attachments to upload a file.
Or:
Drag and drop the file into the appropriate field.
-
Create a corrective task with Create.
The corrective task is displayed in the Maintenance > Machine Maintenance or Maintenance > Tool Maintenance menu entry.
-
To edit the task details, continue with Configure task details.
-
To appraise the corrective task, continue with Appraise task.
-
To confirm working time to a corrective task, continue with Confirm working time for a corrective or preventive task.
-
To change the status of the corrective task, continue with Change the status of a corrective or preventive task.
-
To create a related corrective task for an existing corrective task, continue with Create a related task for an existing corrective or preventive task.
Configure task details
The task details for a corrective task of a device and that of a tool differ only in the Device and Tool field.
Prerequisite
User or Administrator role
Procedure
-
Open the Maintenance > Machine Maintenance menu entry.
Or:
Open the Maintenance > Tool Maintenance menu entry.
-
Select corrective task.
-
Use
 to deactivate or
  to activate notifications about changes to the status of the task.
If the status of a task changes, a notification is sent to the Notification Service module. The Notification Service module then processes the notification further.
Introduction to the Notification Service Module -
Enter name of the Task.
-
Enter the Description.
-
Select Breakdown Occurred.
Breakdown occurred? is only displayed for devices.
-
Select Priority.
-
Select Malfunction Start and Malfunction End.
-
Select Resolving Group.
-
Select the user in the Responsible field.
-
Confirm details with Save.
The corrective task details are configured.
-
To appraise the corrective task, continue with Appraie task.
-
To add further attachments to a corrective task, continue with Manage attachments for a corrective or preventive task.
-
To confirm working time for a corrective task, continue with Confirm working time for a corrective or preventive task.
-
To change the status of the corrective task, continue with Change the status of a corrective or preventive task.
-
To create a related corrective task for a corrective task, continue with Create a related task for an existing corrective or preventive task.
Appraise task
The recorded error is described in detail in the Analysis area in the Instructions tab. It describes the error, the cause and what was done to fix it.
Additionally working times can be confirmed.
Prerequisite
User or Administrator role
Procedure
-
Open the Maintenance > Machine Maintenance menu entry.
Or:
Open the Maintenance > Tool Maintenance menu entry.
-
Select corrective task.
-
In the detail view, click on the Instructions tab.
-
Evaluate task.
-
Localize errors in the device or tool.
-
Eliminate error.
-
Fill out Analysis:
-
Error
-
Cause
-
-
Fill out Problem Solving:
-
Description below Action (X)
-
-
To add another solution description, click on
Add Action.Adding another action is only available in the last action.
-
To add files to Error, Cause or action Description:
-
Select element.
-
Click on the Files tab.
-
Use
Add Attachments to upload a file.Or:
-
Drag and drop the file into the field.
Images are displayed in the gallery tab.
-
-
Confirm details with Save.
The corrective task has been appraised.
-
To confirm working time for a corrective task, continue with Confirm working time for a corrective or preventive task.
-
If the task could not be resolved and the task is to be assigned to another user, continue with Assign a corrective or preventive task to a user.
-
To add attachments to the corrective task, continue with Configure task details.
-
To change the status of the corrective task, continue with Change the status of a corrective or preventive task.
-
To create a related task for the corrective task, continue with Create a related task for an existing corrective or preventive task.