Tool Administration: Types
Types are created and configured on the Tool Management > Tool Administration > Types tab. Types are required to create tools and components. The data of the type is transferred when a tool or component is created. There are two kinds of type: Tool types and component types. The kind of type can no longer be changed.
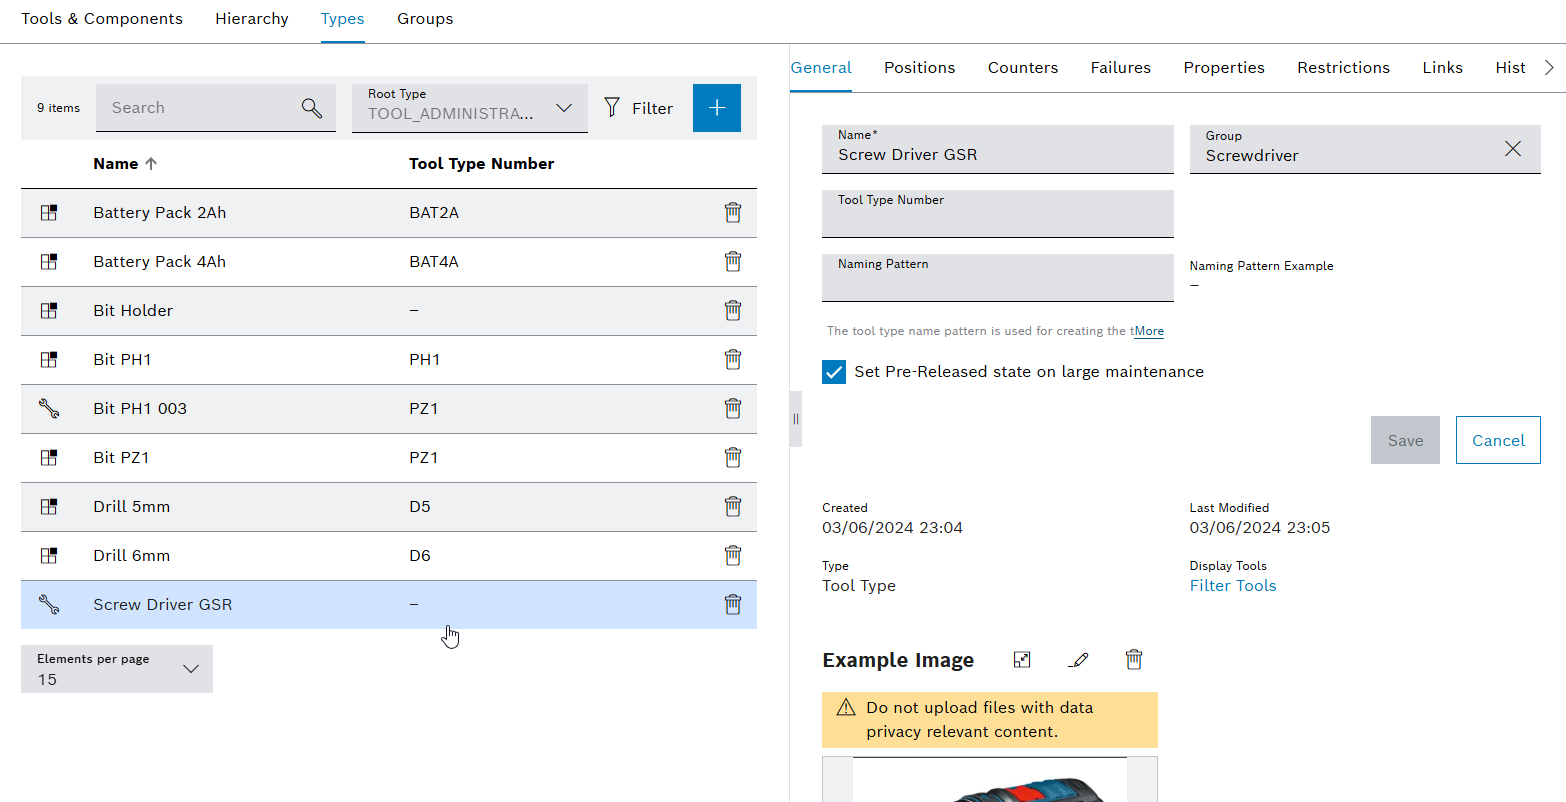
The Types tab contains two areas: a types display and a detailed view, where general information, positions, counters, properties and the history can be viewed.
The detail view opens when a type is selected in the table.
Display of types
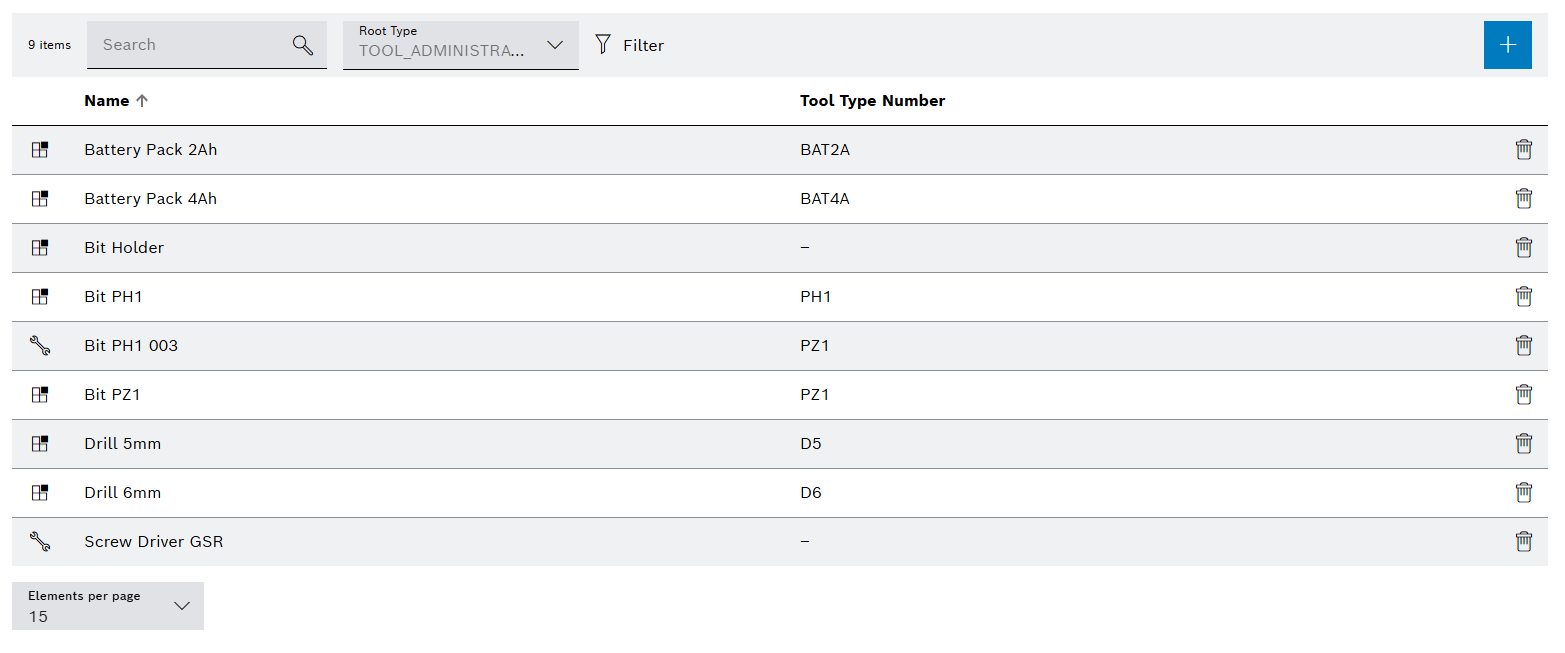
| Element / Icon | Description |
|---|---|
XX items |
Number of available types. |
Search |
Search by type. Type name or part of name. |
Root Type |
Filter by tool type or component type:
All Tools Components |
|
Filter the display by criteria. |
|
Hide or show filters. Click for switching the view. |
|
|
Kind of type |
Indicator for tool type or component type:
Name relates to a tool type.
Name relates to a component type. |
Name |
Name of the type. |
Tool Type Number |
Tool type number. |


Detailed view
The detailed view contains the following tabs:
-
General
-
Positions
-
Counters
-
Failures
-
Properties
-
Restrictions
-
Links
History
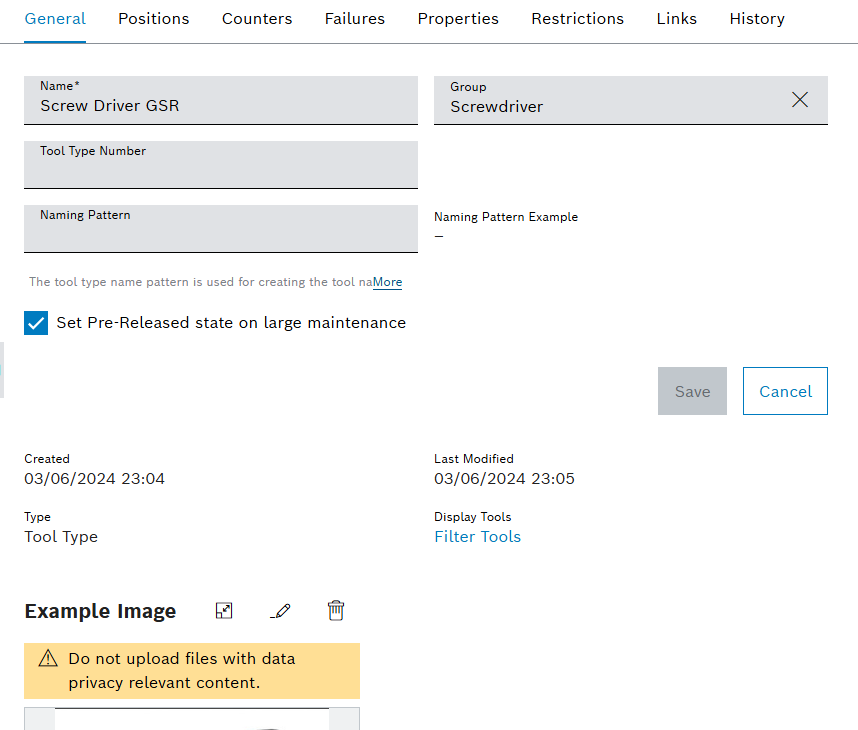
Tool Administration: Types - General
If a type is selected in the Tool Management > Tool Administration > Types tab, the detail view opens. In the detailed view in the General tab, type data such as name, group and sample image can be changed.
| Element / Icon | Description |
|---|---|
Name |
Name of the type. |
Group |
Assigned group for the type. Search and select the group. Enter the group name or part of it. |
Tool Type Number |
Tool type number. |
Naming Pattern |
The naming pattern is required to create multiple tools or components. The naming pattern can contain the variables {n} to {nnnnnnnn}. |
Naming Pattern Example |
The currently entered name is generated in real time from the Naming Pattern field. |
Set Pre-Released State On Large Maintenance |
When the large maintenance has been reached, the tool or component is set to the Pre-Released release status. |
Created |
Date (day / month / year / time) when the type was created. |
Last modified |
Date (day / month / year / time) when the type data was modified. |
Type |
Kind of type. |
Display Tools / Display Components |
Display all tools or components created with this type in the Tool Management > Tool Administration > Tools & Components tab. |
|
Display sample image. |
|
Select and upload a sample image. |
|
Delete the sample image. |
Tool Administration: Types - Positions
If a type is selected in the Tool Management > Tool Administration > Types tab, the detail view opens. The positions of the type are configured in the detailed view in the Positions tab. The position is the connection between types. Types are connected hierarchically to other types. A tool is at the top of the hierarchy. Components can be attached to the tool at the positions.
If types are connected together via positions, the tools and components created with these types can be used in Tool Administration: Hierarchy
|
Changes to type positions type are automatically transferred to all created tools or components of this type. Changing positions can change the health status of tools and components. |
Items can be dragged and dropped within the table using the  icon. The placement of the positions in the table determines the horizontal order of the positions in the hierarchy from left to right. A positioning image can be added in order to visualize the positions.
Example: For the Screw Driver GSR type, the created positions are Battery Holder and Clamp. Both positions are required for the operation of the type Screw Driver GSR. Possible usable types are stored in the type positions. The Battery Holder position can have the type Battery Pack 12 V 2 Ah or Battery Pack 12 V 4 Ah attached to it. The Clamp position can have the type Bit attached to it.
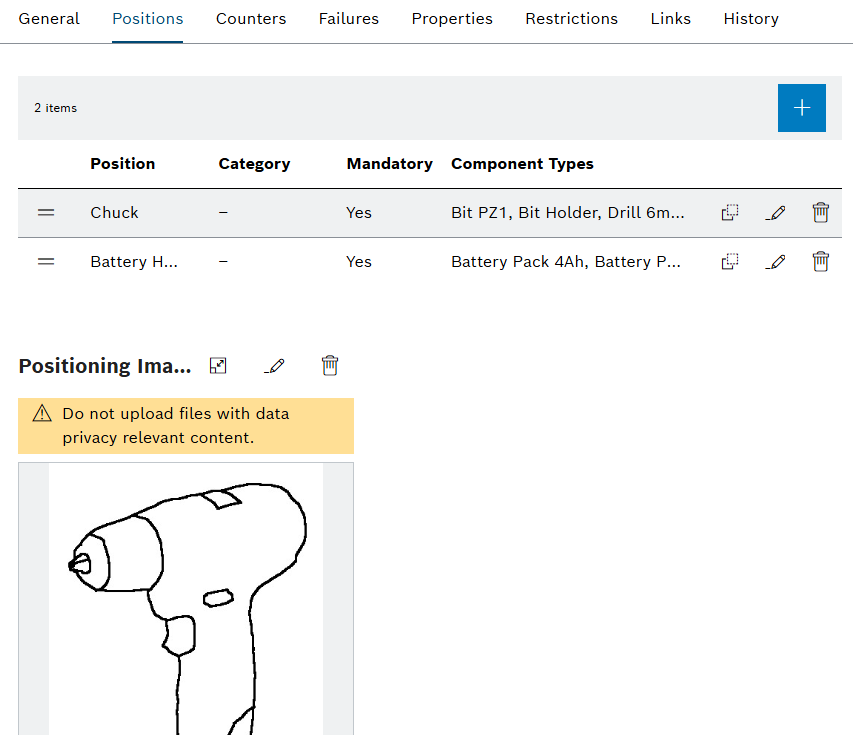
| Element / Icon | Description |
|---|---|
XX items |
Number of available positions. |
|
|
|
Change the position in the table. |
Position |
Name of the position. |
Category |
Name of the assigned category. Categories are used to group positions in the hierarchy. |
Mandatory |
Shows whether the position is required or not for the operation of the tool or component. If the position is required, a component must be attached to this position. |
Component Types |
Displays the types of components that can be attached to this position. |
|
Create a position with the component types of the position. |
|
|
|
Delete position. |
Positioning image
| Element / Icon | Description |
|---|---|
|
Displaying the positioning image and setting positions on the positioning image. |
|
Select and upload the positioning image. |
|
Delete positioning image. |
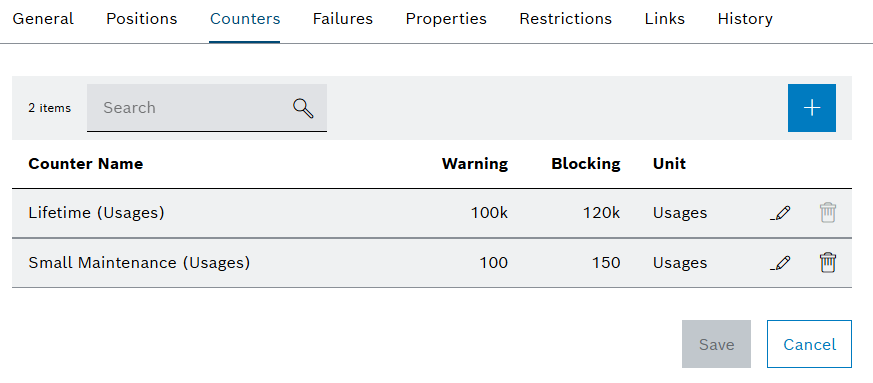
Tool Administration: Types - Counters
If a type is selected in the Tool Management > Tool Administration > Types tab, the detail view opens. The type counters are configured in the detailed view of the Counters tab. Counters can increase after a certain time or after each use. Warning and blocking limits can be adjusted for each counter. When a tool or component is created, the type counters are transferred to the tool or component. Changes to counters are not transferred to tools or components of the type that have already been created. When a counter type is selected, more information about the counter type appears.
| Element / Icon | Description |
|---|---|
XX items |
Number of available counters of the selected type. |
Search |
Search for counter by entering in full or in part. |
|
|
Counter Name |
Name of the counter. |
Warning |
Warning limit of the counter. |
Blocking |
Blocking limit of the counter. |
|
|
|
Delete counter. |
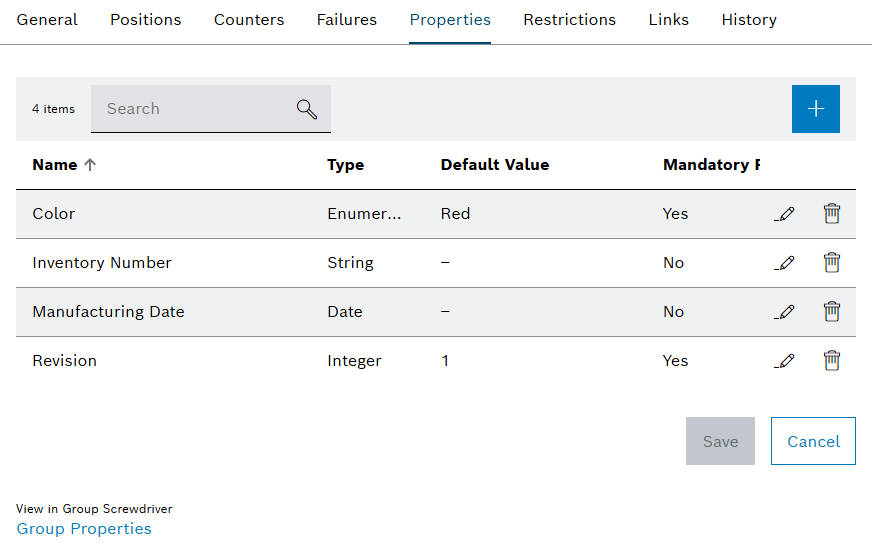
Tool Administration: Types - Properties
If a type is selected in the Tool Management > Tool Administration > Types tab, the detail view opens. In the detailed view in the Properties tab, created properties are assigned to the type. The value of the property is entered or selected in the tool or component.
A default value can be defined for each property. If a default value is defined, this value is assigned to the property when a tool or component is created. If a property is required, a value must be entered or selected in the tool or component for it to be released.
When a tool or component is created, the properties of the selected type are taken over by them. Changes to properties are not transferred to tools or components of the type that have already been created. Changes to properties can be synchronized with the type in the detail view of a related tool or component.
| Element / Icon | Description |
|---|---|
XX items |
Number of available properties for the selected type. |
Search |
Search by property. Enter the full name of the property or part of it. |
|
|
Name |
Name of the property. |
Type |
Type of the property. |
Default Value |
The default value of the property that is entered or selected |
Mandatory |
Shows whether it is necessary to enter a value in the tool or component in order to release it. |
|
Option to edit the property or jump to the related group properties:
The property has not been inherited from a group, so changing the property is possible on type level.
The property has been inherited from a group, so changing the property is possible on group level. |
|
Delete property from type. |
View In Group X Group Properties |
Navigate to Tool Management > Tool Administration > Groups. |

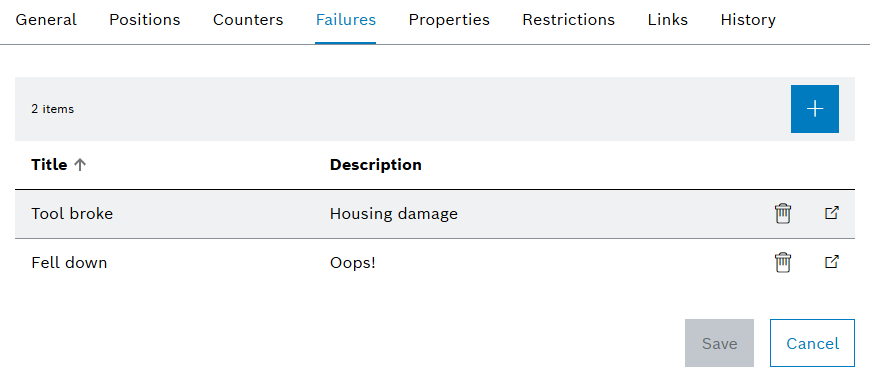
Tool Administration: Types - Failures
If a type is selected in the Tool Management > Tool Administration > Types tab, the detail view opens. Failures are created and assigned to the type in the detailed view in the Failure tab.
| Element / Icon | Description |
|---|---|
XX items |
Number of available failures for the selected type. |
|
Assign a failure to the type:
Add Existing Failures Assign existing failures to the type. Create New Failure Create a new failure and assign it to the type. |
Title |
Name of the failure. |
Description |
Description of the failure. |
|
Display failures in the Tool Management > Configuration > Failures tab. |
|
Delete failure from the type. |
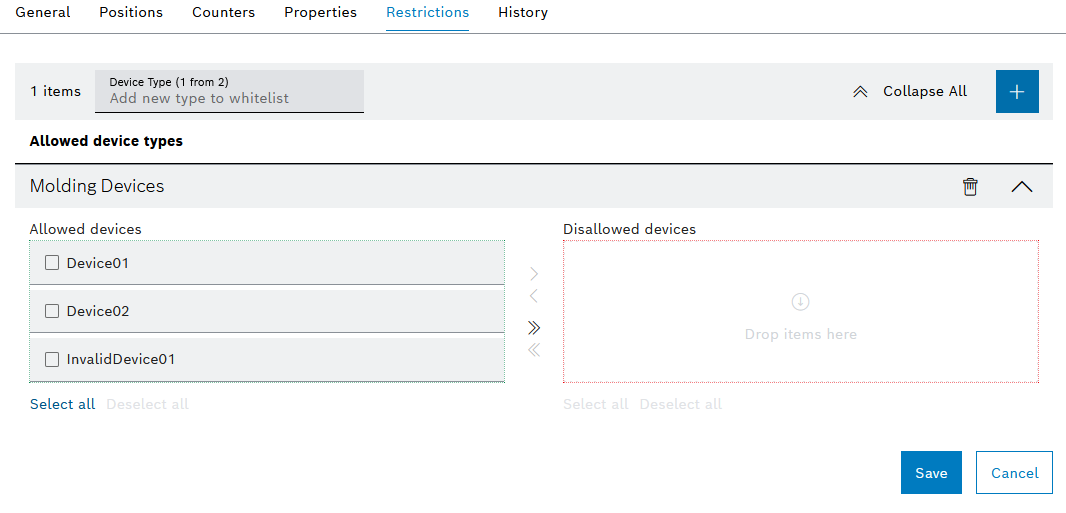
Tool Administration: Types - Restrictions
If a type is selected in the Tool Management > Tool Administration > Types tab, the detailed view opens. Mounting restrictions can be created for the type in the detailed view in the Restrictions tab. Restrictions can be used to prohibit or permit the mounting of a tool in a specific device. If a restriction is active, tools of that type cannot be mounted in a device.
Adding a device type results in allowing tool mounting to any of its devices for the selected type. After adding a device type, specific devices can be disallowed, e.g. mounting a tool of that type to the device will not be possible.
| Element / Icon | Description |
|---|---|
XX items |
Number of available restrictions. |
Device type (X of X) |
Select the device type. Enter the full name of the device type or part of it. |
|
Expand or collapse restrictions. |
|
Add a restriction for the selected Device Type. |


Allowed Device Types
| Element / Icon | Description |
|---|---|
Device Type Name |
The name of the device type. |
|
Delete any restriction for device type. |
|
Expand or collapse device type. |
Allowed Devices |
List of allowed devices. |
Disallowed Devices |
List of disallowed devices. |


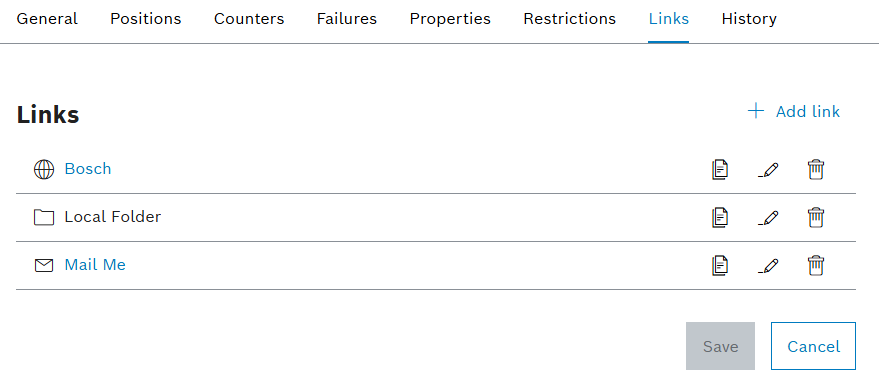
Tool Administration: Types - Links
If a type is selected in the Tool Management > Tool Administration > Types tab, the detailed view opens. The links of the type are displayed in the detailed view in the Links tab. The links of the type are inherited by the associated tools or the associated components. Links can be created to link web links or folders. Links can be created to link web pages, emails or folders. For example, web pages or folders can contain additional information about the tool type or component type. Emails can be defined to store the emails of the responsible person or persons.
| Element / Icon | Description |
|---|---|
|
|
|
Link containing an email address. If you click on the link, a new email opens with the stored email address. |
|
Link containing a web page. If you click on the link, the included web page opens. |
|
Link containing a folder path. The link cannot be clicked due to security reasons. Copy the path to the clipboard with |
|
Copy the link to the clipboard. |
|
Edit link. |
|
Delete link. |


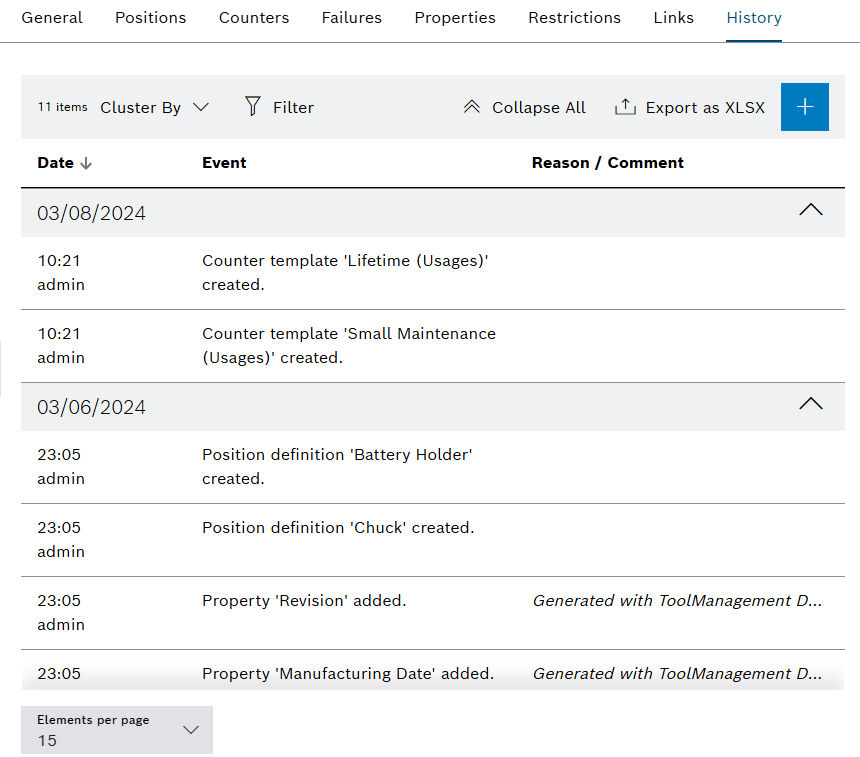
Tool Administration: Types - History
If a type is selected in the Tool Management > Tool Administration > Types tab, the detail view opens. All changes to the type are documented in the detailed view on the History tab. The history can be filtered and exported according to specific criteria. When exporting, the set filters are applied.
| Element / Icon | Description |
|---|---|
XX items |
Number of available history entries. |
Cluster By |
Cluster entries by selected criterion:
Created At Cluster entries by date. Created By Cluster entries by creator. Event Type Cluster entries by event. |
|
Filter by history entries. |
|
Hide or show filters. Click for switching the view. |
|
Expand or collapse cluster. |
|
|
|
|
Date |
Date of the event. |
Event |
Description of the event. |
Reason / Comment |
The reason or comment entered for the event. |
Creating a type
Types are required to create tools and components. When you create a type, you define whether the type is a tool type or a component type. The kind of type can no longer be changed.
Prerequisite
Tool Management Expert or Tool Management Admin role
Procedure
-
Click on the Tool Management > Tool Administration > Types tab.
-
Create type with
 .
. -
Select Create Tool Type or Create Component Type.
Example: Create Tool Type
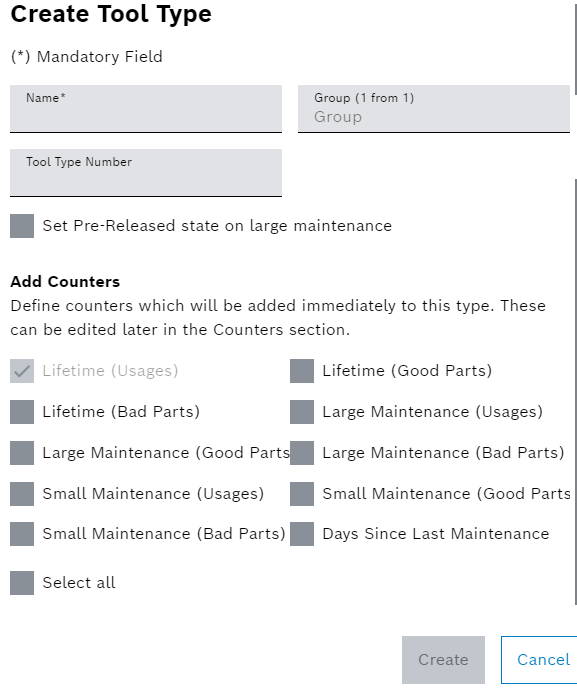
-
Enter Name.
-
Select Group, to do so, enter all or part of the group name and select it from the drop-down list.
-
Enter Tool Type Number.
-
Activate the checkbox if the release status Pre-Released is to be set automatically for the large maintenance.
-
To add individual counters, activate the corresponding checkboxes. Alternatively, activate the Select All checkbox to add all counters.
-
Create type with Create.
The type is created.
-
To edit the type, continue with Configuring a type.
Configuring a type
You can change general data of the type, such as the name and group.
Prerequisite
-
Tool Management ExpertorTool Management Adminrole -
A type has been created.
Creating a type
Procedure
-
Click on the Tool Management > Tool Administration > Types tab.
-
Select type.
-
In the detailed view, click on the General tab.
-
Enter Name.
-
Select Group by entering all or part of the group name and selecting it from the drop-down list.
-
Enter Tool Type Number.
-
Assign Naming Pattern.
-
Accept changes with Save.
-
Depending on configuration, enter Comment.
-
Confirm changes with Save.
-
-
Upload an example image with
 .
.Or:
Delete an example image with
 .
.
The type data has been configured.
-
To add positions to the type, continue with Create position for the type.
-
To edit type positions, continue with Configure positions of the type.
-
To edit positions on the positioning image, continue with Set positions on the positioning image of the type.
-
To enter a counter of a type, continue with Configure the counter template limits of the type.
-
To edit type properties, continue with Configure properties of the type or the group.
-
To add a history entry to the type, continue with Creating a history entry in the type history.
-
To export the type history, continue with Exporting the type history.
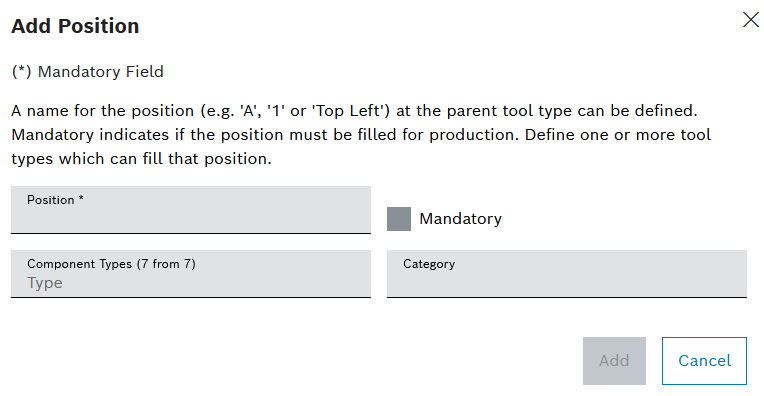
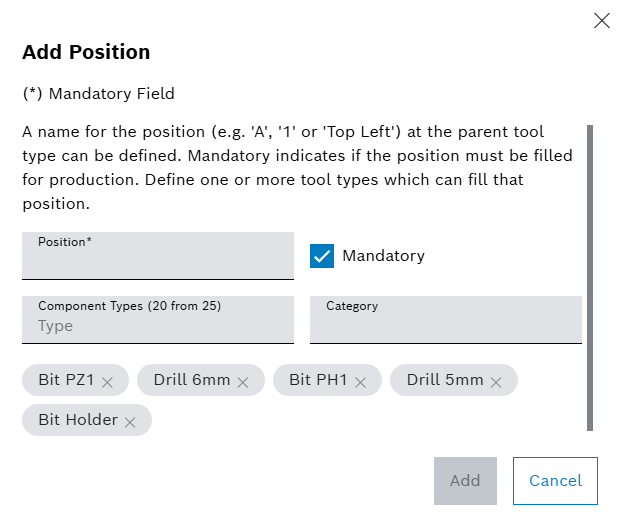
Create position for the type
The positions are used to connect types to each other. When you create a position, you define which component types can be attached to the position.
|
The categories can be used to group positions for the hierarchy. For example, for more complex tool or component types, assemblies can be grouped into categories to provide a better overview of the hierarchy. Categories already used are displayed in a drop-down list. |
Prerequisite
-
Tool Management ExpertorTool Management Adminrole -
A type has been created.
Creating type
Procedure
-
Click on the Tool Management > Tool Administration > Types tab.
-
Select type.
-
In the detail view, open the Positions tab.
-
To create a new position without component types:
-
Create position with
.
-
Enter the name of the Position.
-
If it is mandatory to attach a component at the position, activate the Mandatory checkbox.
-
To add a component type that can be attached to the position:
-
Enter the name of the component type in full or in part in Component Types.
-
Select a component type.
-
-
To remove a component type, use
 next to the component type chip.
 -
To assign the position to a category, enter or select Category.
-
-
To create a new position with already configured component types:
-
Copy an existing position with
 .
.
-
Enter the name of the Position.
-
If it is mandatory to attach a component at the position, activate the Mandatory checkbox.
-
To add more component types that can be attached to the position:
-
Enter the name of the component type in full or in part in Component Types.
-
Select a component type.
-
-
To remove existing component types, use
next to the component type chip. -
To assign the position to a category, enter or select Category.
-
-
Create the position with Add.
-
Accept changes with Save.
-
Depending on configuration, enter Comment.
-
Confirm changes with Save.
The position is shown in the Tool Management > Tool Administration > Types tab in the detailed view of the type in the Positions tab.
-
To edit the position, continue with Configure positions of the type.
-
To edit the position on the positioning image, continue with Set positions on the positioning image of the type.
Configure positions of the type
Positions are created for types. The positions are used to connect types to each other. When you create a position, you define which component types can be attached.
|
The categories can be used to group positions for the hierarchy. For example, for more complex tool or component types, assemblies can be grouped into categories to provide a better overview of the hierarchy. Categories already used are displayed in a drop-down list. |
Prerequisite
-
Tool Management ExpertorTool Management Adminrole -
A type has been created.
Creating a type -
A position has been created.
Creating a type
Procedure
-
Click on the Tool Management > Tool Administration > Types tab.
-
Select type.
-
In the detail view, open the Positions tab.
-
Open position with
.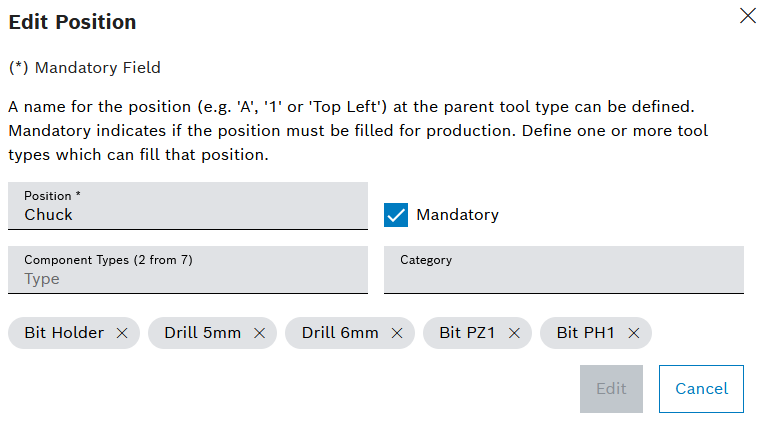
-
Change the name of the Position.
-
If it is mdandatory to attach a component at the position for operation, activate the Mandatory checkbox.
-
To add a component type that can be attached to the position:
-
Enter the name of the component type in full or in part in Component Types.
-
Select a component type.
-
-
To remove a component type, use
next to the component type chip. -
To assign the position to a category, enter or select Category.
-
Save the position with Edit.
-
Accept changes with Save.
-
Depending on configuration, enter Comment.
-
Confirm changes with Save.
The position is changed.
-
To edit the position on the positioning image, continue with Set positions on the positioning image of the type.
Set positions on the positioning image of the type
In the hierarchy, you can attach or release components to the positions of the tool or component in a positioning image. For this purpose, positions must be created in the type and a positioning image must be added. In addition, the positions must be set on the positioning image.
Prerequisite
-
Tool Management ExpertorTool Management Adminrole -
A type has been created.
Creating a type -
A positioning image is added.
Tool Administration: Types - Positions -
A position has been created.
Create position for the type
Procedure
-
Click on the Tool Management > Tool Administration > Types tab.
-
Select type.
-
In the detail view, open the Positions tab.
-
Open the positioning image with
 .
.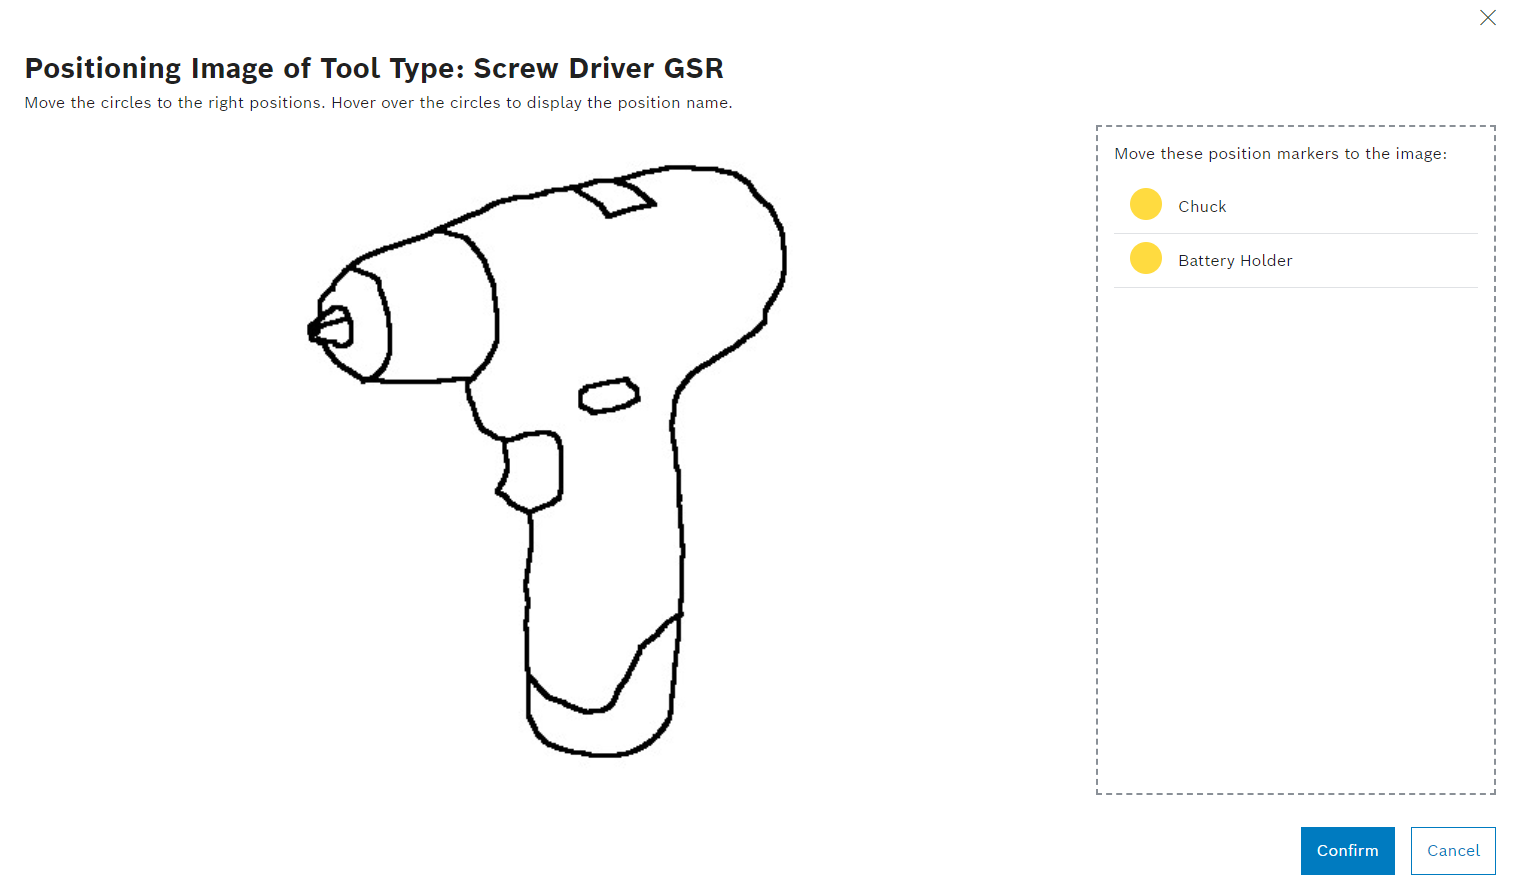
Type positions are displayed.
-
Set positions on the positioning image using drag-and-drop.
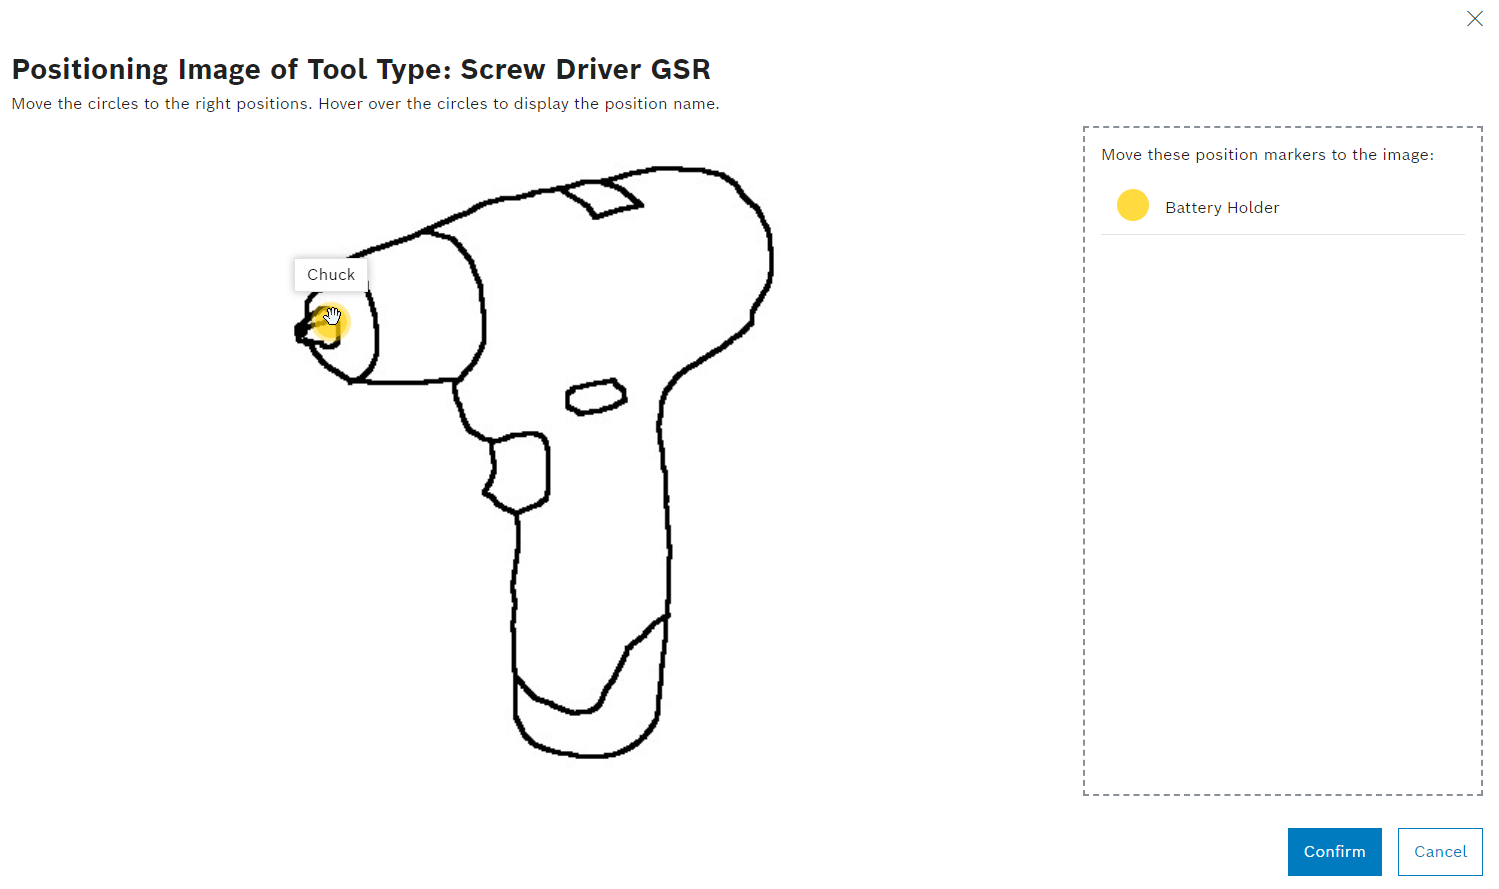
-
Confirm the location of the positions with Confirm.
The positions are set on the positioning image. Tools or components of this type can be attached and removed in the hierarchy in the positioning image.
-
To connect or remove tools and components from each other in the positioning image, continue with Attaching and releasing tools and components in the positioning image.
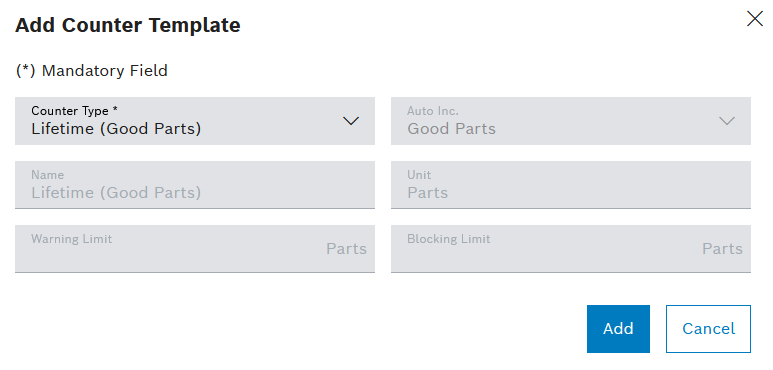
Create a counter template for the type
Counter templates can be created for the type. Counters are used when a tool or component of the type is created. The limits of the counters of the tool or component can be adjusted.
Prerequisite
-
Tool Management ExpertorTool Management Adminrole -
A type has been created.
Creating Type
Procedure
-
Click on the Tool Management > Tool Administration > Types tab.
-
Select type.
-
In the detailed view, click on the Counters tab.
-
Create counter template with
.
-
Select the Counter Type.
The fields Name, Auto Inc. and Unit can only be edited if the Custom counter type has been selected.
-
To create a custom counter template:
-
Select counter type Custom.
-
Enter the Name.
-
Select Auto Inc..
-: Do not count related to incoming usages.
Usages: Automatically count related to incoming usages. Unit is set automatically to Usages.
The Unit can only be selected when Auto Inc. has been set to _.
-
Select Unit.
The unit is displayed next to the fields Warning Limit and Blocking Limit.
-
-
Enter Warning Limit and Blocking Limit.
-
Create a counter template with Add.
The counter template is displayed on the Tool Management > Tool Administration > Types tab in the detailed view of the type on the Counters tab.
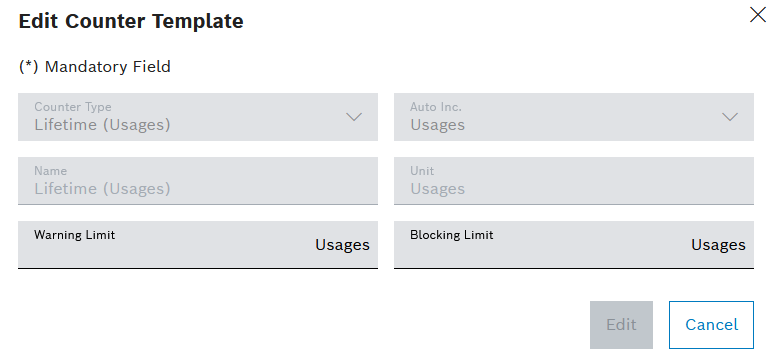
Configure the counter template limits of the type
The warning and blocking limits of the counter templates can be predefined. The warning and blocking limit is applied when a tool or component is created. Only the warning and blocking limits of a counter can be changed. To configure a counter, it must be deleted and created again.
Prerequisite
-
Tool Management ExpertorTool Management Adminrole -
A type has been created.
Creating a type -
A counter template has been created for the type.
Create a counter template for the type
Procedure
-
Click on the Tool Management > Tool Administration > Types tab.
-
Select type.
-
In the detailed view, click on the Counters tab.
-
Open the counter template from the table with
.
-
Enter Warning Limit and Blocking Limit.
-
Save warning and blocking limits with Edit.
The warning and blocking limit of the counter template is configured.
Assign failure to a type
Failures can be assigned to a type. Failures are created in the Tool Management > Configuration > Failures tab.
Prerequisite
Tool Management Expert or Tool Management Admin role
Procedure
-
Click on the Tool Management > Tool Administration > Types tab.
-
Select type.
-
In the detailed view, open the Failures tab.
-
Add failure to the type with
. -
Select Add Existing Failures.
Or:
Select Create New Failure.
After a new failure has been created, the failure is automatically assigned to the type.
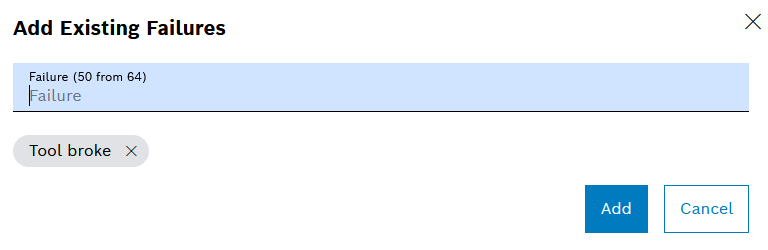
Multiple failures can be added at once.
-
Select the failure by entering the name of the failure in full or in part and selecting it from the drop-down list.
-
Assign the failure with Add.
The added failures are displayed in the Tool Management > Tool Administration > Types tab in the detailed view of the type. A newly created failure is displayed in the Tool Management > Configuration > Failures tab.
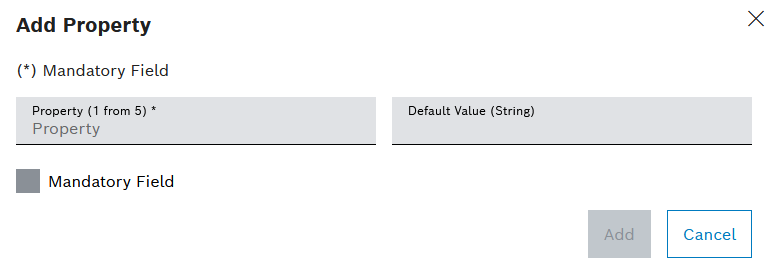
Assign a property to a type or a group
Properties can be assigned to a group or a type. Properties are created on the Tool Management > Tool Administration > Properties tab. The properties are adopted when a tool or a component of the type or the type’s group is created. The value of the property can be entered in the tool or component.
Prerequisite
-
Tool Management ExpertorTool Management Adminrole -
A type or a group has been created.
Creating a type -
A property has been created.
Creating a property
Procedure
-
Click on the Tool Management > Tool Administration > Types tab.
Or:
Open the Tool Management > Tool Administration > Groups tab.
-
Select type or group.
-
In the detailed view, go to the Properties tab.
-
Add property to the type or group with
.
-
Select the Property by entering the name of the property in full or in part and selecting it from the drop-down list.
-
If it is mandatory to fill in a property before releasing the tool, activate the Mandatory Field checkbox.
-
To pre-populate a value for the property in the tool or component, enter the Default Value.
-
Assign the property with Add.
-
Accept changes with Save.
-
Depending on configuration, enter Comment.
-
Confirm changes with Save.
The property is displayed in the Tool Management > Tool Administration > Types or Tool Management > Tool Administration > Group tab in the detailed view of the type or group in the Properties tab.
-
To edit the property, continue with Configure properties of the type or the group.
Configure properties of the type or the group
Properties are linked to the type or group. The value of the property is entered or selected in the tool or component. You can define a default value for the property in the type or the group. Entering a value in the property can be marked as required. If the property is required, the tool or component cannot be released if no value is entered for this property.
Properties can be created in the Tool Management > Configuration > Properties tab.
Prerequisites
-
Tool Management ExpertorTool Management Adminrole -
A type or a group has been created.
Creating a group
Creating a type -
A property has been created.
Creating a property -
A property has been assigned to the type or the group.
Assign a property to a type or a group
Procedure
-
Click on the Tool Management > Tool Administration > Types tab.
Or:
Click on the Tool Management > Tool Administration > Groups tab.
-
Select type or group.
-
In the detailed view, click on the Properties tab.
-
To remove a property from the type or the group:
-
Remove property with
.
-
-
To edit a property:
-
Open property with
. -
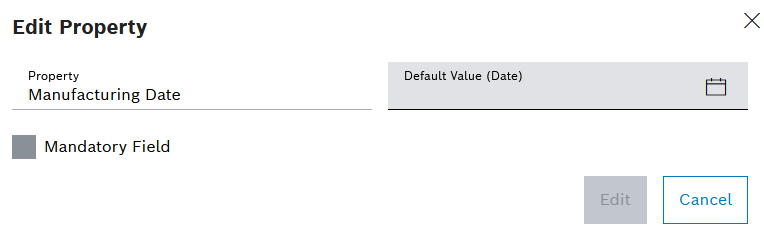
To set a value for the property in the tool or in the component, enter a Default Value.
-
If it is mandatory to fill in a property before releasing the tool, activate the Mandatory Field checkbox.
-
Save the property with Edit.
-
-
Accept changes with Save.
-
Depending on configuration, enter Comment.
-
Confirm changes with Save.
The properties of the type or the group are configured.
Create new mounting restriction for a type
Mounting restrictions can be created for a type in order to prohibit tools or components of the type from being mounted for a device or a device type.
Prerequisite
-
Tool Management ExpertorTool Management Adminrole -
A type has been created.
Creating a type
Procedure
-
Click on the Tool Management > Tool Administration > Types tab.
-
Select type.
-
In the detailed view, open the Restrictions tab.
-
To add a restriction for the type:
-
Enter the name of the device type in Device Type (X of X) in full or in part.
-
Select the device type and click
 .
.
-
-
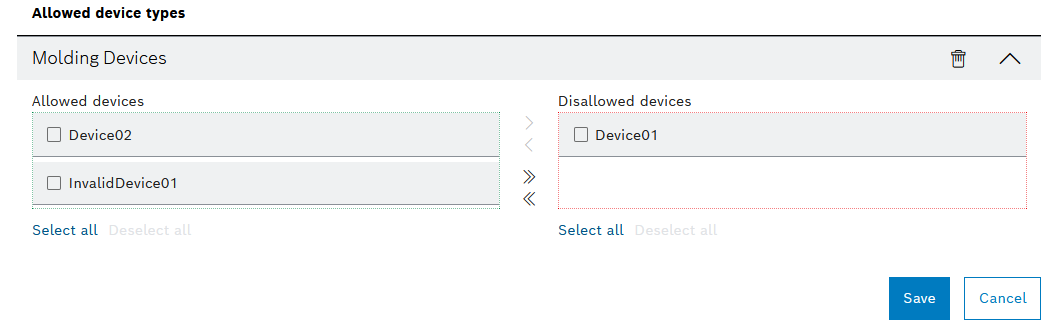
Prohibit mounting by moving devices from Allowed Devices to Disallowed Devices:
-
Click
 next to the device.
Or:
Select one or more devices via checkboxes next to the device names and click
 .
.Or:
Select all devices' checkboxes with Select All and click
.Or:
Select Add All.
-
-
Confirm the restriction with Save.
-
Accept changes with Save.
-
Depending on configuration, enter Comment.
-
Confirm changes with Save.
The tools or components of the type cannot be mounted in the devices.
Creating a history entry in the type history
All changes to the type are saved in the history. History entries can be created manually.
Prerequisite
Tool Management Expert or Tool Management Admin role
Procedure
-
Click on the Tool Management > Tool Administration > Types tab.
-
Select type.
-
In the detailed view, click on the History tab.
-
Create history entry with
.
-
Enter Comment.
-
Create history entry with Create.
-
The history entry is displayed in the Tool Management > Tool Administration > Types tab, in the detailed view of the type in the History tab.
-
Exporting the type history
The history of a type can be exported to an XLSX file. The filters on the History tab are applied when the history is exported.
Prerequisite
Tool Management Guest or Tool Management User or Tool Management Expert or Tool Management Admin role
Procedure
-
Click on the Tool Management > Tool Administration > Types tab.
-
Select type.
-
In the detailed view, click on the History tab.
-
Export history with
 Export As XLSX.
The history is saved to an XLSX file based on the set filters.
Create a link for a type
Links can be created for tool types or component types. Links of a type are also shown at the tool or component.
Prerequisite
Tool Management Expert or Tool Management Admin role
Procedure
-
Click on the _Tool Management > Types _ tab.
-
Select a tool type or component type.
-
In the detailed view, click on the Links tab.
-
Click
.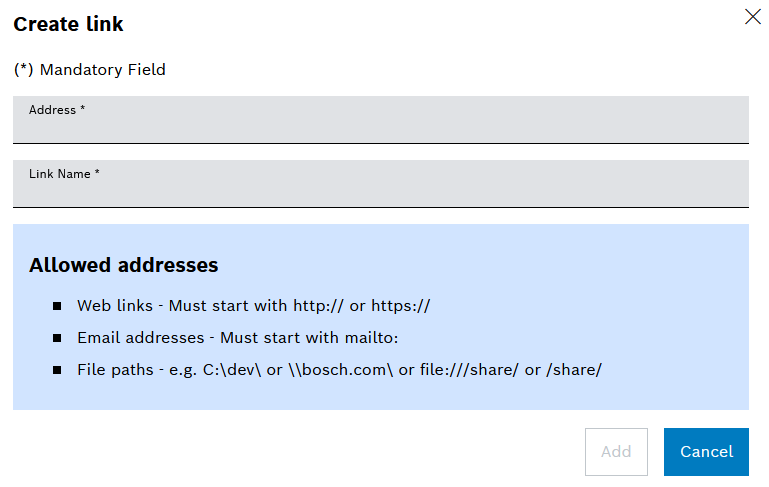
-
Enter Address.
-
Enter Link Name.
-
Create the link with Add.
-
Confirm changes with Save.
The link is displayed in the tool type or component type.
Deleting a type
Deleted types are no longer displayed. Deleted types can be displayed using the filter functions in the Tool Management > Tool Administration > Types tab.
|
Deleted types remain in the system. Creating a type will fail in case the same name is used as a deleted type. |
Prerequisite
-
Tool Management ExpertorTool Management Adminrole -
A type has been created.
Creating a type
Procedure
-
Click on the Tool Management > Tool Administration > Types tab.
-
Delete type with
.
-
Remove type with Delete.
The type is no longer displayed by default. Deleted types can be viewed and recovered via a filter.
Recovering a type
Deleted types can be recovered.
Prerequisite
-
Tool Management ExpertorTool Management Adminrole -
A type has been created.
Creating a type
Procedure
-
Click on the Tool Management > Tool Administration > Types tab.
-
Select
 .
.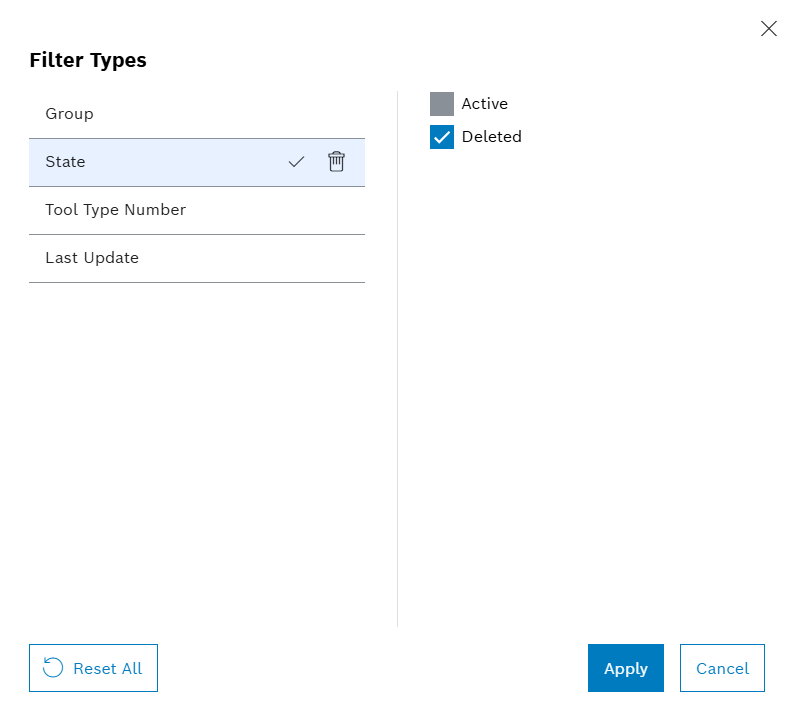
-
Set State filter to Deleted.
-
Apply filter with Apply-
-
-
Select
 for a type.
 -
Confirm with Recover.
The type is recovered.