Start a monitoring process
A new monitoring process starts by scanning a material, that has not been monitored before, at a location which target state is configured to be the start state of a monitoring process. A material, that has already been monitored before, can be monitored again if the current monitoring state is an end state.
Example: Scanning a new material at a location with target state InThawingPosition will start a new Single Stage Thawing monitoring process for this material.
A material that has already been monitored, can be monitored again if the current monitoring state is an end state.
| The material must not be blocked in order to start a monitoring process. |

Scanning sequence
Scanning material first
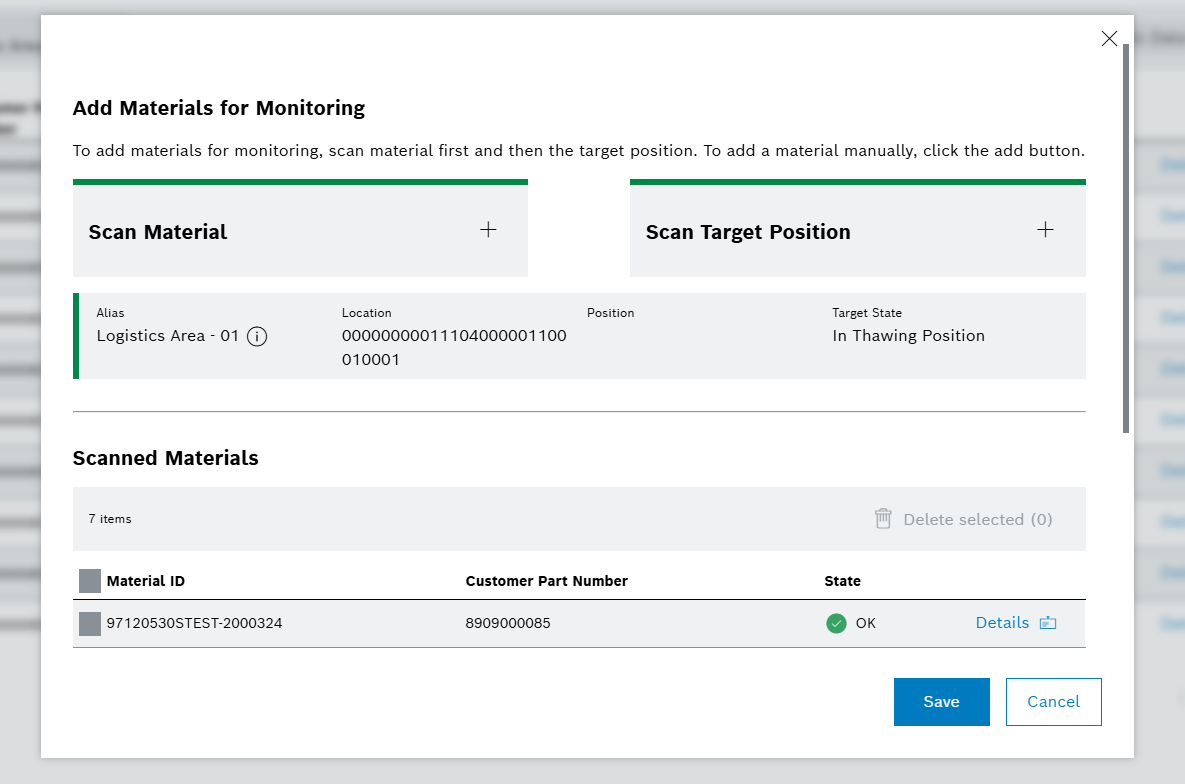
When a material is scanned before a target position, the scanned material will be added to the Scanned Materials List in the Add Materials for Monitoring window. Afterward more materials can be scanned. After finishing the material scanning, the target position must be scanned to start the monitoring process(es).
| After a location is scanned, the processes start automatically if materials were already added to the Scanned Materials List. |
Scanning target position first
When the target position is scanned first, the scanned target position is displayed in the Add Materials for Monitoring page. Afterwards materials can be scanned or scan results can be checked, without the monitoring process(es) starting automatically. Once the scanning is complete, the monitoring process(es) can be started by clicking Save in the Add Materials for Monitoring page.
| The previous behavior of automatically scanning a position, and then scanning a material, which automatically starts the process can still be replicated if the position is scanned once more after the material is added. |
Scanning
Materials and target positions can either be scanned by a USB-connected scanner or manually. Scanning a label opens the Add Material for Monitoring window, where further labels can be scanned and the results of the scans can be checked.
USB scanning
Prerequisites
MaterialManagement_Monitoring_User, MaterialManagement_Expert or MaterialManagement_Administrator role
Procedure
-
Scan a material or a location label with a usb-connected scanner.
The Add Material for Scanning window opens and further labels can be scanned.
Manual scanning
When scanning materials or target positions manually, all information in the Add Material for Monitoring window must be entered by hand. The entered label string must be valid and only preconfigured locations can be chosen.
Successful scans are marked with a  , whereas unsuccessful scans are marked with , whereas unsuccessful scans are marked with  . .
|
Prerequisites
MaterialManagement_Monitoring_User, MaterialManagement Expert or MaterialManagement Administrator role
Procedure
-
In the Material Management > Material Monitoring page click on
 .
.The Add Material for Monitoring window page open.
-
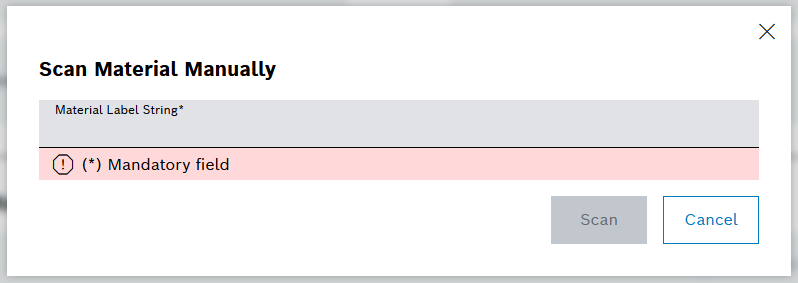
To enter a material label string, click on
 in the Scan Material field.
The Scan Material Manually window opens.
-
Enter a valid material label string and click on Scan.
-
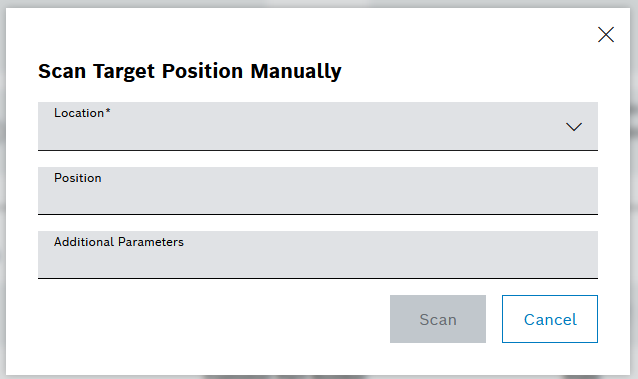
To enter a target position, click on
in the Scan Target Position field.The Scan Target Position Manually window opens.
-
In the drop-down list Location , chose a location and enter additional information if necessary.
-
To save the location, click on Scan. .Continue with Start Monitoring.
Start monitoring
Prerequisites
-
MaterialManagement_Monitoring_User,MaterialManagement ExpertorMaterialManagement Administratorrole -
Materials and location are scanned.
-
In the Add Materials for Monitoring window, ensure that all scanned Material IDs are marked with
. -
Click on Save.
The monitoring process is indicated and a loading bar shows the progress.
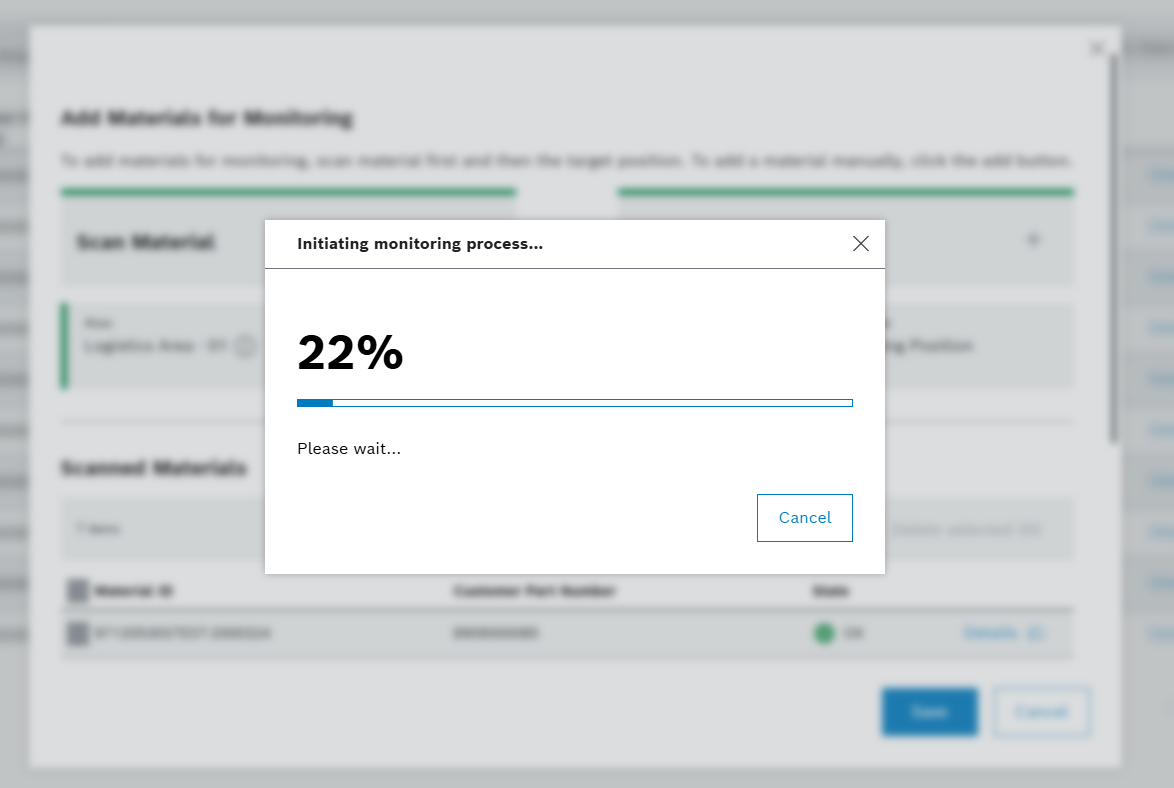
After the loading bar reaches 100%, the monitoring process(es) for the scanned materials are started and the current state is displayed in the Material Monitoring page.
| If errors occur during the initialization of the monitoring processes, the Process Start Results dialog is shown. No further scanning is possible until the dialog is closed. |
Scanning errors
During the scanning process several errors can occur. Errors are displayed via notification in the Web Portal and with different banners and icons in the Material Monitoring page.
-
If an erroneous location is scanned, a banner is shown that the user scanned a label that could not be parsed.
-
If an erroneous label is scanned, the user is notified that the given label could not be parsed as a material label.
-
If a material label could be parsed, but the material could not be created, the material is added to the Scanned Materials List in the Add Materials for Monitoring window with an error icon indicating that the material creation was unsuccessful. To get more information about the error, click on Details to open the Scanned Material Details page.
-
If an error occurred while starting the monitoring process for a material, the error is displayed in the Process Start Results dialog with additional information.
Process start results dialog
If errors occur during the initialization of the monitoring processes, the Process Start Results dialog is shown. This dialog displays the processes that could not be started and the successfully started processes in separate tables.
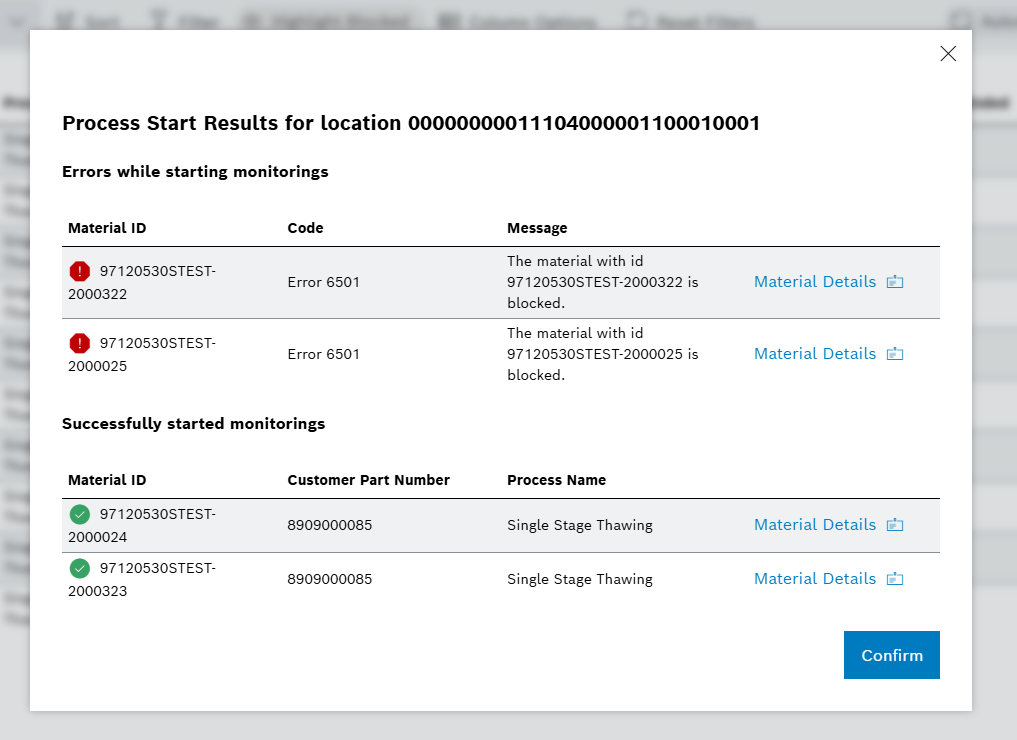
| As long as the Process Start Results dialog is opened, no further scanning is possible. To close the dialog, click on Confirm. |