Downtimes
The following types of downtimes exist:
-
One-off downtimes/4M downtimes (planned/unplanned)
-
Downtime series/regular 4M downtimes (planned only)
As soon as the current time + offset (configurable in Shopfloor Management Administration ) reaches the start of a downtime belonging to a downtime series, it is automatically transformed into a regular, individual downtime. It is no longer part of the (downtime) series, i.e. changes to the series no longer affect it. It can be edited in the calendar overview.
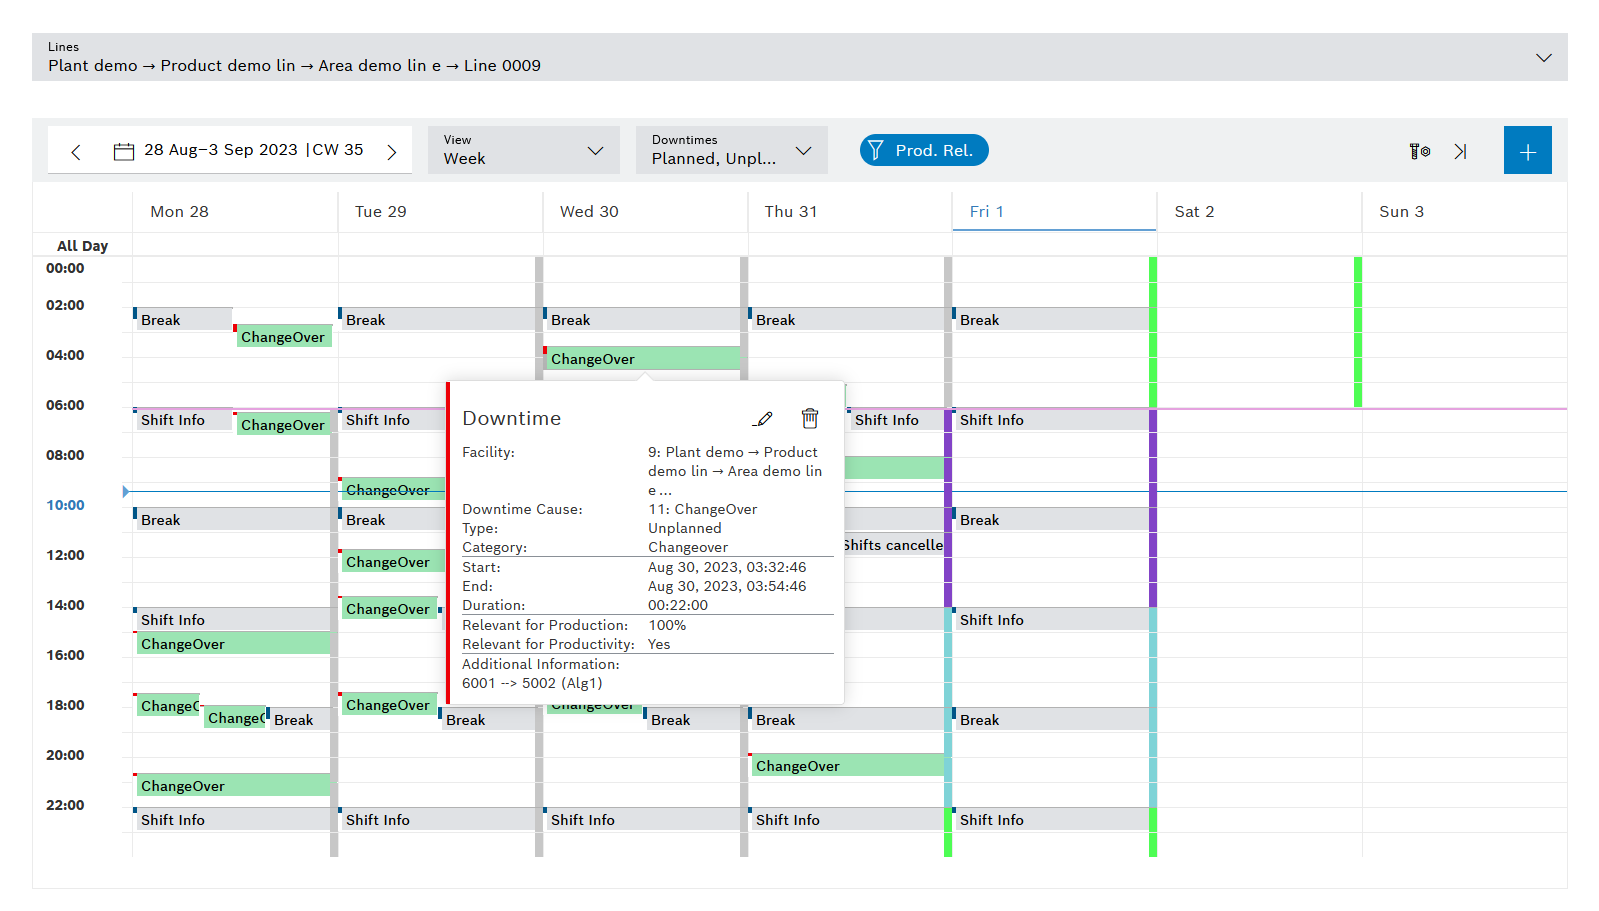
Viewing downtime details
Prerequisites
-
Shift Book GuestorShift Book UserorShift Book LeaderorShift Book Adminrole -
The Shift book tab is open. Shift book tab.
Procedure
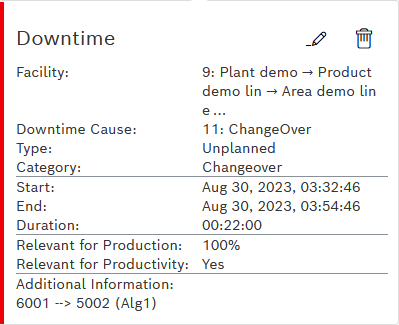
Click the required downtime.
Details of the downtime are displayed in a pop-up.
Add a downtime or downtime series
Prerequisites
-
Shift Book UserorShift Book LeaderorShift Book Adminrole -
The Shift book tab is open. Shift book tab.
Procedure
-
To add a downtime, a downtime (now) or a downtime series:
-
Downtime/downtime series. Click
 and select the Add Downtime option.
If a time range has been selected in the calendar before
is clicked, this time range is automatically applied. -
Downtime (now): Click on
 .
.If a cell has been selected in the calendar before
is clicked, this time is automatically applied as the start time. The current time is entered as the end time.The Add Downtime or Add Downtime (Now) dialog is open. Adding Downtime Dialog or Add Downtime (Now) Dialog
-
-
Enter data.
-
Click Save.
-
If maintenance tasks are to be created for a downtime, activate the Open Maintenance Tab checkbox. Operating Instructions | Maintenance Management
-
Click Add.
The Maintenance tab opens.
-
To add a maintenance task, click
. Create Corrective Task or Create preventive task
The added downtime or added downtime series is displayed in the calendar view. A downtime series is indicated by the  icon.
icon.
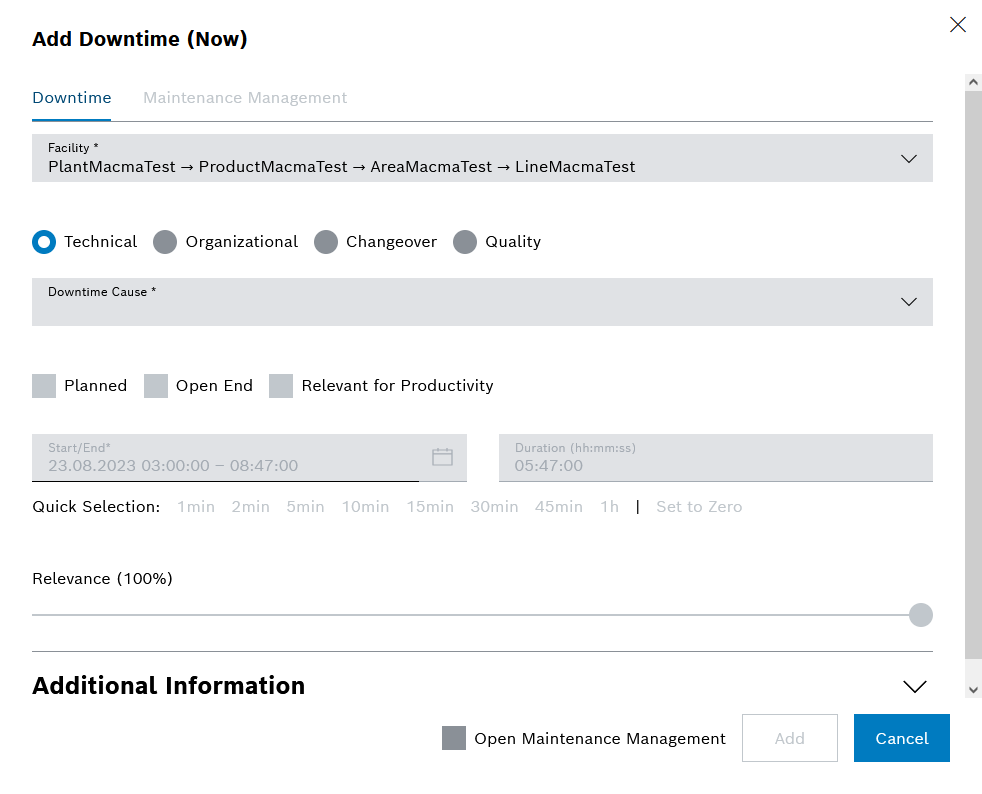
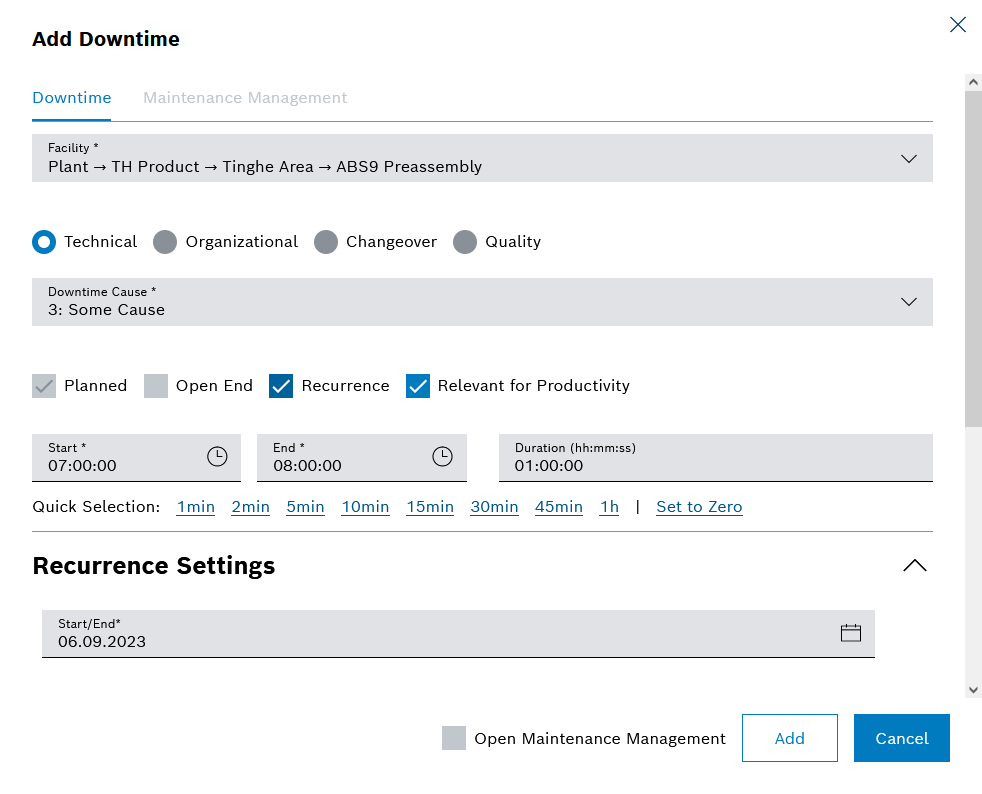
Adding downtime dialog

| Element | Description | ||
|---|---|---|---|
Facility* |
Selection of the facility affected by the downtime |
||
Technical/organizational/changeover-related/quality losses |
Selection of the type of downtime |
||
Downtime cause* |
Selection of the cause of downtime
|
||
Planned/Open End/Series/Relevant for Productivity |
Choose between:
|
||
Start/end* |
Start date and time (from – to) of the downtime in the format: date + hours:minutes:seconds
|
||
Duration |
Duration of the downtime in the format: hours:minutes:seconds.
|
||
Quick selection |
Links to add/subtract predefined fixed times to/from the current duration |
||
Relevance |
0 % = Time-neutral 50 % = Facility output halved 100 % = Facility is at a standstill |
||
Additional information |
Notes
|
||
Open Maintenance |
To add a maintenance task, see the Maintenance Dialog
|

Add downtime (now) dialog
| Element | Description |
|---|---|
Start/End* |
Date and time (from – to) of the downtime in the format: date + hours:minutes:seconds
|
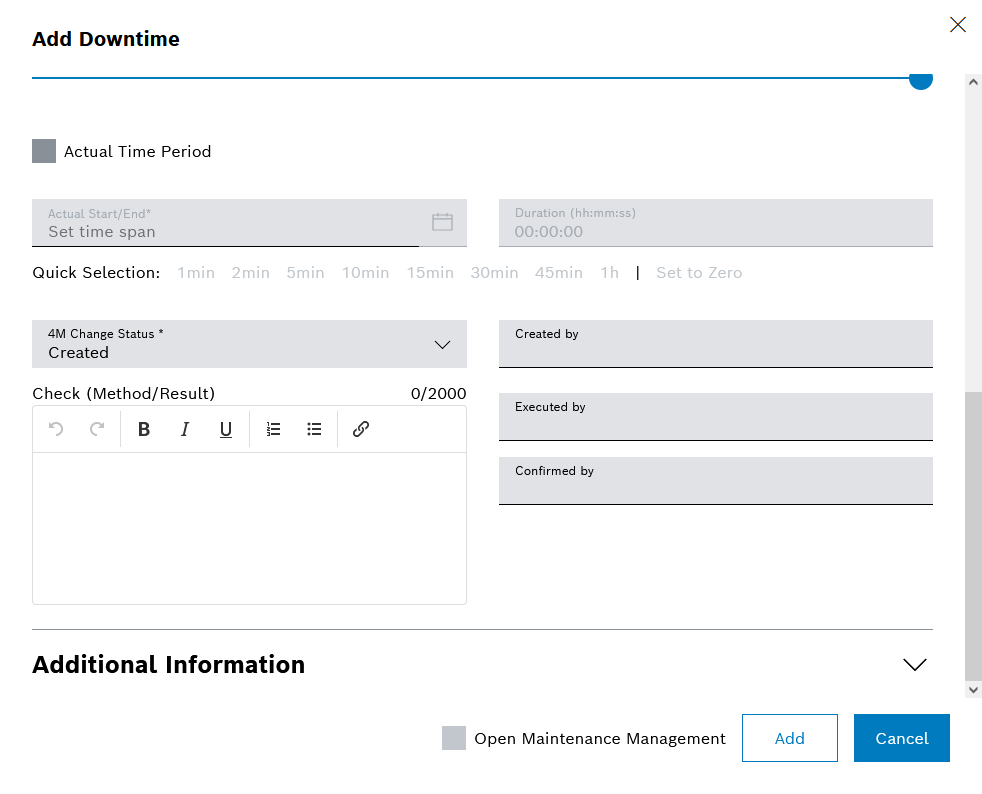
4M downtime action dialog
When selecting a 4M cause of downtime, the Add downtime dialog expands to include the following fields:
| Element | Description |
|---|---|
Machine, Man, Material, Method |
Selection of the 4M reference for the downtime: Machine, Man, Material, Method |
Planned start/planned end* |
Planned start date and time (from – to) of the downtime in the format: date + hours:minutes:seconds |
Duration |
Duration of the downtime in the format: hours:minutes:seconds. |
Quick selection |
Links to add/subtract predefined fixed times to/from the current duration |
Actual time period |
Selection of actual time period: Activates the input fields for entering the actual start and end |
Actual start/actual end* |
If Actual time period is enabled: Actual start date and time (from – to) of the downtime in the format: date + hours:minutes:seconds |
Duration |
If Actual time period is enabled: Duration of the downtime in the format: hours:minutes:seconds. |
Quick selection |
Links to add/subtract predefined fixed times to/from the current duration |
Confirmation status* |
Selection of the current status of the 4M downtime |
Adaptation description |
Description of the adaptation. Initialized depending on the selected 4M downtime cause |
Scheduled by |
Organizational unit (group of people) that initiated the 4M downtime action |
Executed by |
Organizational unit (group of people) that executed the 4M downtime action |
Confirmed by |
Organizational unit (group of people) that is responsible for the 4M downtime action |
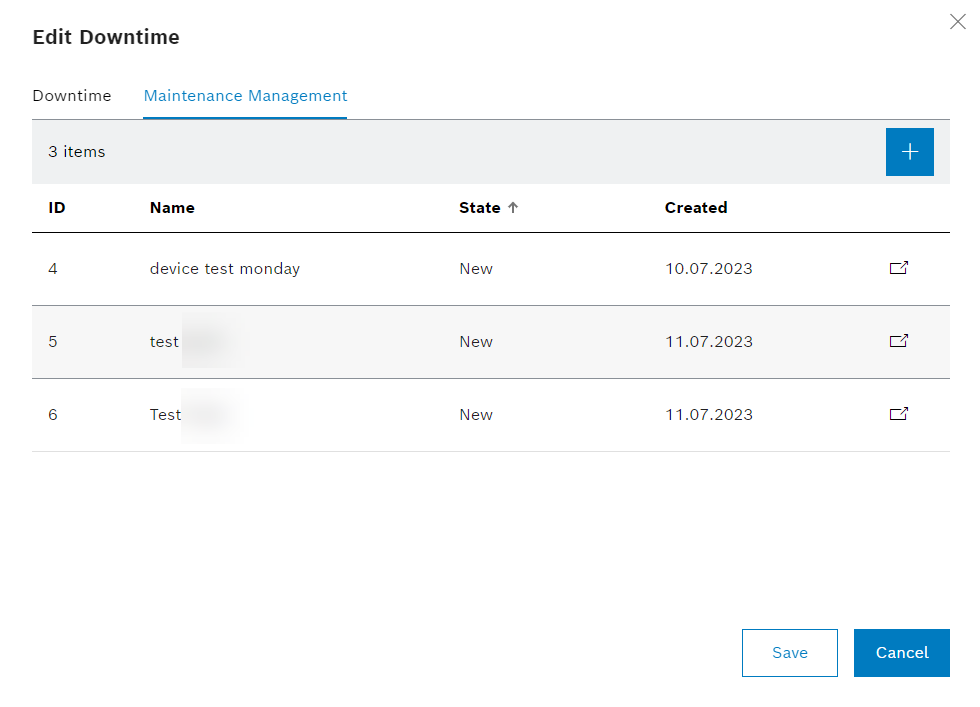
Maintenance dialog
In the Maintenance tab, you can view the maintenance tasks for the downtime or create new maintenance tasks.
|
To display the maintenance tab, the Maintenance Management module must be installed (see Operating Instructions | Maintenance Management ). The Enable Maintenance Management Integration setting must have been activated in Shopfloor Management Administration (see Global configuration ). |
| Element | Description |
|---|---|
|
To add a maintenance task, see Create Corrective Task |
List of Maintenance Tasks |
Maintenance tasks that have been added to the downtime |
Add downtime series dialog
When the Series option is activated, the Add downtime dialog expands to include the following fields:
| Element | Description | ||
|---|---|---|---|
Daily |
Selection of every x-th day or every x-th working day
|
||
Weekly |
Selection of desired days of the week, repeated every week |
||
Monthly |
Selection of every x-th day every y-th month or of every x-th day of the week every y-th month |
Copy downtime
Prerequisites
-
Shift Book UserorShift Book LeaderorShift Book Adminrole -
The Shift book tab is open. Shift book tab.
Procedure
-
Click a downtime or a downtime as part of a downtime series in the calendar and click
 . Alternatively, use CTRL and drag-and-drop to move the downtime to the desired position.
Open-ended downtimes and automatically created downtimes cannot be copied.
4M downtimes can be copied. Subsequent 4M properties are reset in the process.
The Copy downtime dialog opens.
-
In Start of the copied downtime , select the desired date and time for the downtime.
The downtime has been copied to the desired day.
|
Depending on the target time, the type of the copied downtime is changed to planned/unplanned. |
Edit downtime
Prerequisites
-
Shift Book UserorShift Book LeaderorShift Book Adminrole -
The Shift book tab is open. Shift book tab.
Procedure
-
Double-click the downtime.
Or:
Click the downtime and then click
 .
.The Edit downtime dialog opens. The content corresponds to the Add downtime dialog.
-
Make changes.
-
Click Save.
The downtime is changed.
-
To change the start or end of the downtime, press and hold down the mouse button on the top or bottom edge of the downtime in the calendar, then drag the edge as required.
-
To move the downtime, press and hold down the mouse button in the center of the downtime in the calendar, then drag the downtime as required.
|
Planned downtimes that are postponed or extended at short notice become unplanned downtimes. |
Delete downtime
Prerequisites
-
Shift Book UserorShift Book LeaderorShift Book Adminrole -
The Shift book tab is open. Shift book tab.
Procedure
-
Click the required downtime.
Details of the downtime are displayed in a pop-up.
-
Click
 .
. -
In the confirmation dialog that opens, click Delete.
The downtime is deleted.
Edit downtime series
Prerequisites
-
Shift Book UserorShift Book LeaderorShift Book Adminrole -
The Shift book tab is open. Shift book tab.
Procedure
-
Double-click the downtime series.
Or:
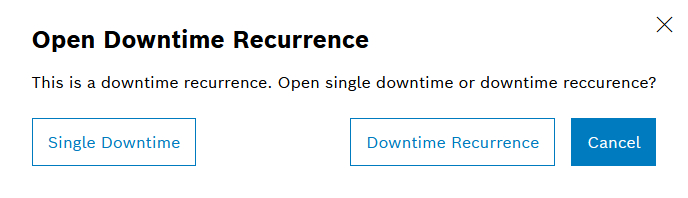
Click the downtime series, then click
.The Open downtime series dialog opens.
-
Select one of the options.
-
To edit an individual downtime of the downtime series, click Individual downtime.
-
To edit the entire downtime series, click Downtime series.
The Edit downtime dialog opens. The content corresponds to the Add downtime dialog.
-
-
Make changes.
-
Click Save.
The downtime series is changed. A modified individual downtime of a downtime series is marked with  .
.
|
Individual downtimes marked with |
Delete downtime series
Prerequisites
-
Shift Book UserorShift Book LeaderorShift Book Adminrole -
The Shift book tab is open. Shift book tab.
Procedure
-
Double-click the downtime series.
Or:
Click the downtime series, then click
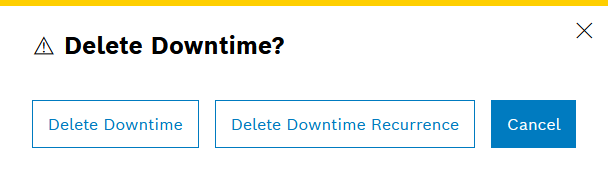
.The Remove downtime? dialog opens.
-
Select one of the options.
-
To delete an individual downtime of the downtime series, click Delete downtime.
-
To delete the entire downtime series, click Delete series.
-
The downtime or downtime series is removed.