Navigate the topology
The topology working area contains several navigation elements, which are described below.
Search field
Use search criteria (ID number or name) to find specific elements in the topology:
-
Enter the search criteria in the search field.
Once the second character has been typed, all items with a name or ID beginning with these characters are displayed as a list.
-
Select the appropriate item from the list or enter additional characters to further narrow down the search.
-
Click the item found in the list or click
 .
.
The item(s) found are highlighted in the topology.
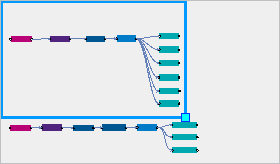
Child element filter
All elements that are in a topology string to the right of a specific element (parent element) are known as child elements.
![]() and
and ![]() at the bottom right corner of an element can be used to selectively hide or show child elements.
at the bottom right corner of an element can be used to selectively hide or show child elements.
|
These symbols are not always displayed — they only appear when you move the mouse over a parent element. |
-
Place the mouse pointer over the parent element in the topology, but do not click.
 appears.
 -
Click
.The child elements are hidden.
-
To show the child elements, place the mouse pointer on the parent element in the topology again.
 appears.
 -
Click
.
The child elements are displayed.
Selection frame
The selection frame marks the area of the topology visible on the screen:
-
Move the selection frame or resize it with the pull point
 at the bottom right.
The visible area of the topology changes accordingly.
-
To hide or show the selection frame, click
 .
.
The selection frame changes the visible area, is hidden or displayed.
Edit topology configuration
-
Call up the Topology tab.
-
Click
 .
. -
The Configure topology dialog window appears.
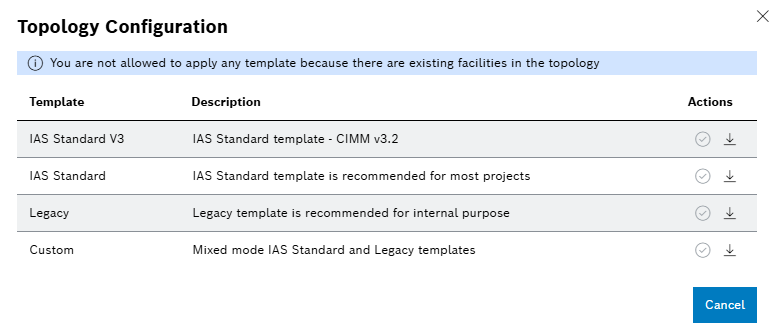
Users can now choose their preferred configuration of the facility type—either IAS Standard, Legacy, or custom template—ideally before initiating the master data configuration process.
-
Click
 to apply the appropriate template.
This icon is not enabled if there is facility in the working area.
-
Click
 to download the desired template.
Edit topology settings
-
Call up the Topology tab.
-
The Topology settings dialog window appears.
-
In the Arrangement method selection field, select the type of topology representation.
Horizontal : All elements of the individual topology strings are arranged horizontally.
Vertical : All elements of the individual topology strings are arranged vertically.
-
To arrange the elements in the topology view automatically, activate the Activate automatic arrangement check box.
A user-specific ordering of the elements that has already been made is discarded. If not activated, the user-specific arrangement remains.
-
To load all element levels, activate the Multi-level loading check box.
This leads to long loading times for large topology. If not activated, only the facility below the selected item are loaded.
-
Click Save.
The topology settings are applied and the topology representation is displayed accordingly.

