Using task templates for machines
|
Templates having Disabled or Released status cannot be edited. |
If a machine task template is selected from the Machine Task Templates menu entry, the detailed view of the template opens. It contains template details, tabs and a footer. The template details and footer do not change when the various tabs are accessed.
Tabs
The detailed view contains the following tabs:
-
Machine task template - Instructions tab
Headlines, descriptions and instructions for executing the upcoming prventive tasks.
-
Machine task template - Applicable for tab
Definition of device types or devices the task template can be used for.
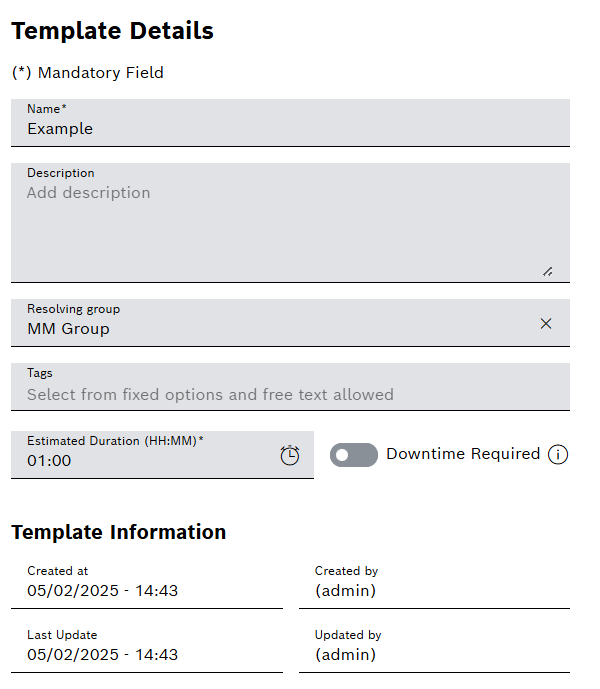
Template Details
| Element / Icon | Description |
|---|---|
Name |
Name of the task template. |
Description |
Description of the task template. |
Resolving Group |
Resolving group assigned to the task template. |
Tags |
Task template tags. Task template tags can be used to filter task templates. |
Estimated Duration |
Indicates how long the task is expected to be completed. |
Downtime Required |
Specifies whether the device must be turned off for the preventive task:
Yes The device must be turned off. No The device does not need to be turned off. |
Template Information |
Created At Date and time when the task template was created. Created By Person who created the task template. Last Update Date and time when the task template was updated. Updated By Person who updated the task template. Template Type Type of the template:
|
Template Version Information |
Last Update Date and time when the version was updated. Updated By Person who updated the version. Status
Version The template version. |
Available Versions |
List of the versions of the task template. If a version is selected, the detailed view of the version opens. Templates having Disabled or Released status cannot be edited. To edit the task template, a new version of the task template must be created. |
|
Create a new version of the task template. Version The template version. Release State The colored circle indicates the release status of the version:
Last Update Date and time when the version was updated. Updated By Person who updated the version.
Delete version. |

Footer
| Element / Icon | Description |
|---|---|
Save |
Save entered descriptions and changes to the task template. |
Cancel |
Cancel any change to the task template. |
Release/Disable |
If the status of the task template is Draft, change the status of the task template to Released. If the status of the task template is Released, change the status of the task template to Disabled. |
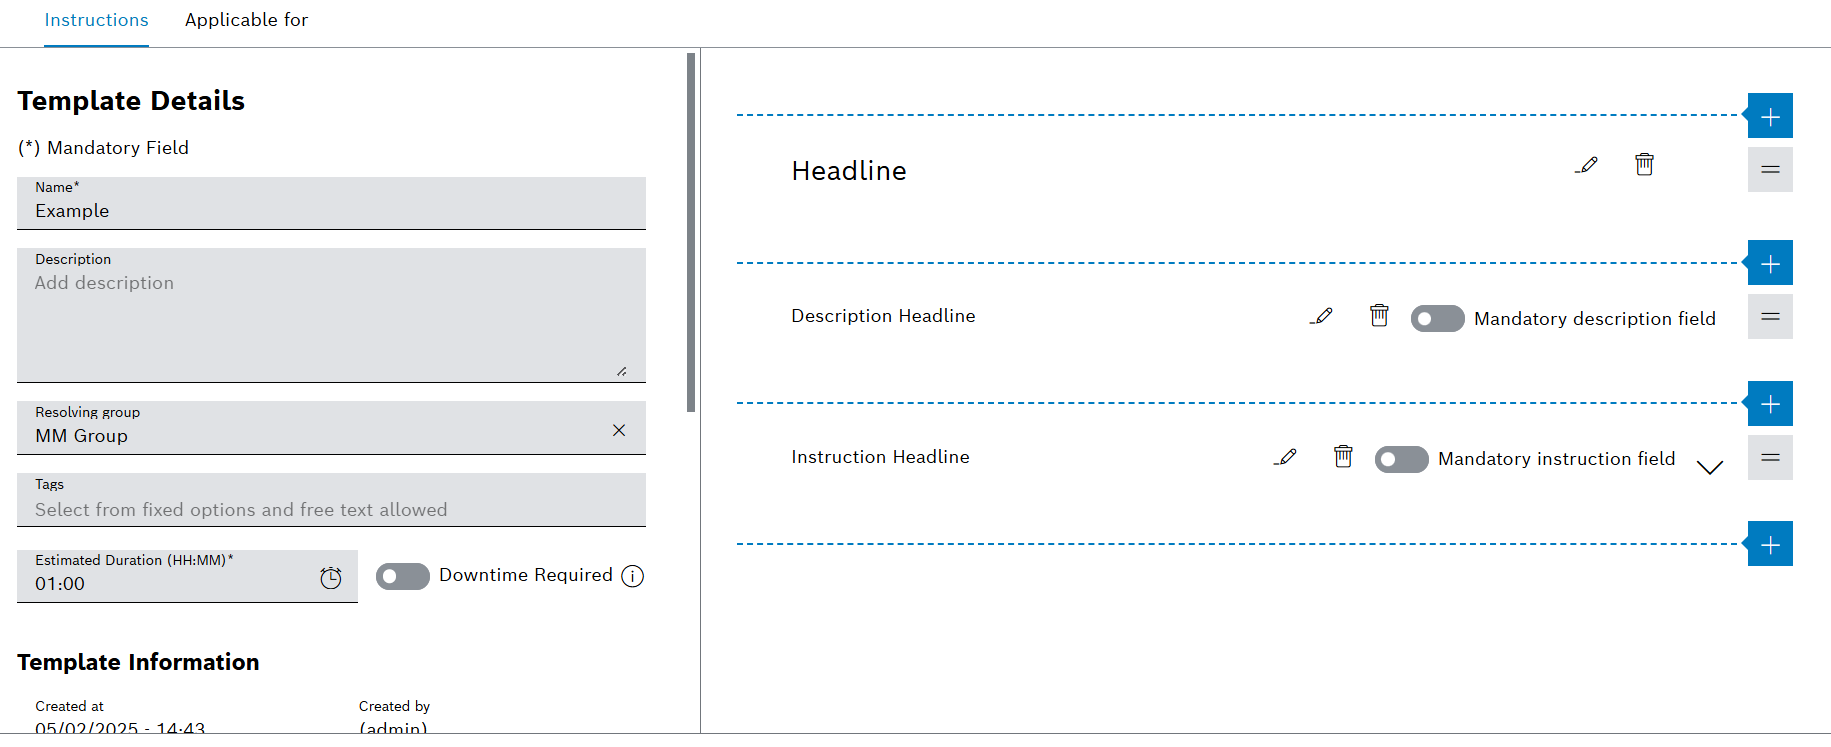
Machine task template - Instructions tab
If a task template is selected in the Maintenance > Machine Task Templates, the detailed view of the task template opens. Headlines, descriptions and instructions can be configured in the detailed view in the Instructions tab.
|
The elements of type Headline, Description Field and Instruction Field may appear more than once. |
| Element / Icon | Description |
|---|---|
Headline |
Headlines can be used for structuring the work steps. |
Description Field |
Description headline with mandatory option. The user will be able to enter a description in the upcoming preventive task. |
Instruction Field |
Instruction headline with mandatory option, instruction description and file attachments. The user will be able to confirm the instruction by a checkbox in the upcoming preventive task. |
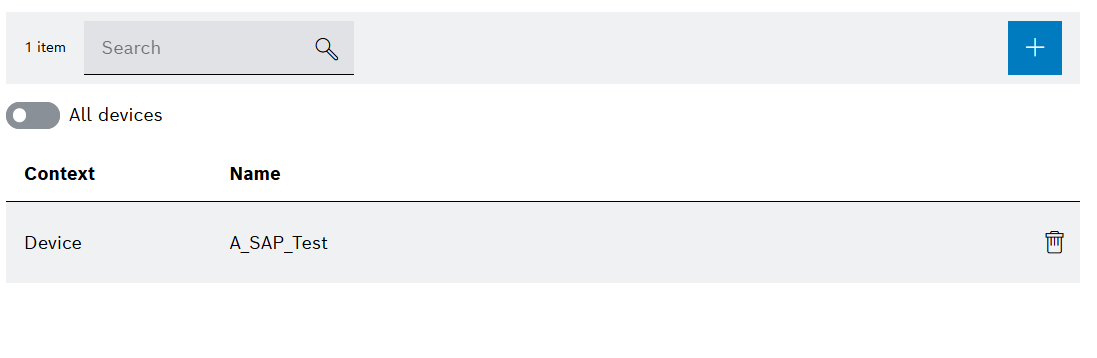
Machine task template - Applicable for tab
The applicable for tab defines for which device types or devices the task template can be used for. It is also possible to allow the template to be used for all devices.
| Element / Icon | Description |
|---|---|
<nn> items |
Number of applicable for entries. |
Search |
Search for applicable for entry. Enter name of device type or device in full or in parts. |
|
Add device type / device. |
|
Enable / disable all devices. |
Context |
Device Type or Device |
Name |
Name of device type or device. |
|
Delete device type / device. |

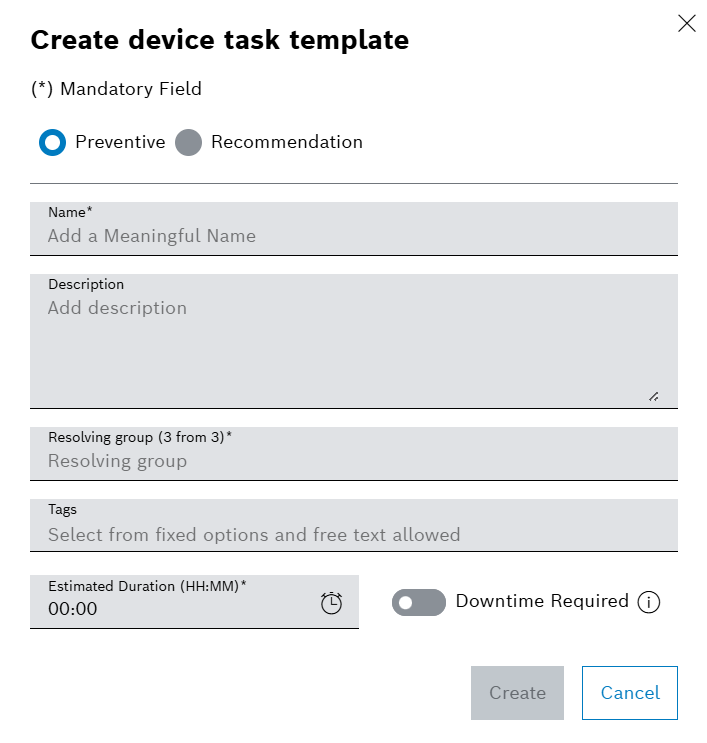
Create machine task template
Prerequisite
Administrator role
Procedure
-
Open the Maintenance > Machine Task Templates menu entry.
-
Create a task template with
 .
.
-
Select Preventive or Recommendation
-
Enter Name.
-
Enter the Description.
-
Select Resolving Group.
-
Select Tags from the drop-down list.
Or:
Enter Tags.
-
Enter the Estimated Duration of the work.
-
If a downtime is required, enable
 Downtime Required.
 -
Create task template with Create.
The task template is displayed in the Maintenance > Machine Task Templates menu entry.
-
To edit the task template details, continue with Configure details of a machine task template.
-
To add instructions to the task template, continue with Configure instructions for a machine task template.
Configure details of a machine task template
Prerequisite
User or Administrator role
Procedure
-
Open the Maintenance > Machine Task Templates menu entry.
-
Select a task template.
-
Enter Name.
-
Enter Description.
-
Select Resolving Group.
Any number of tags can be assigned to a task template.
-
Select Tags from the drop-down list.
Or:
Enter Tags.
-
Enter the Estimated Duration of the work.
-
If a downtime is required, enable
Downtime Required. -
Confirm details with Save.
The task details of a task template are configured.
-
To add instructions to the task template, continue with Configure instructions for a machine task template.
Configure instructions for a machine task template
Prerequisite
Administrator role
Procedure
-
Open the Maintenance > Machine Task Templates menu entry.
-
Select a task template.
-
In the detailed view, click on the Instructions tab.
-
To add a headline:
Insert a headline to structure the work steps in the upcoming preventive task.
-
Select
. -
Select Add Headline from the drop-down list.
-
-
To add a description field:
Insert a description field so that the user can describe executed work in a text field in the upcoming preventive task.
-
Select
. -
Select Add Description Field from the drop-down list.
-
-
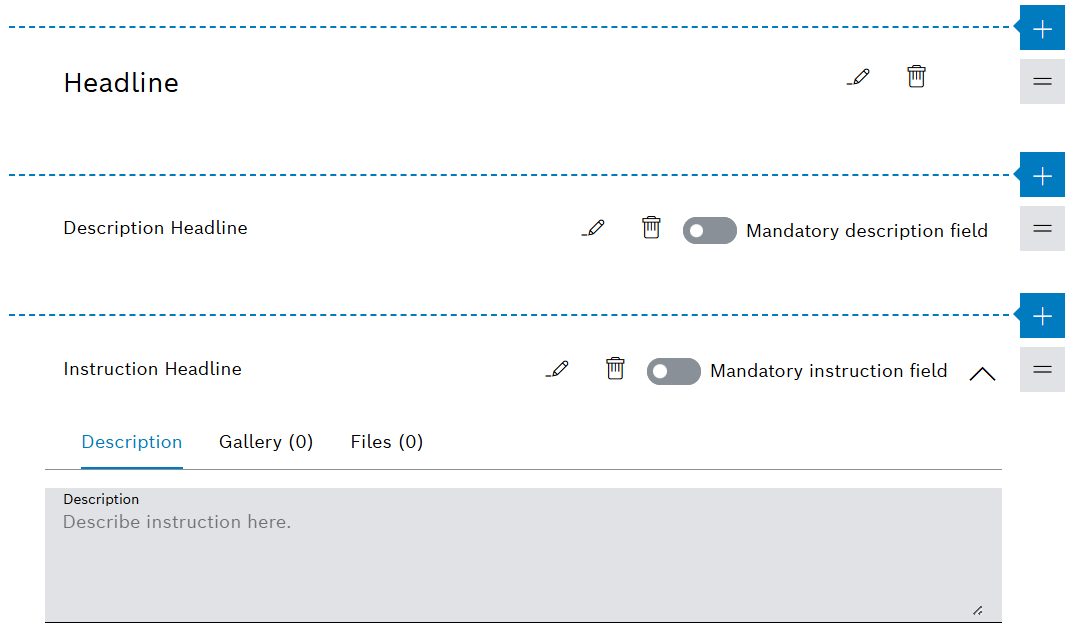
To add an instruction field:
Insert an instruction field so that the user can confirm executed work by a checkbox in the upcoming preventive task.
-
Select
. -
Select Add Instruction Field from the drop-down list.
-
Expand the instruction field with
 .
. -
Enter the description of the instruction.
The description is displayed next to the checkbox in the upcoming preventive task.
-
-
To move a headline, description field or instruction field, click and hold the mouse button over the field for two seconds, then move it.
-
To change the text of a headline, description headline or instruction headline:
-
Select
 .
. -
Enter the text.
-
Confirm the text with
 .
.
-
-
Set the mandatory option for a description field or instruction field:
-
Select the description field or instruction field.
-
Enable
 Mandatory Description Field.
Or:
Enable
Mandatory Instruction Field.
-
-
Save changes to the task template with Save.
Files cannot be added until the task template has been saved.
-
Add files to an instruction field:
-
Select the instruction field.
-
Expand the instruction field with
. -
Click on the Files tab in the description.
-
Use
 Add Attachments to upload a file.
Or:
-
Drag and drop the file into the field.
Images are displayed in the Gallery tab.
-
-
Release the task template with Release.
The task template is configured and released. The task template can be selected as a template when creating a preventive task.
-
To edit the details of the task template, continue with Configure details of a machine task template.
-
To create a schedule for the task template, continue with Create or configure a schedule for a machine task template.
-
To create a preventive task with the task template, continue with Create preventive task.
Configure applicable for settings for a machine task template
Prerequisite
Administrator role
Procedure
-
Open the Maintenance > Machine Task Templates menu entry.
-
Select a task template.
-
In the detailed view, click on the Applicable For tab.
-
To add a device type:
-
Select
. -
Select Device Type from the drop-down list.
-
Select the specific device type from list.
-
Select Add.
-
-
To add a device:
-
Select
. -
Select Device from the drop-down list.
-
Select the specific device from list.
-
Select Add.
-
-
To allow template to be used for all devices:
-
Enable
All Devices.
-
-
To delete a Device Type or Device:
-
Select
 .
.
-
-
Save changes with Save.
The applicable for settings are configured.
-
To edit the details of the task template, continue with Configure details of a machine task template.
-
To create a schedule for the task template, continue with Create or configure a schedule for a machine task template.
-
To create a preventive task with the task template, continue with Create preventive task.
Create or configure a schedule for a machine task template
Prerequisite
User or Administrator role
Procedure
-
Open the Maintenance > Schedules menu entry.
-
Create a schedule with
.Or:
Select a schedule.
-
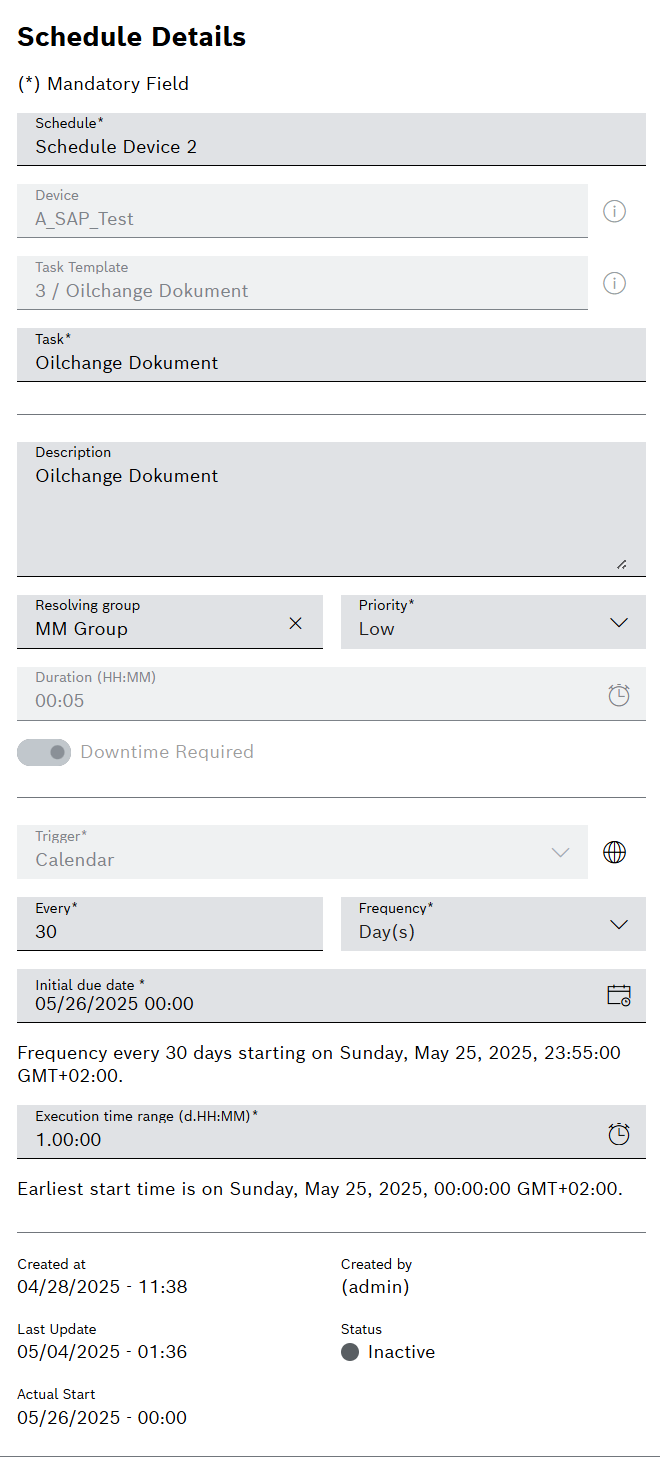
Enter the name of the Schedule.
-
Filter devices by selecting one or more Facilities or scan the QR code.
Or:
Select the Device from the drop-down list.
-
Select Task Template for which the schedule is valid.
-
Enter name of the preventive Task.
-
Enter Description of the preventive task.
-
Select Resolving Group.
-
Select the Priority.
Duration and Downtime Required are displayed for information purposes and can only be edited in the task template.
-
Select the execution type for the schedule in the Trigger drop-down list:
Calendar : The preventive task is created continuously at a set time.
For example, the preventive task can be created every Monday.
Continuous : The preventive task is created continuously.
For example, the preventive task can be created every 3 days, regardless of the days of the week.
-
To select a time zone, click
 and choose Timezone from the drop-down list.
 -
Select Every and Frequency.
The Every and Frequency fields are used to set how often a preventive task is created. * Select the frequency of execution with the Every field. * Select the unit from the Frequency drop-down list.
-
Select Initial Due Date.
The due date specifies when the preventive task is to be created with the schedule for the first time.
-
Select the Execution Time Range.
The execution time range specifies the period before the initial due date in which the preventive task can be started.
-
Create a schedule or confirm its changes with Save.
The schedule is displayed in the Maintenance > Schedules menu entry and the first preventive task is created. As soon as the preventive task is resolved, the next preventive task is created with the defined schedule.