Cart management
Cart Management is used to create and manage carts and station groups so that a connection to the Smart Replenishment Service (SrS) can be established.
|
To use station groups in the SrS, Cart Management of the lines that are in use must be enabled in Admin Settings. |
Cart Management consists of three windows:
-
Station Groups
Grouping of stations with a defined station group setup. If a station group has multiple variants of station group setups, the variants are subordinate to the station group. The station group setup can be set up in the Station Group Setup window.
Station Groups window -
Carts
Creation of carts for the SAP system. The carts can be added to the stations in the Station Group Setup window. Carts shown in red are already assigned to a station.
Carts window -
Station Group Setup
Set up the station group or variant of the station group setup selected in the Station Groups window. A station group consists of several stations that contain tables and carts. In the Station Group Setup window, the stations are arranged from left to right as in the physical production line.
Station Group Setup windowThe title of the Station group setup window is the name of the station group selected in the Station Groups window that is being set up.
Setting up Cart Management
In order to work with Cart Management , data from the carts must be imported, station groups created and station groups set up.
Prerequisite
SAP data for the carts is available.
Procedure
-
Import data for the existing carts.
Adding carts
Importing Changeover Carts -
Create station groups.
Adding a station group
Importing Station Groups -
Set up the individual station groups:
The data is stored in Cart Management and can be viewed by selection. Cart Management can be used to manage station groups and carts.
Carts window
In the Carts window, carts can be created with the data from the SAP system. The carts can be assigned to the stations in the Station Group Setup window.
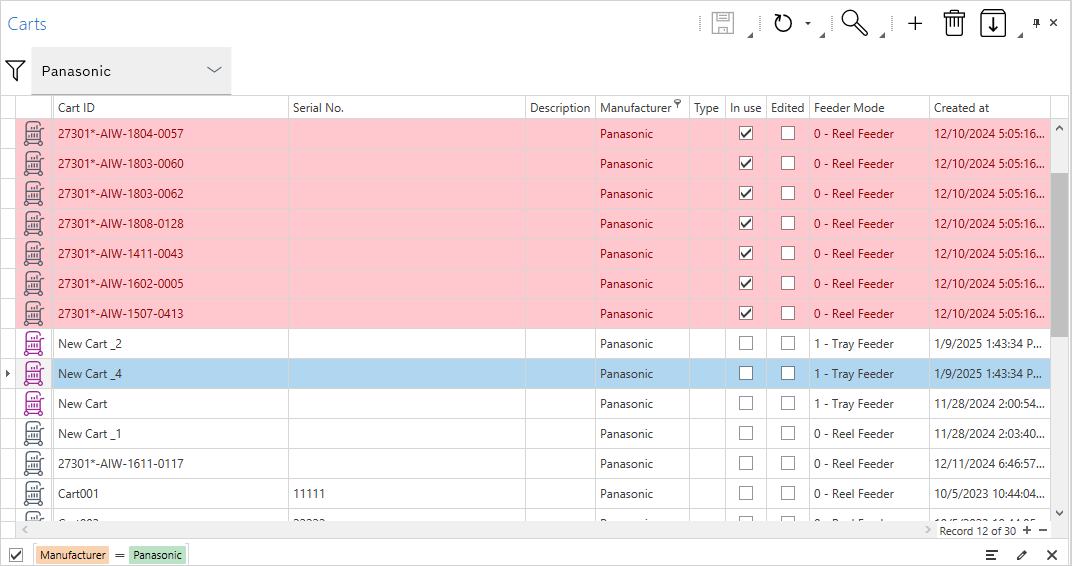
If a station group or a station group setup is selected in the Station Groups window, the carts assigned to this station group or setup are highlighted in red in the Carts window.
Cart entries have differently colored icons depending on whether the cart is configured as a Reel Feeder (gray) or a Tray Feeder (purple).
Specific icons and elements in the Carts window:
| Element | Description | ||
|---|---|---|---|
|
Display assignments of the selected cart. |
||
|
Import a cart from a file. |
||
|
Manufacturer filter In the selection list, select the manufacturer by which the carts are to be filtered. Only carts containing materials for the selected manufacturer are displayed.
|
||
Cart ID |
Identifier of the cart |
||
Serial No. |
Serial number of the cart |
||
Description |
Description of the cart |
||
Manufacturer |
The cart contains the materials specified for this manufacturer. |
||
Type |
Specific material composition in the cart |
||
In use |
The checkbox in the line of the cart is checked if the cart is assigned to at least one station. |
||
Edited |
The checkbox in the line of the cart is checked if the data of the cart has been changed but not yet saved. |
||
Feeder Mode |
Used to specify the operating mode associated with a cart’s feeder functionality. Available options are Reel Feeder and Tray Feeder. |

Adding carts
-
Open the Cart Management menu.
-
Add a cart in the Carts window using
 .
.If a manufacturer is selected in the manufacturer filter, the new cart is automatically created for the selected manufacturer.
A new entry with the Cart ID New Cart appears in the table.
-
Enter the following data in the table line:
-
Cart ID
Required
Take this from the SAP system. -
Serial No.
-
Description
-
Manufacturer
Required
The materials contained are defined for the selected manufacturer.If a manufacturer is selected in the manufacturer filter, this manufacturer is automatically entered. Change if necessary.
-
Type
Specific material composition in the cart -
Feeder Mode
This setting is used to configure whether the cart operates in reel feeding or tray feeding mode.
-
-
Save the carts in the Carts window using
 .
.To cancel the operation, click
 before saving and reply to the prompt in the dialog box with No.
The new cart is saved in Cart Management and appears in the table in the Carts window.
-
To assign a cart to a station, continue with Setting up tables for a station.
-
To import multiple carts, continue with Importing Changeover Carts.
Importing changeover carts
Multiple carts can be imported into Cart Management from a *.csv file with a defined format.
|
If a manufacturer is selected in the manufacturer filter, the imported carts are automatically created for the selected manufacturer. |
Prerequisite
A *.csv file containing the data to be imported has been created with the required import format.
Import format for station groups and carts
Procedure
-
Open the Cart Management menu.
-
Open the file manager in the Carts window using
 .
. -
Select and open the *.csv file in the file manager.
The carts are imported. The Cart Imported dialog box displays information about the import process.
-
Click OK in the dialog window.
-
Use
to save the changes in the Carts window.To cancel the operation, click
before saving and reply to the prompt in the dialog box with No.
The import is complete and the successfully imported carts appear in the table of the Carts window.
-
To delete a cart, continue with Deleting Changeover Carts.
Deleting changeover carts
|
Carts assigned to a station group cannot be deleted. |
-
Open the Cart Management menu.
-
Select a cart to delete in the Carts window.
-
If the cart is assigned to a station group, proceed as follows:
-
Use
 to display the station groups, stations and tables to which the cart is assigned.
Multiple assignments are possible.
The information is displayed in the Cart Uses dialog box.
-
Click OK to close the dialog box.
-
Go to the station groups to which the cart is assigned and remove the cart from all station group setups.
Setting up tables for a station -
Select the cart you want to delete again in the Carts window.
-
-
Delete the cart using
 .
. -
Use
to save the changes in the Carts window.To cancel the operation, click
before saving and reply to the prompt in the dialog box with No.
The deleted cart is no longer displayed in the table in the Carts window.
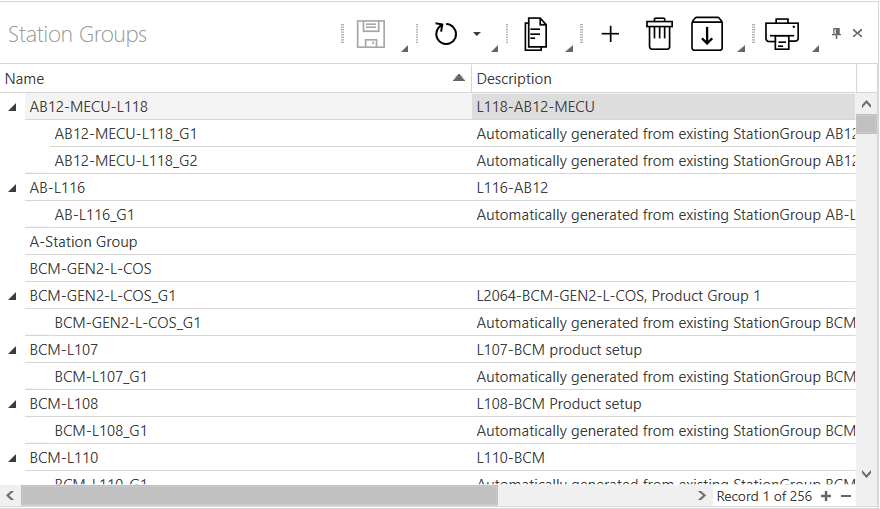
Station Groups window
You can create station groups in the Station Groups window. The station group is set up in the Station Group Setup window. If a station group has multiple variants of setups, they can be created and listed under the station group. Station groups have multiple variants of setups when at least one table in the station group is variable. Different carts are assigned to variable tables in the setup variants of the station group.
Adding a variant of the setup to a station group
Specific icons and toolbar items:
| Element | Description | ||
|---|---|---|---|
|
Copy the selected station group with all setups. |
||
|
Import a station group with setups from a file. |
||
Name |
Name of the station group and variant of the setup |
||
Description |
Description of the station group and variant of the station group setup |
||
Edited |
The checkbox in the line of the station group or variant of the setup is checked if the data has been changed but not yet saved.
|
||
Label |
DMC label of the station group |
Adding a station group
-
Open the Cart Management menu.
-
Add a station group in the Station Groups window using
.A new entry appears in the table with the name New Station Group.
-
Enter the following data in the table line:
-
Name
Required
Name of the station group -
Description
-
-
Use
to save the station group in the Station Groups window.To cancel the operation, click
before saving and reply to the prompt in the dialog box with No.
The new station group is saved in Cart Management and appears in the table of the Station Groups window.
-
To create a station group setup, continue with the Station Group Setup window window.
-
To import multiple station groups, continue with Importing Station Groups.
-
To add a variant of the setup to the station group, go to Adding a variant of the setup to a station group.
Importing station groups
Multiple station groups and variants of station group setups can be imported from a *.csv file with a defined format.
Prerequisite
A *.csv file containing the data to be imported has been created with the required import format.
Import format for station groups and carts
Procedure
-
Open the Cart Management menu.
-
Open the file manager in the Station Groups window using
. -
Select and open the *.csv file in the file manager.
The station groups are imported. The Station Group Imported dialog box displays information about the import process.
-
Click OK in the dialog window.
-
Use
to save the changes in the Station Groups window.To cancel the operation, click
before saving and reply to the prompt in the dialog box with No.
The import is complete and the successfully imported station groups and variants of the station group setups appear in the table in the Station Groups window.
-
To delete a station group, continue with Deleting the station group or variant of the station group setup.
Adding a variant of the setup to a station group
If a station group has more than one setup, the existing setup can be copied as an additional variant and partially edited. A station group can have any number of variants of a setup. All setups for a station group are listed in the table under the associated station group in the Station Groups window.
The original station group setup set up in the Station Group Setup window is copied when a variant of the setup is added. Subsequent editing of the setup of a station group is inherited by the variants. In the variants, additional carts can be assigned to variable tables.
|
Carts assigned to a table in the original setup of the station group cannot be removed. Stations and tables cannot be changed. |
Requirements
-
A station group has been created.
Adding a station group -
A station group setup has been created for the station group.
Station Group Setup window
Procedure
-
Open the Cart Management menu.
-
In the Station Groups window, select the station group that is to receive another variant of its setup.
-
Right-click on the station group to open the context menu and select Add New Setup.
The existing setup of the station group is copied. In the table, the new setup appears below the selected station group. The name of the station group is adopted with the suffix _1. If multiple setups are added without being renamed, they will each be assigned the next higher number.
-
Enter the following data in the table line of the new setup:
-
Name
Required
Name of the variant of the setup -
Description
-
-
Use
to save the new setup in the Station Groups window.To cancel the operation, click
before saving. -
Edit and save the new setup in the Station Group Setup window.
Station Group Setup window
The new station group setup is stored in Cart Management and appears in the table in the Station Groups window under the associated station group. When Setup is selected, the Station Group Setup window displays the setup.
Copying a station group
A station group can be copied with all variants of its setup. The copy is independent of the original station group. You can edit the data in the Station Groups window and the station group setups in the Station Group Setup window.
-
Open the Cart Management menu.
-
In the Station Groups window, select the station group that you want to copy with all setups.
-
Use
 to copy the station group with its setups.
A new entry appears in the table below the selected station group with the name of the original station group and the suffix COPY_. All setups of the selected station group are copied with the original name of the setup and the suffix COPY_ and can be edited in the Station Group Setup window.
-
Edit the new station group independently of the original station group.
-
Use
to save the station group in the Station Groups window.To cancel the operation, click
before saving and reply to the prompt in the dialog box with No.
The new station group is saved in Cart Management and appears in the table of the Station Groups window.
Moving a variant of a setup between station groups
Variants of the setup of a station group can be moved to another station group with the same structure.
Requirements
-
Both station groups have the same number of stations in the setup.
-
The stations of both station groups have the same number of tables in the setup.
Adding a station group
Procedure
-
Open the Cart Management menu.
-
In the Station Groups window, select the variant of the setup of a station group that you want to move to another station group.
-
Move the variant to the desired station group using drag-and-drop.
-
If changes occur as a result of moving the variant of the setup, a dialog box opens with information about the necessary changes.
-
Click OK to accept the changes.
The variant of the setup is moved to the desired station group. -
Click Cancel to cancel moving the setup.
The variant of the setup is not moved.
-
-
Use
to save the changes in the Station Groups window.To cancel the operation, click
before saving and reply to the prompt in the dialog box with No.
In the Station Groups window, the variant of the station group setup is displayed below the selected station group as a variant of the setup. The setup of the variant can be selected in the Station Groups window and displayed and partially edited in the Station Group Setup window.
Comparing variants of setups
The settings and setup of variants of setups can be compared. It does not matter whether the variants of the setups are from the same station group or from different station groups. You can compare two or more variants of setups.
-
Open the Cart Management menu.
-
In the Station Groups window, press and hold [CTRL] and select two or more variants of setups to compare with each other.
-
Right-click on one of the selected variants of the setups to open the context menu and select Compare Setups.
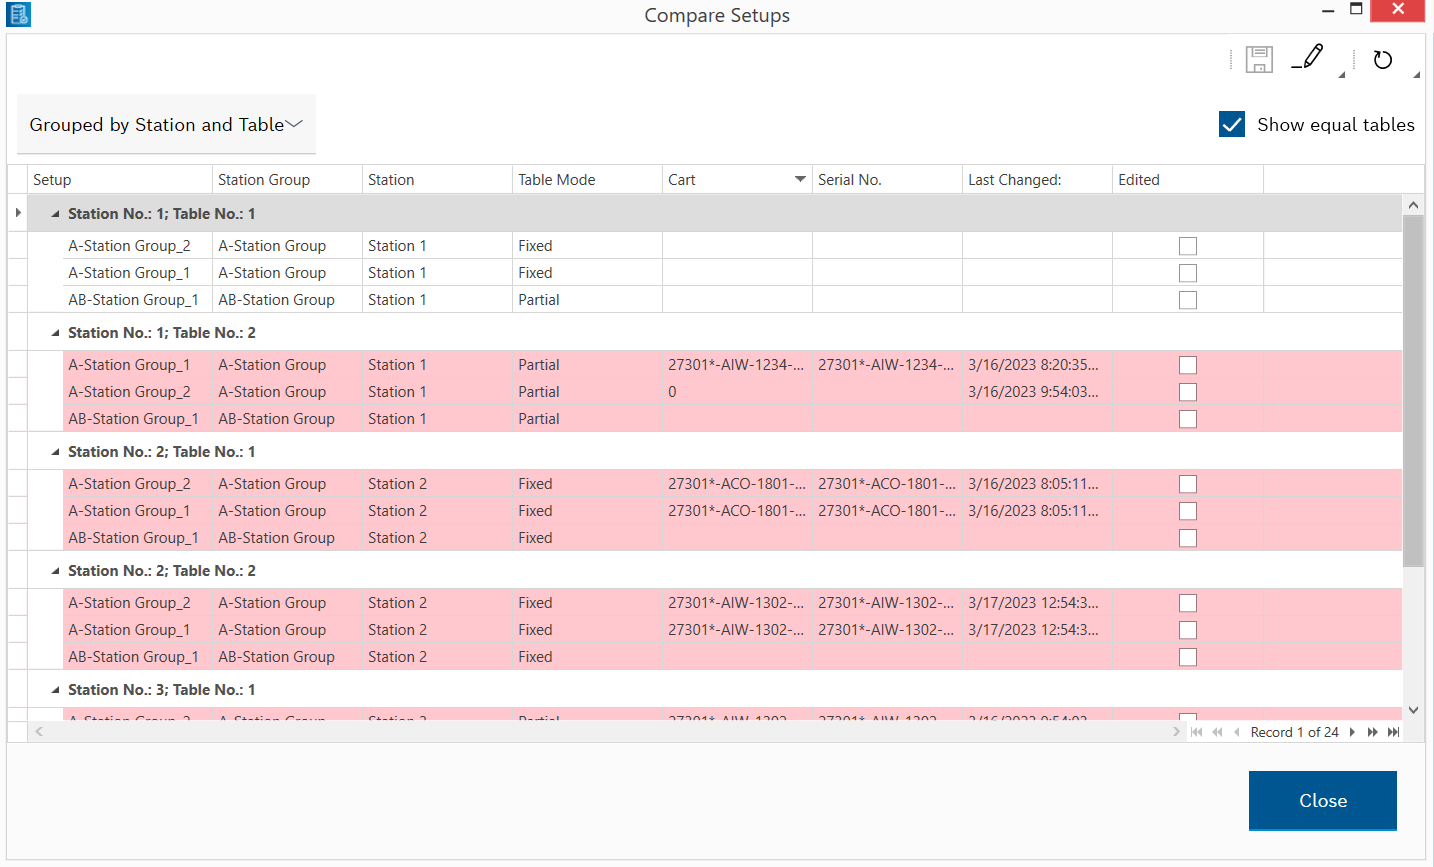
In the Compare Setups dialog box, the individual stations and tables are automatically grouped in the table. The table columns indicate the settings and setup of each individual table. Tables of different variants of setups with the same position, the setup and settings of which differ, are highlighted in red.
-
To disable grouping by stations and tables, select the No Grouping option in the Grouped by Station and Table drop-down list.
The grouping of tables and stations is no longer displayed and the table is sorted alphabetically by station group.
Each column can be sorted alphabetically in ascending or descending order by clicking the arrow on the right side of the column title.
-
Clear the Show equal tables checkbox to stop displaying tables that have the same setup and settings.
Only tables with a red background are displayed in the table.
-
To filter the table by a column entry, click the quick filter next to the column title and select filter criteria.
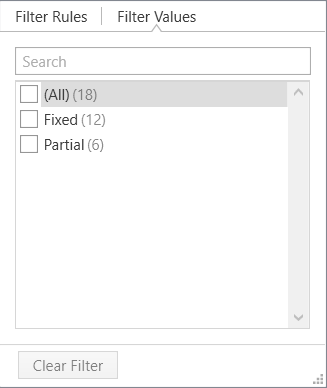
The quick filter dialog box has two tabs:
-
Filter Rules
Individual filter criteria for the selected column can be selected in selection lists. The selected criteria are displayed below the table. -
Filter Values
All entries in the selected column are listed. Check the checkbox of the entries that you wish to display in the table.The table is immediately filtered using the selected filter criteria.
All table entries can be displayed again using Clear Filter.
-
-
To change or remove the cart of a table in the table, activate editing in the toolbar of the Compare Setups dialog box using
 . is highlighted in blue.
-
In the Carts column, select the cart for desired table.
The cell becomes the drop-down list and, in addition to the description of the cart, a
 appears.
 -
Select another available cart from the drop-down list, or remove the existing cart using
. -
Save the changes in the Compare Setups dialog box using
.To cancel the operation, click
before saving and reply to the prompt in the dialog box with No. -
Use
to deactivate editing in the toolbar of the Compare Setups dialog box.
-
-
is no longer highlighted in blue.
-
To close the Compare Setups dialog box, click Close.
Multiple variants of setups can be compared and cart assignments can be edited.
Deleting the station group or variant of the station group setup
Station groups with the associated variants of the setup or individual variants of the setup of a station group can be deleted.
|
When a station group is deleted, all associated variants of the station group setup are also deleted. |
-
Open the Cart Management menu.
-
In the Station Groups window, select a station group or a station group setup that you want to delete.
-
Use
to delete the station group or the variant of the station group setup. -
In the dialog box, reply to the prompt with Yes.
-
Use
to save the changes in the Station Groups window.To cancel the operation, click
before saving and reply to the prompt in the dialog box with No.
The deleted station group or variant of a station group setup is no longer displayed in the table in the Station Groups window.
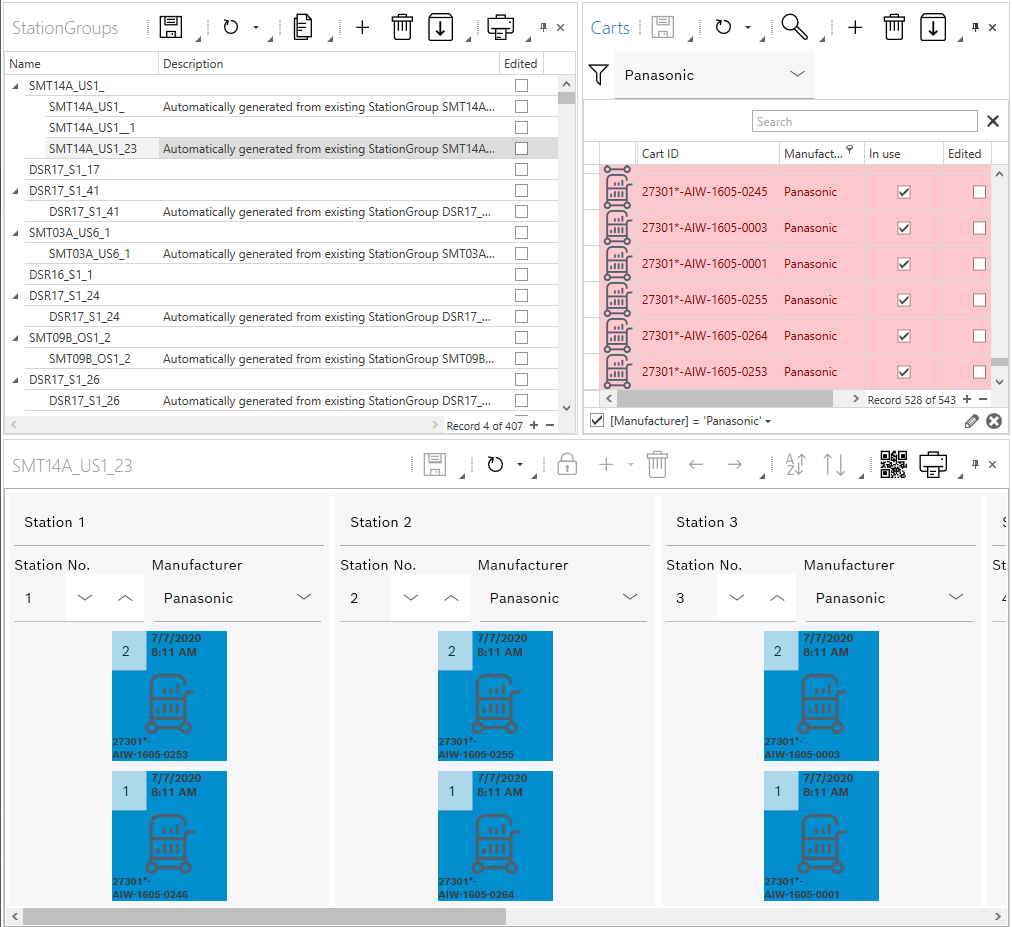
Station Group Setup window
The Station Group Setup window allows you to set up a station group selected in the Station Groups window. If a station group has several variants of setups, the variant can be selected in the Station Groups window and displayed and partially edited in the Station Group Setup window.
|
The setup of a station group can be edited without any restrictions. |
A station group setup consists of several stations, the tables and, if necessary, carts. The stations are arranged and set up from left to right as on the physical production line in the Station Group Setup window.
|
The title of the Station Group Setup window is the name of the station group or variant of the station group setup that is selected in the Station Groups window and is being set up. |
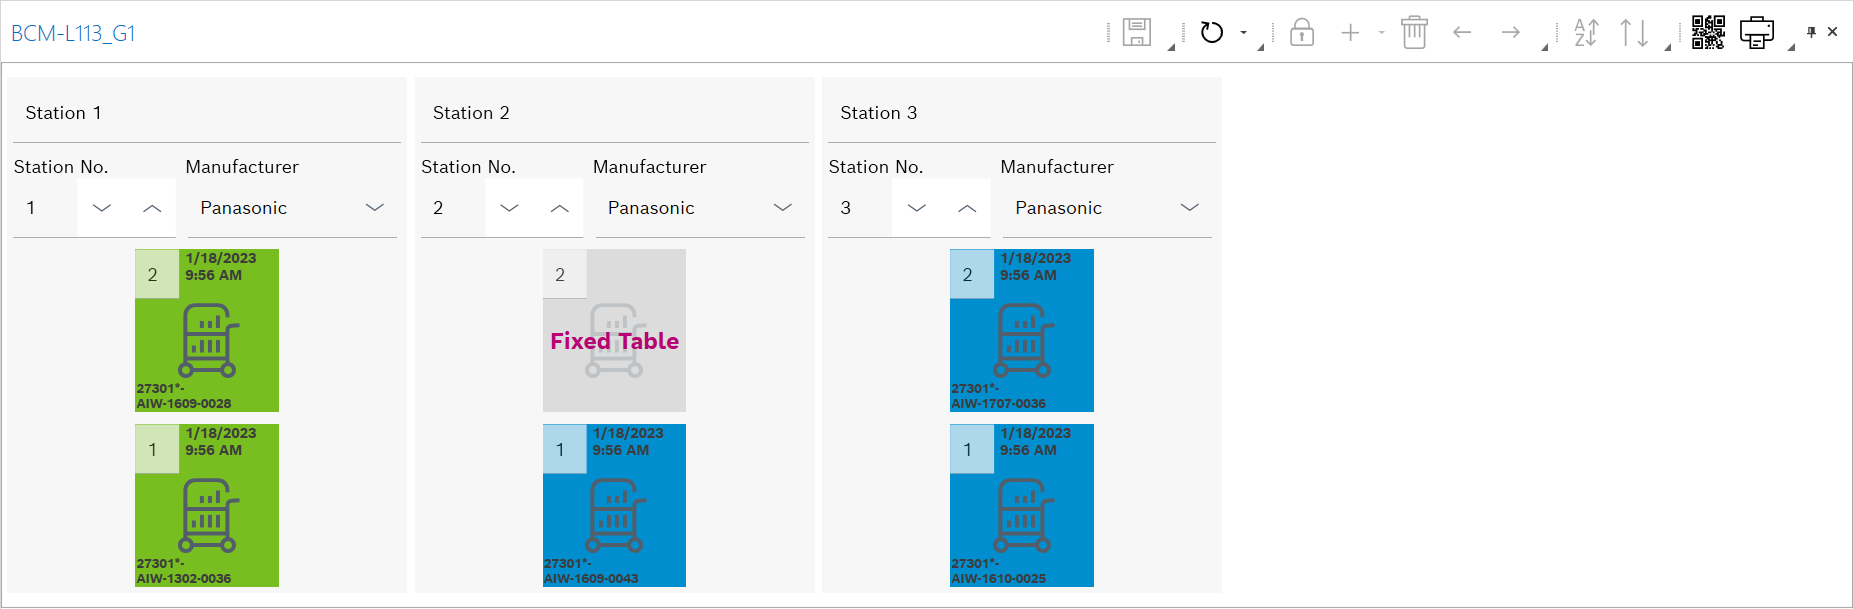
In the Station Group Setup window, individual stations are shown with a gray background and the name in the header. A station is responsible for production for a selected manufacturer. A station can contain two or four tables, which are shown as squares within the station. Each table can be set up individually.
Specific icons and elements in the Station Group Setup window:
| Menu option | Description |
|---|---|
|
If the same cart is assigned to the same table in all variants of a station group setup, change the mode of the table to "Fixed" in the station group setup and assign the cart to the table. |
|
Add a station. |
|
Move the selected station to the left. |
|
Move the selected station to the right. |
|
Sort stations alphabetically. |
|
Sort stations by station numbers. |
|
Display the DMC label of the tables and carts. |

Adding stations to a station group
The setup of a station group consists of several stations. Stations can be added and arranged from left to right as on the physical production line.
-
Open the Cart Management menu.
-
In the Station Groups window, select a station group or a station group setup that you want to set up.
The Station Group Setup window displays the setup of the selected station group or the variant of a station group setup in graphic form.
The title of the Station Group Setup window is the name of the station group or variant of the station group setup that is selected in the Station Groups window and is displayed.
-
Click in the Station Group Setup window.
-
If necessary, use the arrow next to
 to edit the settings for adding a station:
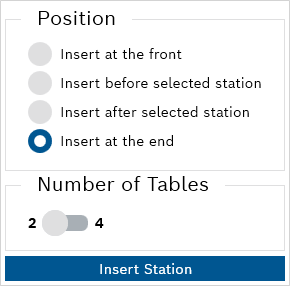
-
Position
-
Insert at the front: The new station is inserted at the beginning as the first station.
-
Insert before selected station: The new station is inserted before the currently selected station.
-
Insert after selected station: The new station is inserted after the currently selected station.
-
Insert at the end (default): The new station is inserted at the end as the last station.
-
-
Number of Tables
The new station contains two (default) or four tables.
The settings for adding a station are automatically saved.
-
-
Use
to add a new station.If a manufacturer is selected in the Carts window in the manufacturer filter, newly created stations are automatically created for the selected manufacturer. The manufacturer of the station can be changed retrospectively.
Example:
One station with two tables and the setting Add station at the end :
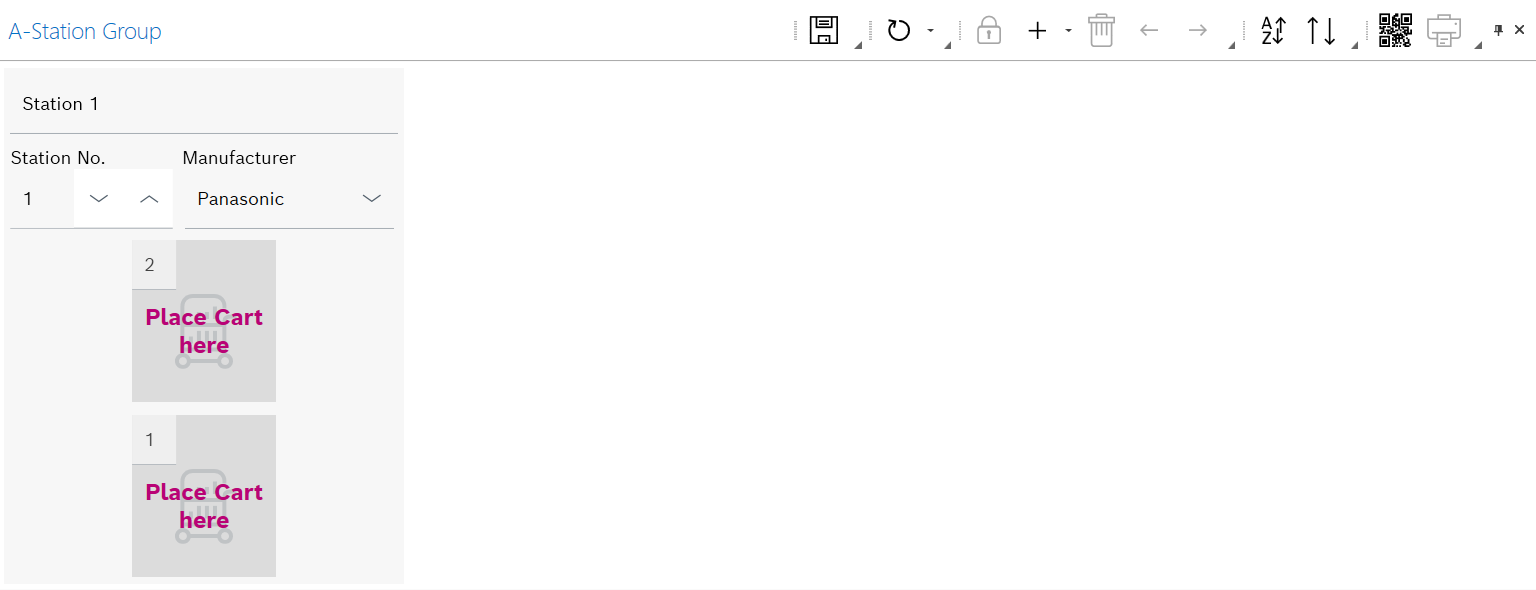
The name Station 1 is automatically displayed in the header of the graphically displayed station. The numbering for additional stations is ascending or descending depending on the setting. Within the station, the tables are displayed as squares.
The table mode is always partial for a newly added station.
-
If necessary, edit the following data in the graphically displayed station:
-
Station 1
Name of station -
Station No.
-
Manufacturer
Name of the manufacturer for whom this station is producing. -
Numbering of the tables
-
-
Add and edit additional stations if necessary.
-
Set up tables for the stations.
Setting up tables for a station -
Use
to save the stations with the changes in the Station Group Setup window.To cancel the operation, click
before saving and reply to the prompt in the dialog box with No. -
To delete a station from the setup, select the station (click on one of the tables in the station) and click
.Carts assigned to the tables of the deleted station are automatically removed.
The new stations are added to the selected station group and set up. The Station Group Setup window allows you to view and edit the graphical representation of the setup for the selected station group.
Organizing stations in a station group
Stations can be moved, sorted, and deleted with the tables and carts they contain.
|
The stations in a station group can be edited without any restrictions. If the station group contains variants of the setup, the subsequent editing of the stations in the station group is inherited by the variants of the setup. |
-
Open the Cart Management menu.
-
In the Station Groups window, select a station group or a station group setup that you want to organize.
The Station Group Setup window graphically displays the stations of the selected station group or the variant of a station group setup.
The title of the Station Group Setup window is the name of the station group or variant of the station group setup that is selected in the Station Groups window and is displayed.
-
Click in the Station Group Setup window.
Moving a Station
-
Select the station to be moved between the other stations.
-
Use
 to move the selected station to the left.
 -
Use
 to move the selected station to the right.
 -
Use
to save the changes in the Station Group Setup window.To cancel the operation, click
before saving and reply to the prompt in the dialog box with No.
The graphical display shows the stations in the changed sequence.
Sorting Stations
|
The sequence of the stations should be modeled on the physical production line. Sorting can confuse the sequence. |
-
To sort the stations alphabetically in ascending order, click
 .
. -
To sort the stations by ascending station number, click
 .
. -
Use
to save the changes in the Station Group Setup window.To cancel the operation, click
before saving and reply to the prompt in the dialog box with No.
The graphical display shows the stations in the changed sequence.
Deleting a Station
-
Select the station to be deleted (click on one of the tables in the station).
-
Use
to delete the station in the toolbar. -
Use
to save the changes in the Station Group Setup window.To cancel the operation, click
before saving and reply to the prompt in the dialog box with No.
The deleted stations are no longer displayed in the graphical display.
Setting up tables for a station
|
The setup of a station group can be edited without any restrictions. If the station group contains variants of the setup, the subsequent editing of the station group setup is inherited by the variants of the setup. |
A station has several tables that can be set up in different ways. Tables can be splitted and combined again, deactivated, the table mode can be changed, and carts can be assigned to the tables.
-
Open the Cart Management menu.
-
In the Station Groups window, select a station group or a station group setup that you want to set up.
The Station Group Setup window displays the setup of the selected station group or the variant of a station group setup in graphic form.
The title of the Station Group Setup window is the name of the station group or variant of the station group setup that is selected in the Station Groups window and is displayed.
-
Click in the Station Group Setup window.
Splitting a table
A table can be split regardless of its current operating mode (e.g., Partial or Fixed). However, the specific context required for splitting depends on the table’s mode: If the table is in Partial Mode, splitting is only enabled when a station group setup is actively selected. Conversely, for tables in Fixed Mode, splitting is only permissible when the station group itself is selected.
|
All operations supported by an unsplit table are equally supported when the table is split. |
-
To split a table, right-click on a table that has not been split yet to open the context menu and select Split Table.
-
The screenshot shows a split fixed table. You can recognize this by the “Split Table” heading and the two cart usage sections. Their positions can be changed — in the screenshot, they are set to 1 and 2.

Combining a split table
Combining a split table in the Order Management ProClient is straightforward.
-
Select a split table. Right-click on one of the two parts to open the context menu, and select Combine table.
-
The two parts will be merged back into a single table again.
|
The resulting table will adopt the feeder mode of the left-hand split, and only the cart from the left side will be retained. |
Deactivating or activating a table
Tables that are not used in production can be deactivated in the graphical display for the station. Carts cannot be assigned to deactivated tables.
|
Tables that have a cart assigned cannot be deactivated. To deactivate the table, remove the cart. |
-
To deactivate an active table, right-click on the table to open the context menu and select Deactivate Table.
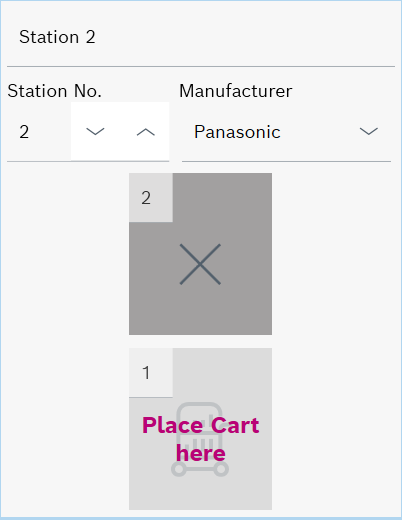
A deactivated table is displayed in the graphical representation with a cross.
-
To activate a deactivated table, right-click on the table to open the context menu and select Activate Table.
-
Use
to save the changes in the Station Group Setup window.To cancel the operation, click
before saving and reply to the prompt in the dialog box with No.
The changed station group setup is saved and can be viewed in the Station Group Setup window.
Editing the table mode of a table
Tables can have two different modes:
-
Partial table
A partial table allows for dynamic adjustments to station group relationships and assignments based on production needs. Gives users the flexibility to modify station groupings or sequences dynamically.
In the setup of a station group, carts cannot be assigned to partial tables. The reason for this is that in further variants of setups, different carts must be assigned to the station group. Therefore, partial tables in the station group are automatically fixed tables in the variants of the station group setups.
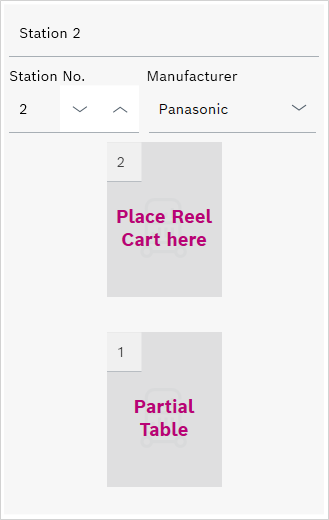
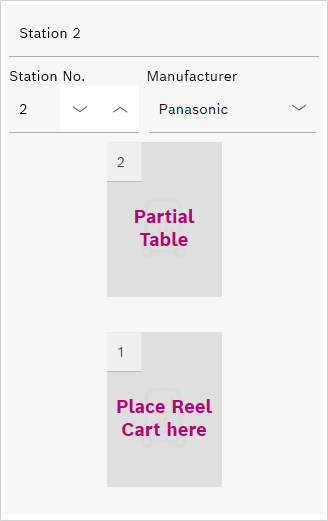
In the graphical representation of a variant of the setup of a station group, the text Partial Table is displayed within a partial table.
-
Fixed table
A fixed table has a static configuration where station groups and assignments are defined and do not change dynamically. Suitable for production workflows that follow consistent patterns and predefined sequences.
In the setup of a station group, carts can be assigned to fixed tables. The assignments are inherited by the other variants of the setup under the station group and cannot be changed or removed in the variants.
In the graphical representation of the setup of a station group, the text Place Reel Cart here is displayed within a fixed table.
-
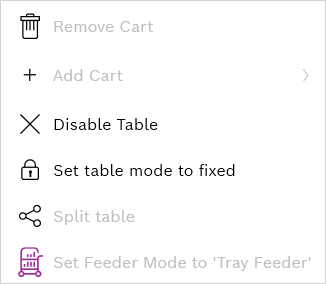
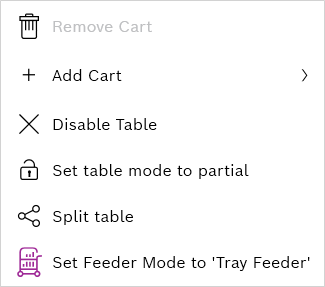
To turn a fixed table into a partial, right-click on the table to open the context menu and select Set table mode to partial.
-
To make a partial table a fixed table, right-click on the table to open the context menu and select Set table mode to fixed.
If a cart is assigned to the table, the cart is removed.
-
Use
to save the changes in the Station Group Setup window.To cancel the operation, click
before saving and reply to the prompt in the dialog box with No.
-
The changed station group setup is saved and is displayed in the Station Group Setup window.
Changing the feeder mode of a table
-
To change the feeder mode of a table, right-click on the table to open the context menu and select Set Feeder Mode.The Feeder mode can only be changed, if there is no cart assigned to the table.
-
Use
to save the changes in the Station Group Setup window.It is only possible to assign tray carts to tray feeders and reel carts to reel feeders. If it’s tried to place a cart on a different feeder type there is a hint for the user why this is not allowed.
The changed feeder mode is saved and is displayed in the Station Group Setup window.
Assigning a cart to and removing a cart from a table
|
In the setup of a station group, a cart can only be assigned to a fixed table. In a variant of the setup of a station group, a cart can only be assigned to a partial table. Within a setup, a cart can only be assigned once. A table configured with the "Tray Feeder" mode only accepts tray feeder carts.+ A table configured with the "Reel Feeder" mode can only be assigned reel feeder carts. |
-
To assign a cart to a table, select the cart in the Carts window.
-
Drag and drop the cart into the Station Group Setup window in the table.
If a cart is assigned to a table that is already occupied, the previous cart is removed from the table and the new one is assigned to the table.
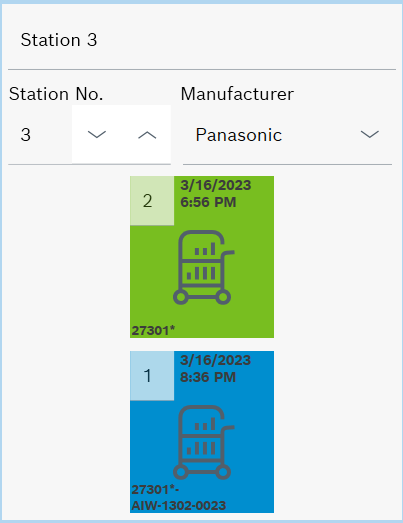
A table to which a cart is assigned is displayed with the cart icon, the date the cart was added to Cart Management and the cart ID.
In a station group setup , all assigned carts are shown in green in the Station Group Setup window. They are passed on to all variants of the setup and are also displayed in green.
In a variant of a station group setup, the carts inherited from the original station group setup are shown in green in the Station Group Setup window. Carts that were added only to the setup variant are shown in blue.
If the same cart is assigned to the same table in all variants of a station group’s setup, the table is framed in orange in all variants of the setup and the station group’s setup. In this situation, the tables framed in orange can be fixed in the setup of the station group using
 .The cart assigned in all variants of the setup is assigned to this table in the setup of the station group.
 -
To remove a cart assigned to a table from the table, right-click on the table to open the context menu and select Remove Cart.
In a variant of the setup of a station group, only the carts shown in blue can be removed. Carts shown in green can only be removed in the original station group setup. The editing of the original setup of the station group is passed on to the variants of the setup.
-
Use
to save the changes in the Station Group Setup window.To cancel the operation, click
before saving and reply to the prompt in the dialog box with No.
The changed setup of the station group or variant of the station group setup is saved and is displayed in the Station Group Setup window.
Import format for station groups and carts
Multiple station groups and carts can be imported from a *.csv file. To import successfully, the following columns must exist in the file:
-
CART_SETUP_ID
-
CART_ID
-
TIMESTAMP
-
MOUNTED
-
EQUIPMENT_ID
-
TABLE_NO
-
CART_TYPE
-
PRODUCT_SETUP_ID
-
SETUP_TYPE
-
TARGET_EQUIP_ID
-
CART_SERIAL_NO
Example:
CART_SETUP_ID;CART_ID;TIMESTAMP;MOUNTED;EQUIPMENT_ID;TABLE_NO;CART_TYPE;PRODUCT_SETUP_ID;SETUP_TYPE;TARGET_EQUIP_ID;CART_SERIAL_NO1113;27301*-AIW-1511-0109;1502351611;T;1044;2;0;1625;-1;1044;27301*-AIW-1511-01091118;27301*-AIW-1511-0108;1502351782;T;1053;2;0;1625;-1;1053;27301*-AIW-1511-01081107;27301*-AIW-1511-0107;1502350169;T;1044;1;0;1625;-1;1044;27301*-AIW-1511-01071106;27301*-AIW-1511-0097;1502351509;T;1041;2;0;1625;-1;1041;27301*-AIW-1511-00971105;27301*-AIW-1511-0095;1502356859;T;1041;1;0;1835;-1;1041;27301*-AIW-1511-00951117;27301*-AIW-1511-0093;1502351757;T;1052;2;0;1625;-1;1052;27301*-AIW-1511-00931114;27301*-AIW-1511-0074;1502351648;T;1047;2;0;1625;-1;1047;27301*-AIW-1511-00741112;27301*-AIW-1511-0068;1502351449;T;1053;1;0;1625;-1;1053;27301*-AIW-1511-00681116;27301*-AIW-1511-0058;1502351727;T;1051;2;0;1625;-1;1051;27301*-AIW-1511-00581110;27301*-AIW-1511-0049;1502351125;T;1051;1;0;1625;-1;1051;27301*-AIW-1511-00491111;27301*-AIW-1511-0037;1502351253;T;1052;1;0;1625;-1;1052;27301*-AIW-1511-00371108;27301*-AIW-1510-0121;1502350364;T;1047;1;0;1625;-1;1047;27301*-AIW-1510-01211115;27301*-AIW-1507-0418;1502351677;T;1050;2;0;1625;-1;1050;27301*-AIW-1507-04181109;27301*-AIW-1507-0411;1502350908;T;1050;1;0;1625;-1;1050;27301*-AIW-1507-0411