Editor tab
Use the Editor tab to maintain and release variants, datasets, lines, and parameters.
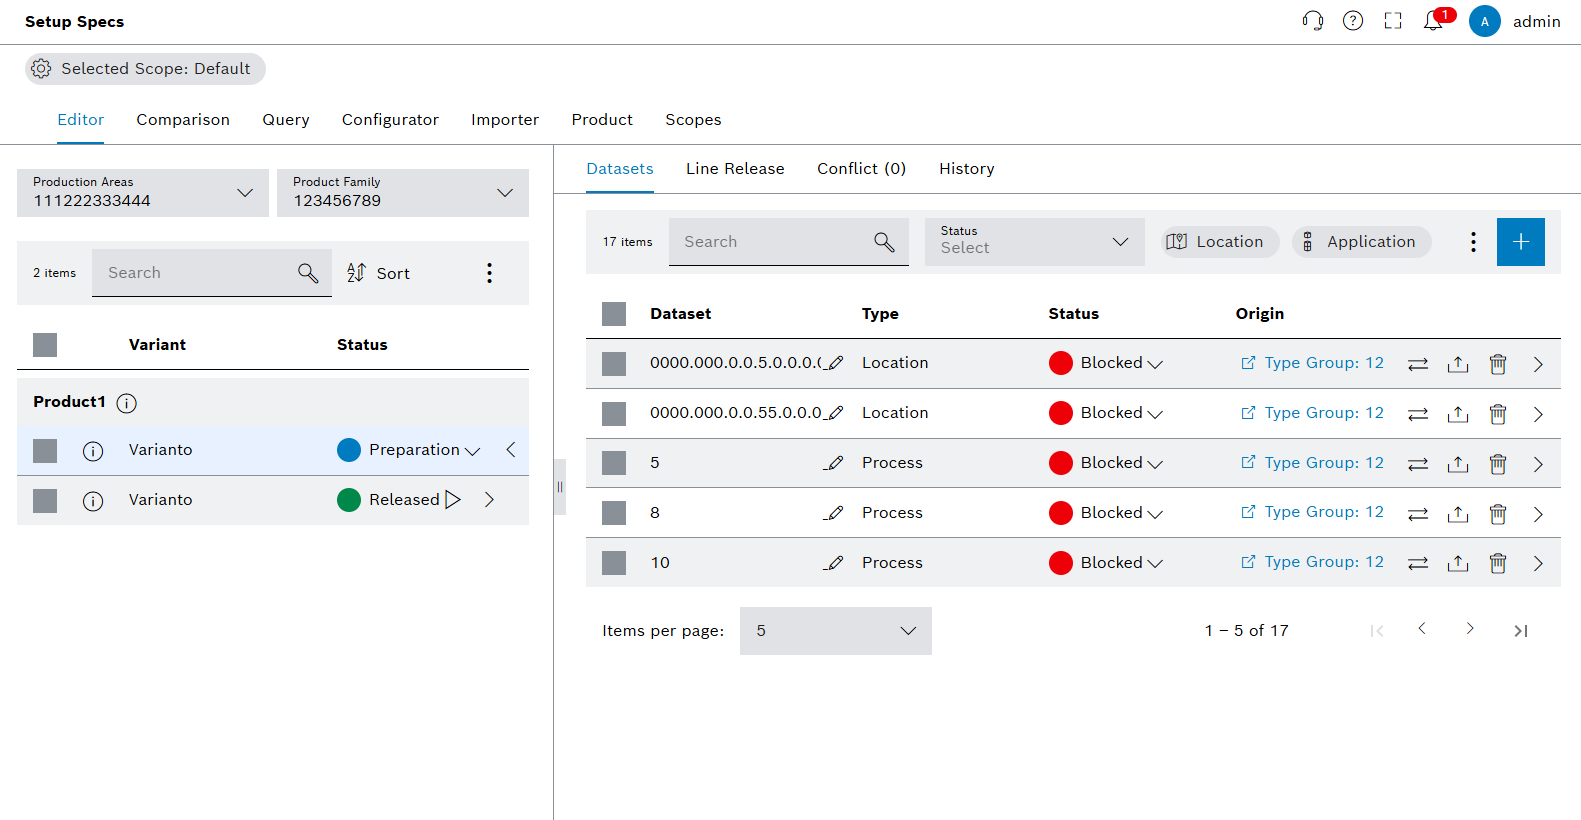
Functions in the overview of Editor tab
| Element | Description |
|---|---|
Selected Scope: Default |
Select available scopes and see selected scope. |
Production Area Selector |
Selector for the production area. |
Product Family Selector |
Selector for the product family. |
|
Adds datasets to variants from production areas and type groups. |
|
Options on the left side show status, create ticket, copy, change status of variant, export and delete options for the select variant. The options icon on the right shows the change the status, export and delete options. |
|
Changes the status of datasets. |
|
Sort out the variants alphabetically. |
|
The arrow on the left side displays the datasets of variants on the right side. The arrow on the right side displays the details of datasets in Parameter Configuration page. |
|
Edit datasets. |
|
Delete datasets. |
|
Export datasets. |
|
Changes the status of datasets. |
|
Shows the variants which have open tickets. |
Origin |
Shows the origin of datasets with URLs. |
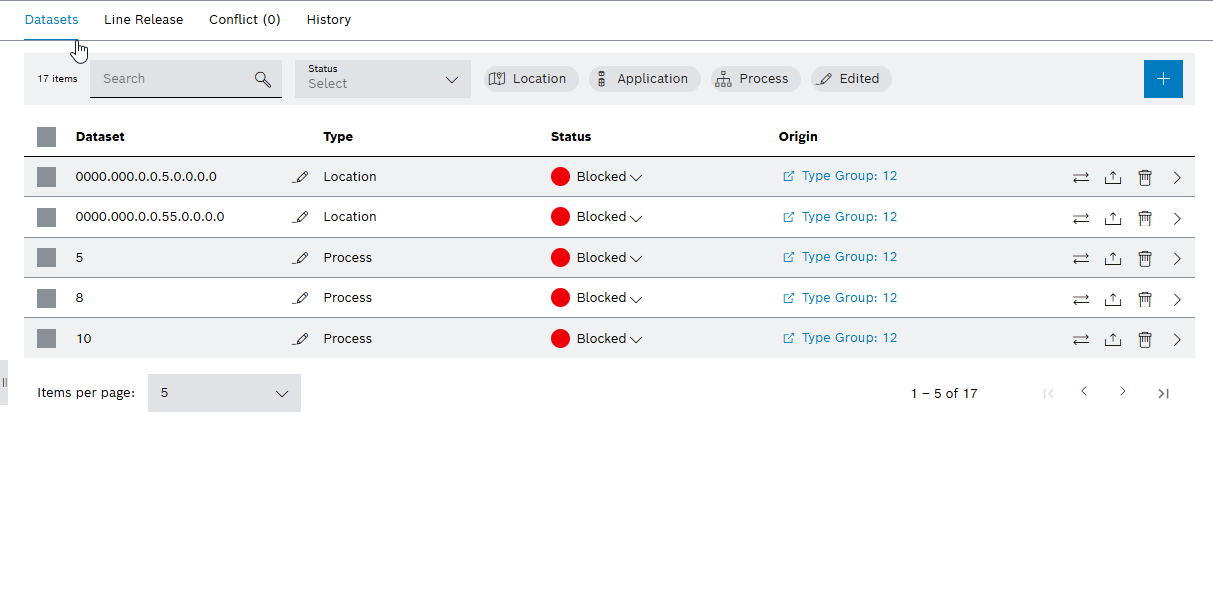
Line Release Tab |
Line releases of variants. |
Conflicts Tab |
Conflicts of variants. |
History Tab |
History of variants. |
Search Bar and Filters |
Searches and filters the parameters and datasets according to type. |


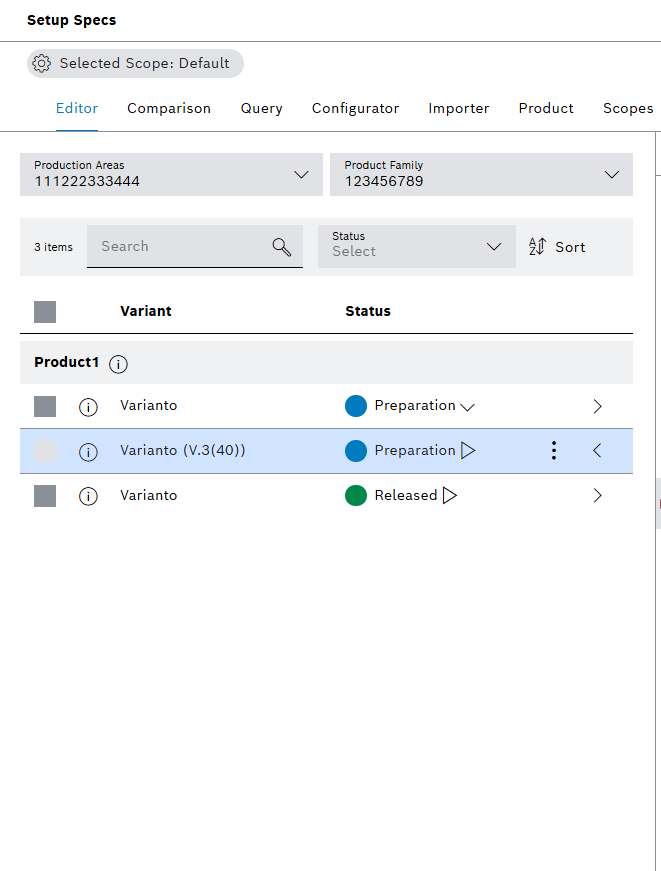
Select variant
Prerequisite
Production area, product family, product and variant exist under Product tab.
Procedure
-
Open the Product & Quality > Setup Specs menu entry.
-
In the Editor, click on the Production Area search box and select a production area.
Alternatively, type in the search box to search for the specific production area. -
Click on the Product Family search box and select a product family.
Alternatively, type in the search box to search for the specific Product Family. -
Select a variant.
Alternatively, click on checkboxes to select one or more variants at the same time.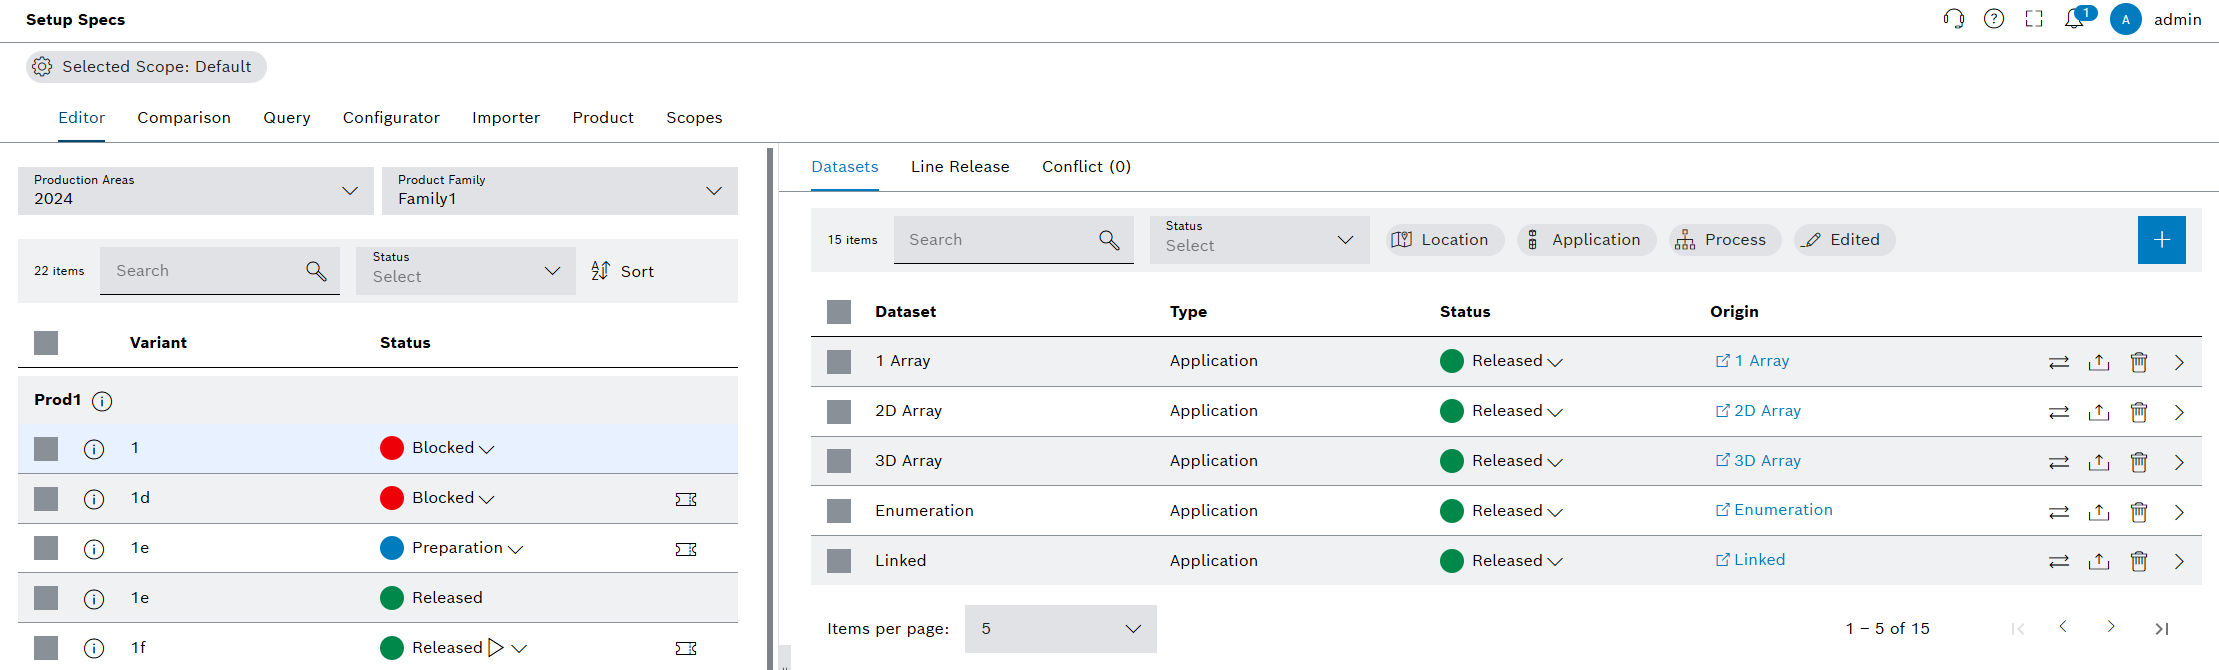
The variant is selected and a success message is shown. On the right side, the datasets of the selected variant were shown.
Add dataset or dataset template to variant
The inheritance capability of Setup Specs allows adding datasets from several type groups.
|
When adding the multiple datasets and dataset templates to the variant, conflicts may occur. See the chapter resolving conflicts to see potential problems and to solve the conflicts before releasing a variant. |
Prerequisites
-
Production area, product family, product and variant exist: Product tab
Procedure
-
Open the Product & Quality > Setup Specs menu entry.
-
In the Editor, click on the Production Area search box and select a production area.
Alternatively, type in the search box to search for the specific production area. -
Click on the Product Family search box and select a product family.
Alternatively, type in the search box to search for the specific Product Family. -
Select a variant.
-
Click on
 .
. -
The Datasets tab is shown.
-
Click on
 .
.
The dialog window opens. -
In the Add Datasets dialog window, select the origin type of datasets and dataset templates.
Repeat this step to add more datasets or dataset templates from production areas and type groups.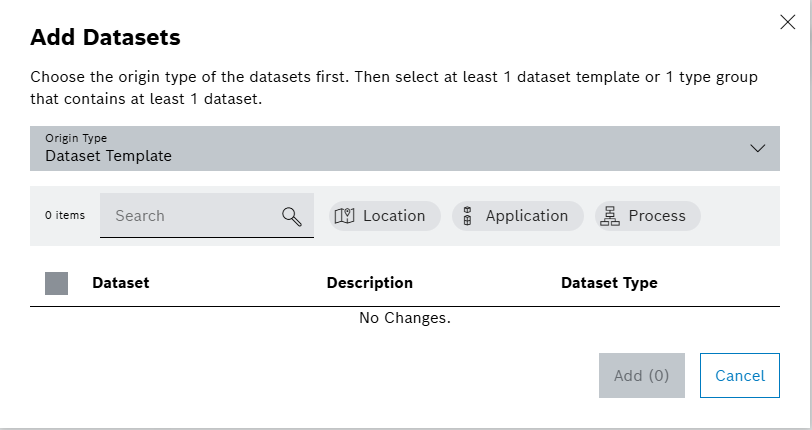
If added datasets and dataset templates share the same name, merging operation tags the new merged dataset as merged datasets. -
Select dataset templates or type groups in the list by activating the checkbox.
-
Click on Add.
The datasets are added to the variant and a success message is shown.
Dataset and Dataset Template
The difference between dataset and dataset template is that the dataset template doesn’t need a real value. Setup Specs sends the default value of the released dataset templates to the station for every undefined value. Datasets come from Type Groups and have real values. The parameters of datasets all have real values.
Maintain the dataset template parameter values under Configurator or Editor. Maintain the dataset parameter values only under Configurator.
|
Merging datasets can lead to conflicts in special cases. To release the variant, first resolve conflicts under the Editor. |
Resolving conflicts
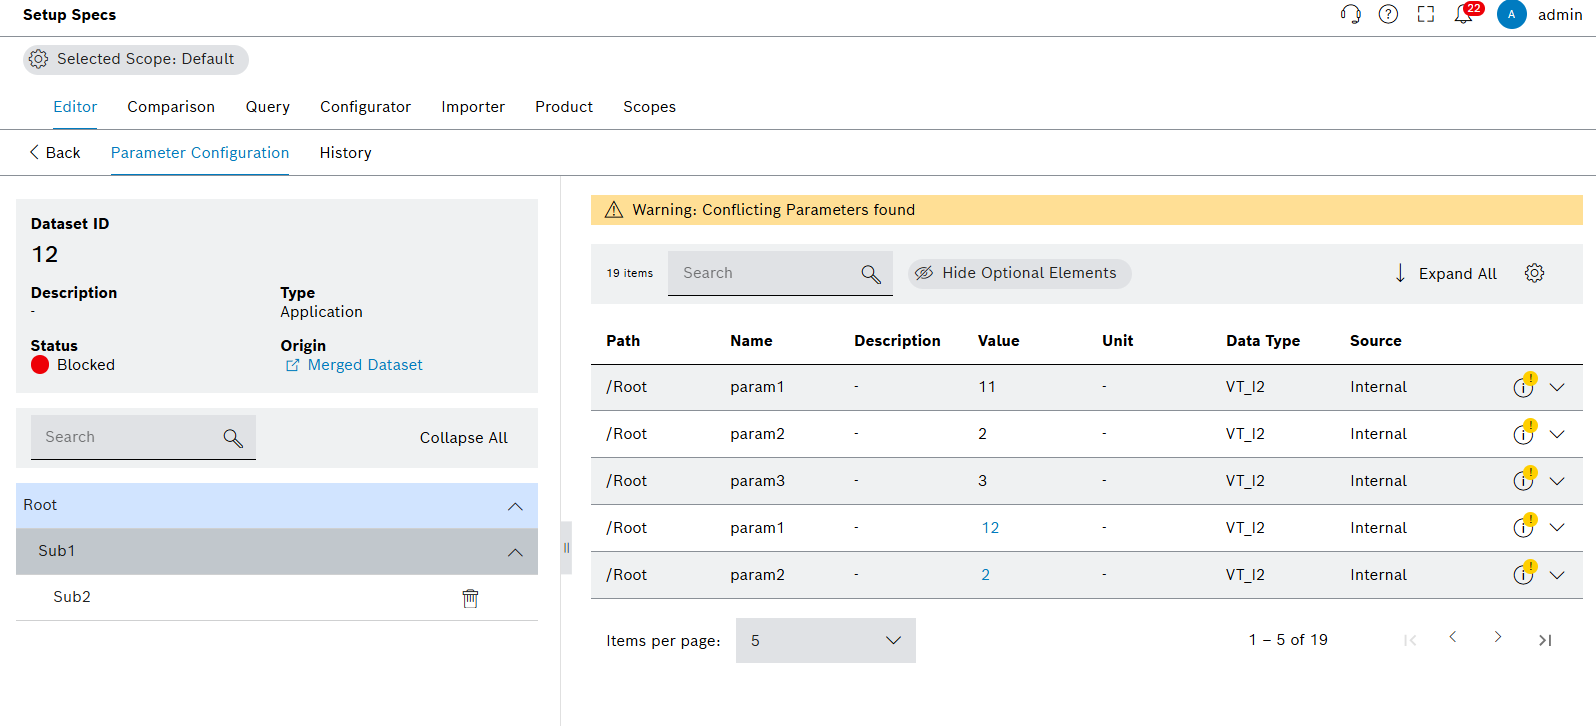
Adding multiple datasets and dataset templates is possible on Setup Specs, and merging might lead to some conflicts. The dedicated Conflicts tab on Setup Specs shows conflicting parameters, allowing to solve the conflicts to release the variant. A conflict occurs in the following situation:
-
The added datasets have same names or numbers.
-
Setup Specs combines and merges the added datasets and all the parameters under the same dataset.
-
A conflict occurs when the merged datasets have parameters sharing the same name.
|
The parameter names should be unique, otherwise Setup Specs will not send parameter to the station. Therefore, resolve the conflicts before releasing the variant. |
Resolve a conflict by:
-
Deleting one of the parameters, so that only one parameter stays with a unique name.
-
Renaming one of the parameters, so that only one parameter stays with a unique name.
Prerequisites
-
Production area, product family, product and variant exist: Product tab
-
Datasets, which share the same name, including the parameters which share the same name exist in the variant.
Procedure
-
Open the Product & Quality > Setup Specs menu entry.
-
In the Editor, click on the Production Area search box and select a production area.
Alternatively, type in the search box to search for the specific production area. -
To select a product family, click on the Product Family search box.
Alternatively, type in the search box to search for the specific product family. -
Select a variant in the list.
-
Click on
. -
To see the conflicts, click on Conflict tab in the detail view.
A table with conflict details is shown.
The conflicting parameters have yellow colored exclamation marks.
-
Click on the URL
 in the Origin column to jump to Configurator tab to rename or delete the parameters to solve the conflicts.
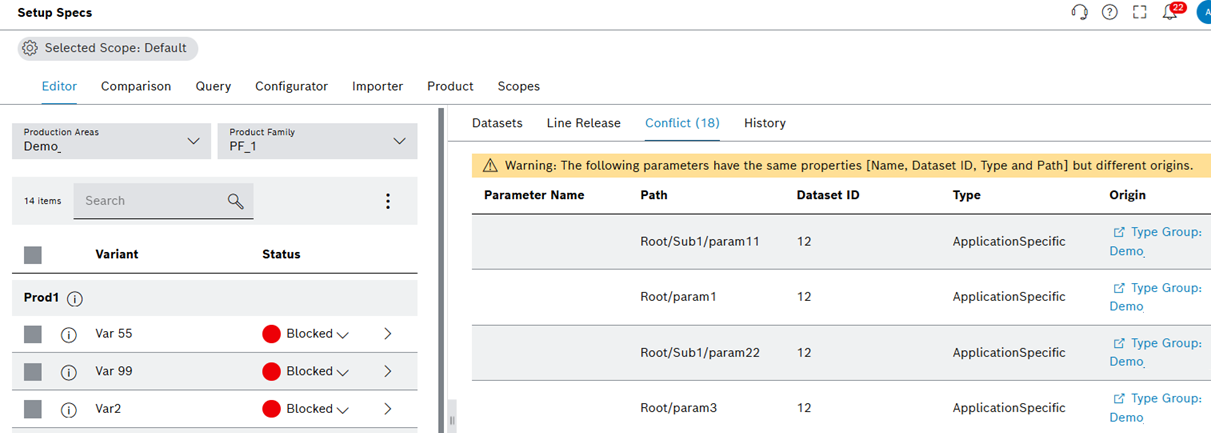
Alternatively, click on the Datasets tab, click on the
in the
row of the merged dataset in the detailed view. -
Click on the conflict icon in the row of the corresponding conflict.
-
Click on Edit in Configurator.
-
Delete or rename the parameter names conflicting.
The conflicts are solved and a success message is shown. The conflicts counter is zero.
Change release status of dataset
To see dataset states, open the Basic setup page.
Prerequisite
Production area, product family, product and variant exist: Product tab
Procedure
-
Open the Product & Quality > Setup Specs menu entry.
-
In the Editor, click on the Production Area search box and select a production area.
Alternatively, type in the search box to search for the specific production area. -
To select a product family, click on the Product Family search box.
Alternatively, type in the search box to search for the specific product family. -
Select a variant.
-
Click on
. -
Change the release status of the datasets on the right side:
-
To change the release status of an individual dataset:
-
Click on Status in the row of the corresponding dataset.
-
Select a new status.
-
Comment and click on Save.
-
-
To change the release status of multiple datasets:
-
Select datasets by activating the checkboxes.
-
Click on
 in the header.
 -
Select
 Change Status of Datasets.
 -
Select the target status of the variant.
-
Comment and click on Save.
-
The release status of the dataset is changed and a success message is shown.
|
If a released dataset has a changed parameter value, or if the variant has a new dataset added, the changed version of variant will appear under variants and Setup Specs sets the state as preparation state. Setup Specs copies the original version of the variant in released state as part of archiving. This version is the original and stays in production. In the preparation state, there is the dataset with new value. Release again to confirm changes. In that case, the version in released will be overwritten by the new variant version. Blocking a released dataset under released variant will change the status of the variant to the blocked. |
Jumping to origin of dataset
Prerequisites
-
Production area, product family, product and variant exist: Product tab
Procedure
-
Open the Product & Quality > Setup Specs menu entry.
-
In the Editor, click on the Production Area search box and select a production area.
Alternatively, type in the search box to search for the specific production area. -
To select a product family, click on the Product Family search box.
Alternatively, type in the search box to search for the specific product family. -
Select a variant.
-
Click on
. -
Click on the URL
in the Origin column to jump to Configurator tab to rename or delete the parameters to solve the conflicts. -
Confirm with Leave.
The Configurator tab is opened and shows the setup parameters.
Jumping to origin of parameter
Prerequisites
-
Production area, product family, product and variant exist: Product tab
Procedure
-
Open the Product & Quality > Setup Specs menu entry.
-
In the Editor, click on the Production Area search box and select a production area.
Alternatively, type in the search box to search for the specific Production Area. -
To select a product family, click on the Product Family search box. Alternatively, type in the search box to search for the specific product family.
-
Select a variant.
-
Click on
on the right side of the dataset.
-
Click on
 .
.
The dialog window opens. -
Click on Edit in Configurator.
-
Confirm with Leave.
Alternatively, click on the URL in Datasets tab.
The Configurator tab is opened and shows the setup parameters.
Add line to variant
Prerequisite
Production area, product family, product and variant exist: Product tab
Procedure
-
Open the Product & Quality > Setup Specs menu entry.
-
In the Editor, click on the Production Area search box and select a production area.
Alternatively, type in the search box to search for the specific production area. -
To select a product family, click on the Product Family search box.
Alternatively, type in the search box to search for the specific product family. -
Select a variant.
-
In the detailed view, open the Line Release tab.
-
Click on
.
The dialog window opens.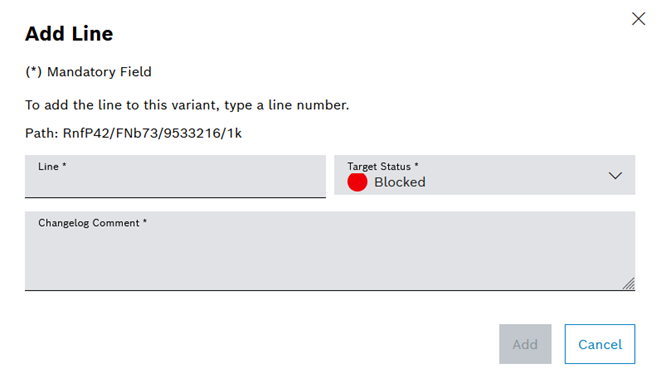
-
Enter data.
The line is added to the variant and a success message is shown.
Change release status of line
To see the line releases states, open the Basic setup page.
Prerequisites
-
Production area, product family, product and variant exist: Product tab
Procedure
-
Open the Product & Quality > Setup Specs menu entry.
-
In the Editor, click on the Production Area search box and select a production area.
Alternatively, type in the search box to search for the specific production area. -
To select a product family, click on the Product Family search box.
Alternatively, type in the search box to search for the specific product family. -
Select a variant.
-
In the detailed view, open the Line Release tab.
-
Change the Line Release Status in the row of the corresponding line.
-
In the Change Line Release Status dialog window, enter a version comment.
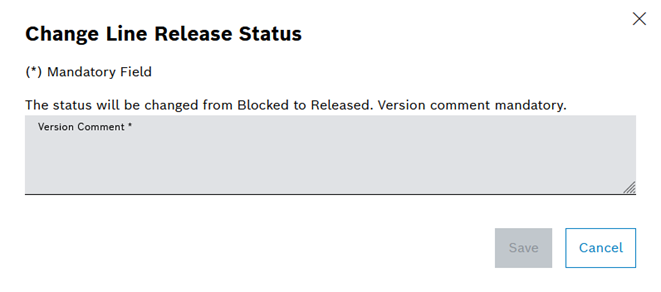
-
Click on Save.
The release status of the line is changed and a success message is shown.
Change release status of variant
To see the variant states, open the Basic setup page.
Prerequisites
-
Production area, product family, product and variant exist: Product tab
-
Variant has no conflicts: Resolving conflicts
Procedure
-
Open the Product & Quality > Setup Specs menu entry.
-
In the Editor, click on the Production Area search box and select a production area.
Alternatively, type in the search box to search for the specific production area. -
To select a product family, click on the Product Family search box.
Alternatively, type in the search box to search for the specific product family. -
Select a variant.
-
Change the release status of the variants on the right side:
-
To change the release status of an individual dataset:
-
Click on Status in the row of the corresponding variant.
-
Select a new status.
-
Comment and click on Save.
-
-
To change the release status of multiple variants:
-
Select variants by activating the checkboxes.
-
Click on
in the header. -
Select
Change Status of Variants.
-
Select the target status of the variant.
-
Comment and click on Save.
-
The release status of the variant is changed and a success message is shown.
Copy variant
Prerequisites
-
Production area, product family, product and variant exist: Product tab
Procedure
-
Open the Product & Quality > Setup Specs menu entry.
-
In the Editor, click on the Production Area search box and select a production area.
Alternatively, type in the search box to search for the specific production area. -
To select a product family, click on the Product Family search box.
Alternatively, type in the search box to search for the specific product family. -
Select one or more variants in the list by activating the checkbox.
-
Click on
in the header. -
Click on
 Copy.
Copy.
The dialog window opens.
-
Enter data:
-
In the Product Family drop-down list, select the product family to add the copied variant.
-
Enter the name of the target variant in the line of the variant.
The name of the variant must be unique within a product.
-
Select the Target Status in the line of the variant.
-
-
Click on Copy.
Variants including dataset and lines are copied and a success message is shown.
Export variant
Prerequisite
Production area, product family, product and variant exist: Product tab
Procedure
-
Open the Product & Quality > Setup Specs menu entry.
-
In the Editor, click on the Production Area search box and select a production area.
Alternatively, type in the search box to search for the specific production area. -
To select a product family, click on the Product Family search box.
Alternatively, type in the search box to search for the specific product family. -
Select one or more variants in the list by activating the checkbox.
-
Click on
in the header. -
Click on
 Export in the options menu.
The dialog window opens. -
Select an export format DAT or JSON from the drop-down menu.
-
Click on Export.
-
Open or save the file in the operating system dialog window.
|
Only location type datasets of variants are exportable in CSV format. |
Variants are exported and a success message is shown.
Automatic export of variant
Prerequisites
-
Production area, product family, product and variant exist: Product tab
Once configured by following the steps on OPS Manual, Setup Specs allows automatic export of variants when the variants are released. Setup Specs saves the file on the file share on Orchestrator module. Set the status of the variant to the blocked status to delete the exported file.
Procedure
Enable and disable the automatic export features on:
-
Use Product tab for enabling automatic export on production area level.
-
Use Configurator tab for enabling automatic export on dataset level.
|
The automatic export supports different formats. The export decisions on Configurator tab overrules the export decisions made on Product tab automatically. The automatic export format of a dataset has a higher priority than the selected production area format. |
|
Only location type datasets are automatically exported in CSV format. Even selected as CSV, Setup Specs exports other types of datasets in DAT format automatically. |
Filter variant
Prerequisite
Production area, product family, product and variant exist: Product tab
Procedure
-
Open the Product & Quality > Setup Specs menu entry.
-
In the Editor, click on the Production Area search box and select a production area.
Alternatively, type in the search box to search for the specific production area. -
To select a product family, click on the Product Family search box.
Alternatively, type in the search box to search for the specific product family. -
Select the status to filter variants in the Status drop-down list.
Variants are filtered and a success message is shown.
Search for product
Prerequisite
Production area, product family, product and variant exist: Product tab
Procedure
-
Open the Product & Quality > Setup Specs menu entry.
-
In the Editor, click on the Production Area search box and select a production area.
Alternatively, type in the search box to search for the specific production area. -
To select a product family, click on the Product Family search box. Alternatively, type in the search box to search for the specific product family.
-
Enter the product name in full or in part in the search box in the header.
Products that match the selected filter criteria are shown in the list.
Search for dataset
Prerequisites
-
Production area, product family, product and variant exist: Product tab
Procedure
-
Open the Product & Quality > Setup Specs menu entry.
-
In the Editor, click on the Production Area search box and select a production area.
Alternatively, type in the search box to search for the specific production area. -
To select a product family, click on the Product Family search box.
Alternatively, type in the search box to search for the specific product family. -
Click on a variant in the list.
-
Enter the dataset name in full or in part in the search field in the detailed view in the Datasets tab.
Datasets that match the selected filter criteria are shown in the list.
Edit parameter value
Prerequisites
-
Production area, product family, product and variant exist: Product tab
-
Dataset structure, structure element and parameters exist: Configurator tab
Procedure
-
Open the Product & Quality > Setup Specs menu entry.
-
In the Editor, click on the Production Area search box and select a production Area.
Alternatively, type in the search box to search for the specific production area. -
To select a product family, click on the Product Family search box.
Alternatively, type in the search box to search for the specific product family. -
Click on a variant in the list.
-
Click on
in the row of the dataset in the detailed view. -
Click on a structure element in the list.
-
In the detailed view, edit the value in the row of the parameter.
-
Click on Save in the detailed view.
-
Enter a version comment in the Save and Create Version dialog window.
-
Click on Save.
|
Edit dataset template parameters from production areas in Editor or Configurator. Edit parameters from type groups only in Configurator. |
Parameter values are edited and a success message is shown.
Search for parameters
Prerequisites
-
Production area, product family, product and variant exist: Product tab
-
Dataset structure, structure element and parameters exist: Configurator tab
Procedure
-
Open the Product & Quality > Setup Specs menu entry.
-
In the Editor, click on the Production Area search box and select a production area.
Alternatively, type in the search box to search for the specific production area. -
To select a product family, click on the Product Family search box.
Alternatively, type in the search box to search for the specific *product family. -
Click on a variant in the list.
-
Click on
in the row of the dataset in the detailed view. -
Click on a structure element in the list.
-
Enter the parameter name in full or in part in the search field in the detailed view in the header.
Parameters that match the selected filter criteria are shown in the list.
Search for structure element
Prerequisites
-
Production area, product family, product and variant exist: Product tab
-
Dataset structure, structure element and parameters exist: Configurator tab
Procedure
-
Open the Product & Quality > Setup Specs menu entry.
-
In the Editor, click on the Production Area search box and select a production area.
Alternatively, type in the search box to search for the specific production area. -
To select a product family, click on the Product Family search box.
Alternatively, type in the search box to search for the specific product family. -
Click on a variant in the list.
-
Click on
in the row of the dataset in the detailed view. -
Enter the name of the structure element in full or in part in the search box in the header.
Structure elements that match the selected filter criteria are shown in the list.
Export dataset
Prerequisites
-
Production area, product family, product and variant exist: Product tab
-
Dataset structure, structure element and parameters exist: Configurator tab
Procedure
-
Open the Product & Quality > Setup Specs menu entry.
-
In the Editor, click on the Production Area search box and select a production area.
Alternatively, type in the search box to search for the specific production area. -
To select a product family, click on the Product Family search box.
Alternatively, type in the search box to search for the specific product family. -
Click on a variant in the list.
-
Select a dataset in the detailed view by activating the checkbox.
-
Click on
in the header. -
Click on
Export in the options menu. -
In the Export dialog window, select an export format from JSON, DAT or CSV using the radio button.
-
Click on Export.
-
Open or save the file in the operating system dialog window.
|
Setup Specs exports only location type datasets in CSV format. |
Datasets are exported and a success message is shown.
Display history of dataset
Prerequisites
-
Production area, product family, product and variant exist: Product tab
-
Dataset structure, structure element and parameters exist: Configurator tab
Procedure
-
Open the Product & Quality > Setup Specs menu entry.
-
In the Editor, click on the Production Area search box and select a production area.
Alternatively, type in the search box to search for the specific production area. -
To select a product family, click on the Product Family search box.
Alternatively, type in the search box to search for the specific product family. -
Click on a variant in the list.
-
Click on
in the row of the dataset in the detailed view. -
Open the History tab.
The dataset history is shown in the list.
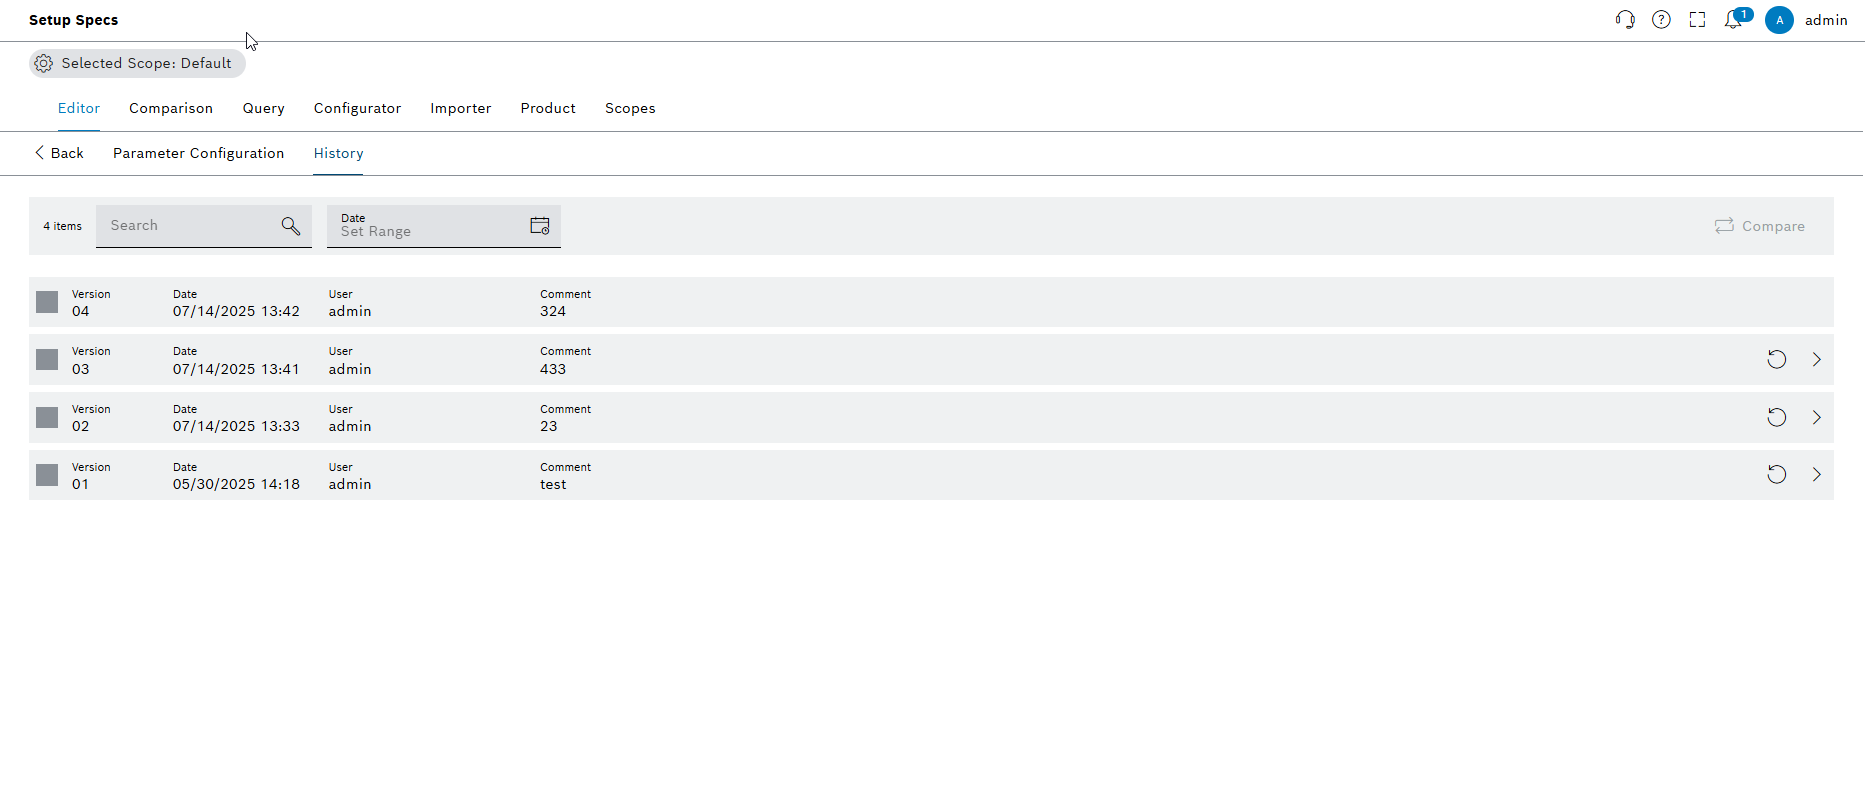
Functions in the History tab
-
To search for a version, enter the user ID in the search box.
-
To filter by a version, select a creation date in Date field.
-
To compare versions, select multiple versions by activating the checkboxes and click on
 Compare.
 -
To restore a version and consequently reset the dataset, click on
 in the row of the version.
 -
To display the older version of the dataset, click on
in the row of the dataset on the right.
|
When restoring of an older version, Setup Specs checks differences from the most recent dataset structure. Setup Specs updates the old dataset to the most recent structure. |
Display the history of the variant
Prerequisites
-
Production area, product family, product and variant exist: Product tab
-
Dataset structure, structure element and parameters exist: Configurator tab
Procedure
-
Open the Product & Quality > Setup Specs menu entry.
-
In the Editor, click on the Production Area search box and select a production area.
Alternatively, type in the search box to search for the specific production area. -
To select a product family, click on the Product Family search box.
Alternatively, type in the search box to search for the specific product family. -
Click on a variant in the list.
-
Open the History tab from the right side.
The variant history is shown in the list.

Functions in the History tab
-
To search for a version, enter the user ID or variant version number in the search box.
-
To filter by a date, select the date under the Date field.
-
To display all the versions of the variant, use the expand/collapse icons on the right.
-
To display the older version of the variant, click on the version, or select from the checkboxes on the right.
When the older version of a variant was selected, Setup Specs displays the old version of the variant on the left, under the actual version.
When this older version of the variant was selected, Setup Specs shows blue banner and warns user regarding the older version of the variant is actively selected and displayed.
-
To see the older variants' datasets, open the datasets tab next to the history tab.
-
To remove the older versions, click on the
menu on the left side. -
Proceed with close version or close all versions.
Display product information
Prerequisite
Production area, product family, product and variant exist: Product tab
Procedure
-
Open the Product & Quality > Setup Specs menu entry.
-
In the Editor, click on the Production Area search box and select a production area.
Alternatively, type in the search box to search for the specific production area. -
To select a product family, click on the Product Family search box.
Alternatively, type in the search box to search for the specific product family. -
Move the cursor on
icon in the row of the product.
Product information about details and released lines are shown in the list.
Create ticket
Create ticket in Editor by following the steps creating ticket in Query.
Prerequisite
Production area, product family, product and variant exist: Product tab
Procedure
-
Open the Product & Quality > Setup Specs menu entry.
-
In the Editor, click on the Production Area search box and select a production area.
Alternatively, type in the search box to search for the specific production area. -
To select a product family, click on the Product Family search box.
Alternatively, type in the search box to search for the specific product family. -
Select one or more variants in the list by activating the checkbox.
-
Click on
 Create Ticket in the header.
The dialog window opens. -
Enter data.
The Production Area, Product Family, Product and Variant fields are already selected and therefore grayed out. Click on
next to the variant to jump to Ticket Management.
The ticket is created and shown on Task Tracking > Ticket Management menu entry.
|
Resolve all open tickets to release a variant. |