Configurator tab
Use the Configurator tab to manage dataset structures, structure elements, and parameters, as well as to import and export datasets.
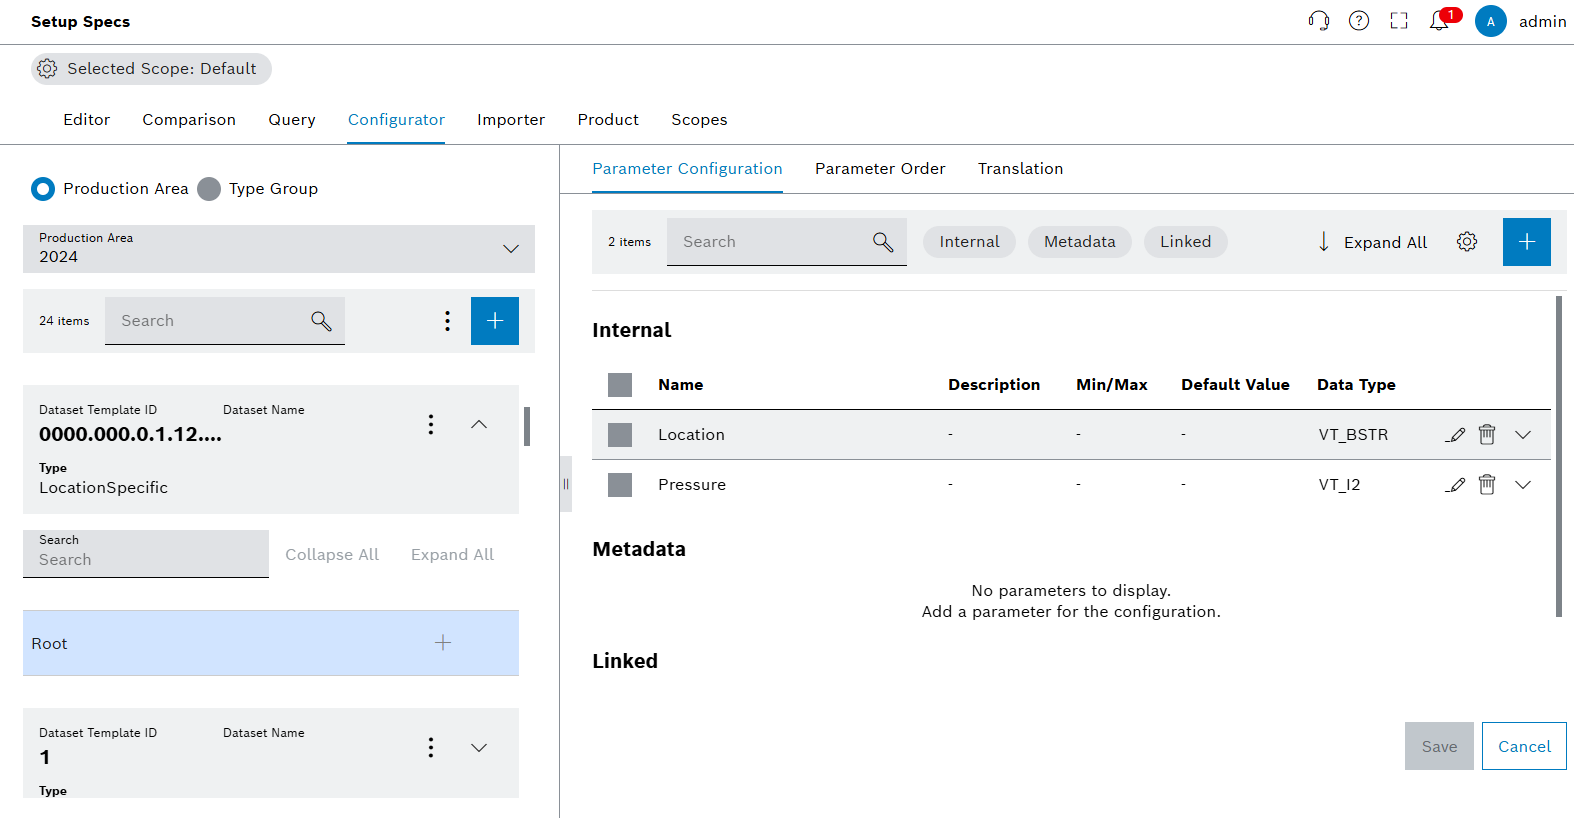
Functions in the overview of Configurator tab
| Element | Description |
|---|---|
Selected Scope: Default |
Select available scopes and see selected scope. |
Production Area and Type Group Radio Buttons |
Select production areas or type groups. |
|
Add icon on the left adds datasets to production areas and type groups. Add icon on the right adds parameters to the selected datasets. |
|
Shows filtering options and card settings on the left side. On dataset level shows copy, import, export and delete options. |
|
Down arrow on the left side expands the root elements of datasets. The down arrow on the right side expands the parameter information. |
|
Edit parameters. |
|
Delete parameters. |
|
Column settings for the table. |
Expand All |
Expands all parameters. |
Collapse All |
Collapses all parameters. |
Search Bar and Filters |
Searches and filters the parameters and datasets according to type. |
Parameter Configuration |
Shows parameters of selected datasets. |
Parameter Order |
Parameter orders of the datasets. |
Translations |
Translations of the parameters. |


Create type group
Type Group is a collection of one or more datasets. Use Configurator to add, edit, remove Type Groups and the datasets.
Procedure
-
Open the Product & Quality > Setup Specs menu entry.
-
Click on the Configurator tab.
-
Select the radio button Type Group to choose type group view.
-
To show the type group options, click on
 .
. -
Select the
 Create a Type Group option.
The dialog window opens: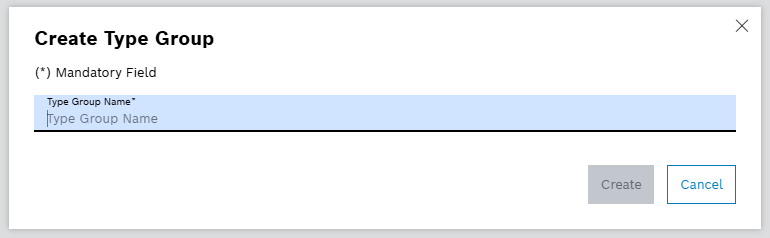
-
Enter a name for the type group.
-
Click on Create.
The type group is created and a success message is shown.
|
Type Group name must be unique. |
Copy type group
Prerequisite
Procedure
-
Open the Product & Quality > Setup Specs menu entry.
-
Click on the Configurator tab.
-
Select the radio button Type Group to choose type group view.
-
To copy existing type group, choose the type group from the dropdown menu.
-
To show the type group options, click on
. -
Select
 Copy Type Group option.
The dialog window opens: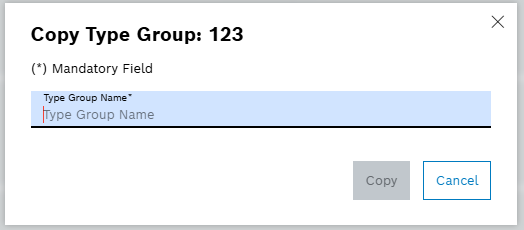
-
Enter a name for the new copy of Type Group.
-
Click on Copy.
The type group is copied and a success message is shown. The copied type group is shown on the Type Group dropdown menu.
|
Copied type group name must be unique. |
Edit type group
Prerequisite
Procedure
-
Open the Product & Quality > Setup Specs menu entry.
-
Click on the Configurator tab.
-
Select the radio button Type Group to choose type group view.
-
To edit existing type group, choose a type group from the dropdown menu.
-
To show the type group options, click on
. -
Select
 Edit Type Group option.
The dialog window opens: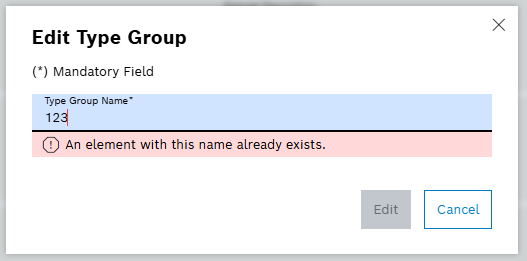
-
Enter a new name for the type group.
-
Click on Edit.
The type group is changed and a success message is shown.
|
Edited type group name must be unique. |
Create dataset structure
Prerequisites
Procedure
-
Open the Product & Quality > Setup Specs menu entry.
-
Click on the Configurator tab.
-
Select Production Area or Type Group from the radio buttons.
-
Select Dataset under Type Group or Dataset Template under Production Area from the dropdown menu.
-
Click on
 to add dataset or dataset template.
The dialog window opens. -
Enter data in the dialog window.
-
Select the type of dataset or dataset template to create by selecting the radio button.
-
To add a Location type:
-
Enter a line number or a station number of the dataset structure in the text box Line or Station.
-
If needed, fill the optional fields Station Index, Functional Unit, Working Position, Tool Position and Description.
-
If needed, navigate to Export tab to enable automatic export.
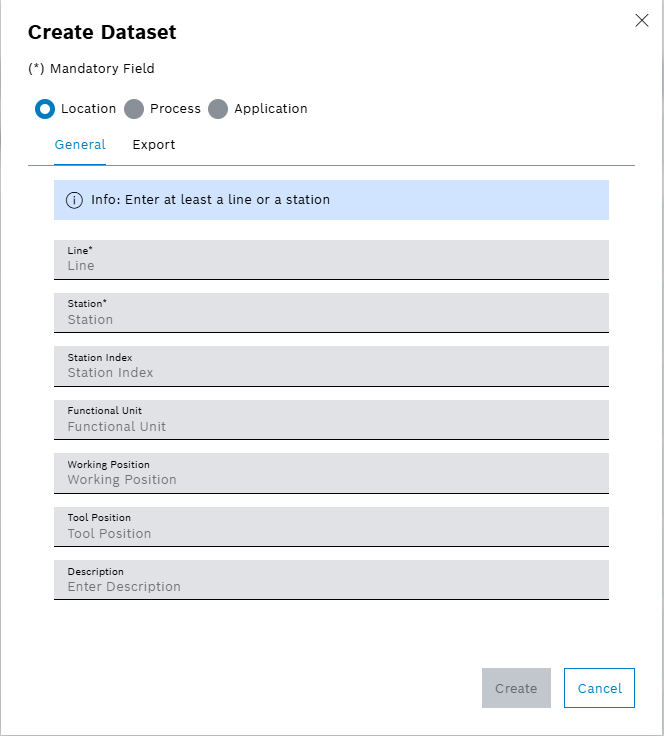
-
-
To add a Process type:
-
Enter a process number of the dataset structure in the text box Process Number.
-
If needed, fill the optional field Description.
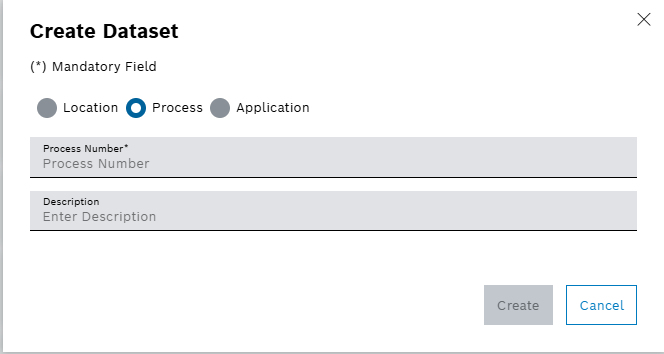
-
-
To add an Application type:
-
Enter an application name or number of the dataset structure in the text box Application.
-
If needed, fill the optional field Description.
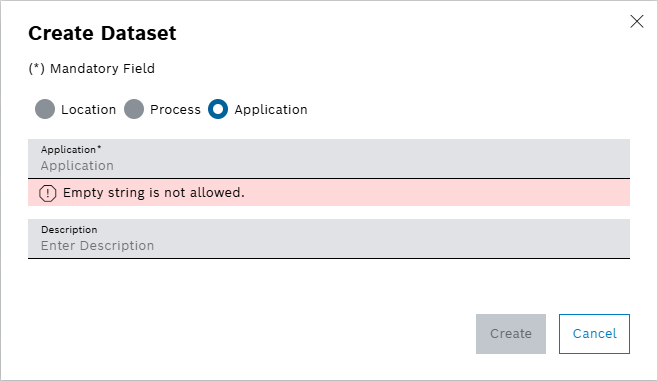
-
-
-
Click on Create.
The dataset or dataset template structure is created and a success message is shown.
Edit dataset structure
Prerequisites
Procedure
-
Open the Product & Quality > Setup Specs menu entry.
-
Click on the Configurator tab.
-
Select Production Area or Type Group from the radio buttons.
-
Select a Location type Dataset or Dataset Template from the detailed view.
-
Click on
in the dataset structure row in the detailed view. -
Select
Edit option.
The dialog window opens: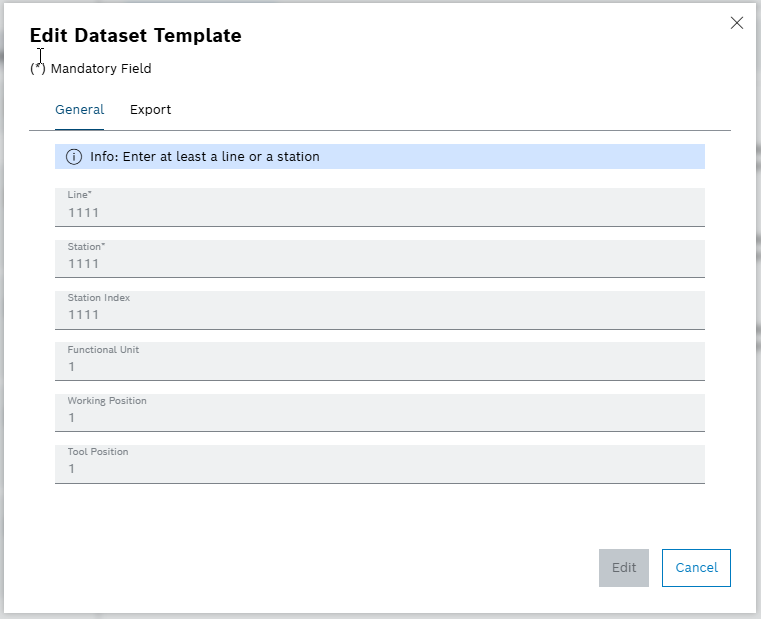
-
Enable or disable the automatic export for the Dataset or Dataset Template.
-
Select an export format.
-
Click on Edit.
The format for automatic export of the dataset structure is changed and a success message is shown.
|
Alternatively, edit the automatic export on Production Area level under Product Tab: Enabling automatic export for production area. |
Copy dataset structure
Prerequisites
Procedure
-
Open the Product & Quality > Setup Specs menu entry.
-
Click on the Configurator tab.
-
Select Production Area or Type Group from the radio buttons.
-
Select a dataset or dataset template from the detailed view.
-
Click on
in the dataset structure row in the detailed view. -
Click on
Copy.
The dialog window opens: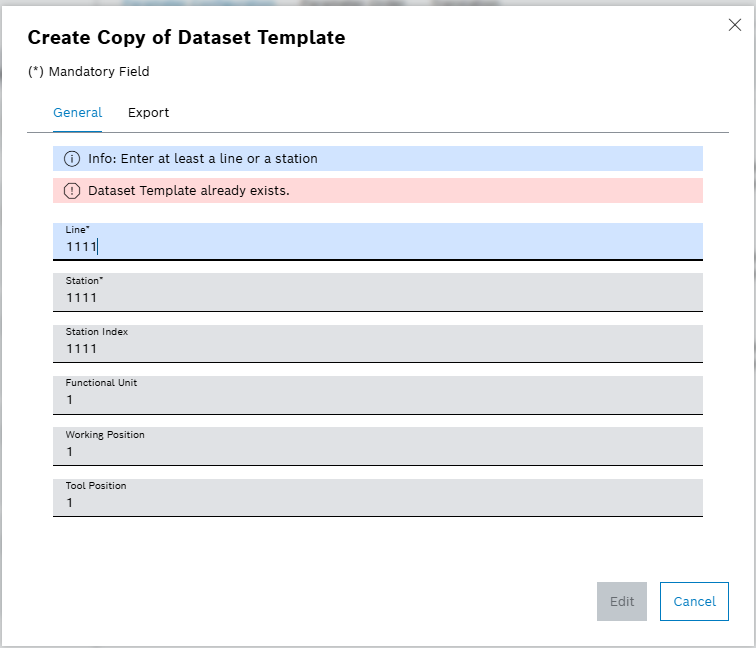
-
Enter data on the Create Copy of Dataset window.
-
Click on Edit.
The dataset structure is copied and a success message is shown.
Filter dataset structure
Prerequisites
Procedure
-
Open the Product & Quality > Setup Specs menu entry.
-
Click on the Configurator tab.
-
Select Production Area or Type Group from the radio buttons.
-
Click on a filter criterion in the header in the detailed view:
-
Click on the
 Location to display only location-specific dataset structures.
 -
Click on the
 Application to display only application-specific dataset structures.
 -
Click on the
 Process to display only process-specific dataset structures.
-
The dataset structure is filtered and a success message is shown.
Search for dataset structure
Prerequisites
Procedure
-
Open the Product & Quality > Setup Specs menu entry.
-
Click on the Configurator tab.
-
Select Production Area or Type Group from the radio buttons.
-
In the detailed view, enter the dataset structure name in full or in part in the search box.
Dataset structures that match the selected filter criteria are shown in the list.
Card settings for dataset structure
Prerequisites
Procedure
-
Open the Product & Quality > Setup Specs menu entry.
-
Click on the Configurator tab.
-
Select Production Area or Type Group from the radio buttons.
-
In the detailed view, select
 Card Settings option.
The dialog window opens: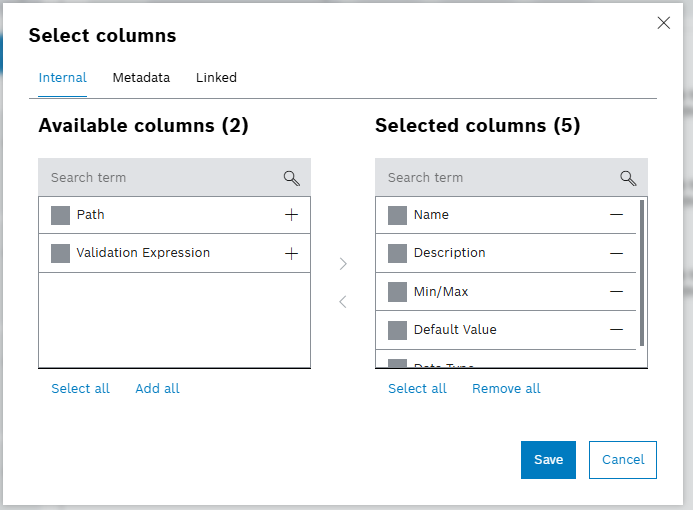
-
To change the attributes on detailed view, drag and drop or use
 and
and
 to move the following items between Available Fields to Selected Fields:
-
Adding Description field under Selected Fields shows Description of each dataset in detailed view.
-
Adding Type field under Selected Fields shows the Type of each dataset in the detailed view.
-
Adding Dataset Template ID field under Selected Fields shows Dataset Template ID of each dataset in detailed view. (Only available under the Production Area).
-
Adding Dataset ID field under Selected Fields shows Dataset ID of each dataset in detailed view. (Only available under Type Group).
-
-
Click on Save.
The card settings are updated and a success message is shown.
|
To execute the card setting selections in bulk, use Select all, Add all and Remove all options under Card Settings.
|
Scroll and collapse settings for dataset structure
Prerequisites
Procedure
-
Open the Product & Quality > Setup Specs menu entry.
-
Click on the Configurator tab.
-
Select Production Area or Type Group from the radio buttons.
-
In the detailed view, see the following actions:
-
To collapse all datasets to hide root elements, click on
 Collapse All.
 -
To scroll back up to the beginning of the dataset list, click on
 Scroll Up.
 -
To scroll back up to highlighted dataset, click on
 Scroll to Selection.
-
The actions of collapsing, scrolling up to the beginning of the list, and scrolling back to selection are enabled.
Add structure element
Prerequisites
Procedure
-
Open the Product & Quality > Setup Specs menu entry.
-
Click on the Configurator tab.
-
Select Production Area or Type Group from the radio buttons.
-
Click on a dDataset or dataset template in the detailed view or on
 in the row of dataset on detailed view.
 -
Click on the
in the root row.
The dialog window opens. -
Enter a name in the Create Structure Element window.
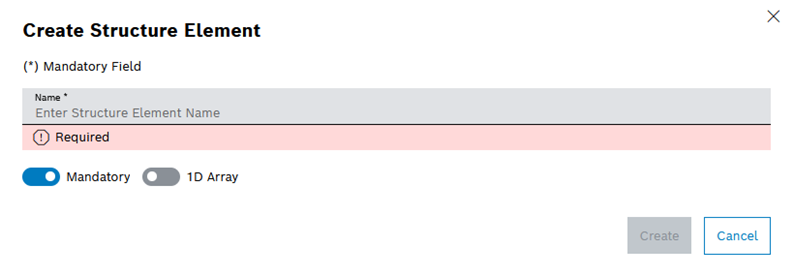
-
Enter the name of the structure element in the Name text box.
-
Deactivate the Mandatory switch if the structure element is not required for the release.
-
Activate the 1D array switch to create a 1D structure array.
-
Enter a minimum number of 1D structure arrays in the Minimum text box (only if the 1D array switch is active).
-
Enter a maximum number of 1D structure arrays in the Maximum text box (only if the 1D array switch is active).
-
-
Click on Create.
-
Click on Save in the detailed view.
-
Enter a version comment in the Save Changes dialog window.
-
Click on Save.
The structure element is added and a success message is shown.
Edit structure element
Prerequisites
Procedure
-
Open the Product & Quality > Setup Specs menu entry.
-
Click on the Configurator tab.
-
Select Production Area or Type Group from the radio buttons.
-
Click on a dataset or dataset template or on
in the row of the corresponding dataset. -
Click on the Root element and then click on
in the row of Root element. -
Click on
Edit.
The dialog window opens.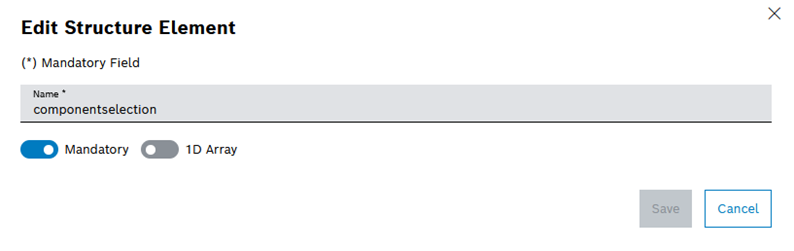
-
Enter data.
-
Deactivate the Mandatory switch if the structure element is not required for the release.
-
Enter the minimum number of 1D structure arrays in the Minimum text box (only if the 1D array switch is active).
-
Enter the maximum number of 1D structure arrays in the Maximum text box (only if the 1D array switch is active).
-
-
Click on Save.
-
Click on Save in the detailed view.
-
Enter a version comment in the Save Changes window.
-
Click on Save.
The structure element is changed and a success message is shown.
|
To add more structure elements under specific elements, select the structure element first and click on
|
Search for the structure element
Prerequisites
Procedure
-
Open the Product & Quality > Setup Specs menu entry.
-
Click on the Configurator tab.
-
Select Production Area or Type Group from the radio buttons.
-
Click on a dataset or dataset template in the detailed view or on
in the row of dataset on detailed view. -
Enter the structure element name in full or in part in the search box.
Structure elements that match the selected filter criteria are shown in the list.
Create parameters
Prerequisites
Procedure
-
Open the Product & Quality > Setup Specs menu entry.
-
Click on the Configurator tab.
-
Select Production Area or Type Group from the radio buttons.
-
Click on a dataset or dataset template or on
in the row of the corresponding dataset. -
Select a structure element.
-
To add parameters, click on
in the Parameter Configuration tab.
The dialog window opens. -
Enter the name in the Create Parameter window.
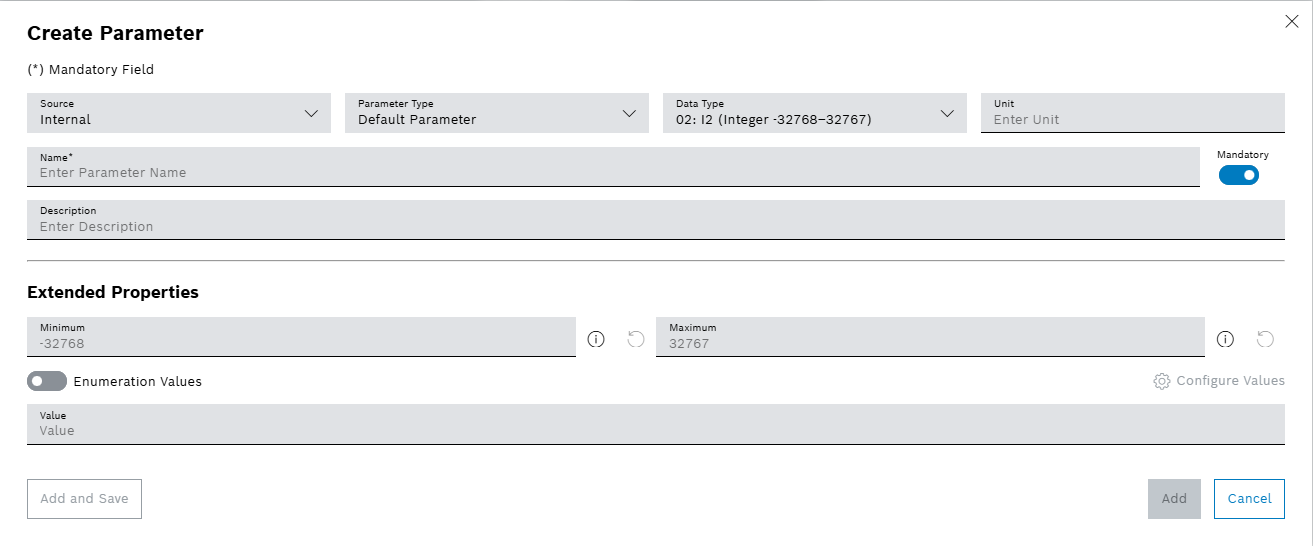
-
Select the source of the parameter in the Source drop-down list.
-
Use Internal in dataset and dataset template to configure parameters.
-
-
To select the parameter type, use the dropdown menu.
-
Select a data type of the parameter in the Data Type drop-down list only for the internal source.
-
02: I2 - Integer between minimum -32768 and maximum 32767
-
03: I4 - Integer between minimum -2147483648 and maximum -2147483647
-
04: R4 - Decimal with single precision
-
05: R8 - Decimal with double precision
-
07: DATE - Date and time in DD/MM/YYYY format
-
08: BSTR - String
-
11: BOOL - Boolean true or false
-
16: I1 - Integer between minimum -128 and maximum 127
-
17: UI1 - Integer between minimum 0 and maximum 255
-
18: UI2 - Integer between minimum 0 and maximum 65535
-
19: UI4 - Integer between minimum 0 and maximum 4294967295
-
20: I8 - Integer between minimum -9e+18 and maximum 9e+18
-
21: UI8 - Integer between minimum 0 and maximum 1.8e+19
-
-
Enter a unit of the parameter in the Unit text box.
-
Deactivate the Mandatory switch if the parameter is not required for the release.
Setup Specs cannot release a dataset with a parameter with activated Mandatory switch if the parameter doesn’t have value. Provide the value after creation, but before release.
-
Enter a minimum value of the parameter in the Minimum text box.
-
Enter a maximum value of the parameter in the Maximum text box.
-
Enter a default value of the parameter from Dataset Template in the Default Value text box.
-
Enter a value of the parameter from Dataset in the Value text box (only for the internal source).
-
-
Enter the minimum number of 1D arrays, 2D arrays or 3D arrays in the Minimum Array Elements text box.
-
Enter the maximum number of 1D arrays, 2D arrays or 3D arrays in the Maximum Array Elements text box.
-
Activate the Enumeration Values switch to add enumeration value.
-
Metadata has configurable name and format string for the parameter.
-
Inheritance of Linked parameters from other existing production areas is possible. Value stays the same as in origin variant. Updating the original parameter updates the linked parameter simultaneously.
-
-
Enter the name of the parameter in the Name text box.
-
Enter a brief description of the parameter in the Description text box.
-
Type the values under the Extended Properties.
To add the parameter and save directly, click on Add & Save.
-
-
Click on Save in the detailed view.
-
Enter a version comment in the Save Changes window.
-
Click on Save.
The parameter is created and a success message is shown.
Edit parameters
Prerequisites
Procedure
-
Open the Product & Quality > Setup Specs menu entry.
-
Click on the Configurator tab.
-
Select Production Area or Type Group from the radio buttons.
-
Click on the dataset or dataset template in the detailed view or on
in the row of dataset on detailed view. -
Select a structure element.
-
In the detailed view, click on the
in the Parameter Configuration tab in the row of a parameter.
A dialog window opens. -
Enter the name in the Edit Parameter window.
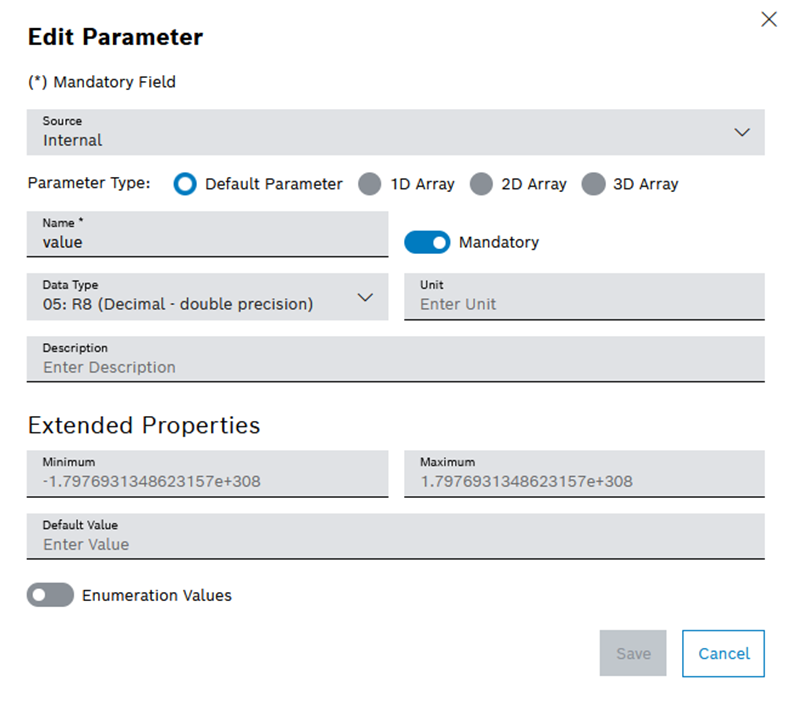
-
Edit the fields considering the rules given on creating a parameter.
To add the edited parameter and save directly, click on Edit and Save.
-
-
Click on Edit in the detailed view.
-
Enter a version comment in the Save Changes dialog window.
-
Click on Save.
The parameter is changed and a success message is shown.
Import parameters
Prerequisites
Procedure
-
Open the Product & Quality > Setup Specs menu entry.
-
Click on the Configurator tab.
-
Select Production Area or Type Group from the radio buttons.
-
Click on the dataset or dataset template in the detailed view or on
in the row of dataset on detailed view. -
Click on
in the Dataset ID or Dataset Template ID row. -
Click on
 Import.
The dialog window opens. -
Select the JSON or DAT file type as the format of export in the operating system window.
Select only one file to import.
-
Click on Save in the detailed view.
-
Enter a version comment in the Save Changes dialog window.
-
Click on Save.
The parameters are imported and a success message is shown.
Export parameters
Prerequisites
Procedure
-
Open the Product & Quality > Setup Specs menu entry.
-
Click on the Configurator tab.
-
Select Production Area or Type Group from the radio buttons.
-
Click on the dataset or dataset template in the detailed view or on
in the row of dataset on detailed view. -
Click on
in the Dataset ID or Dataset Template ID row. -
Click on
 Export.
The dialog window opens. -
Save the file in JSON format in the operating system window.
The parameters are exported and a success message is shown.
Change the order of the parameters
Prerequisites
Procedure
-
Open the Product & Quality > Setup Specs menu entry.
-
Click on the Configurator tab.
-
Select Production Area or Type Group from the radio buttons.
-
Click on the dataset or dataset template in the detailed view or on
in the row of dataset on detailed view. -
Click on a structure element.
-
Open the Parameter Order tab in the detailed view.
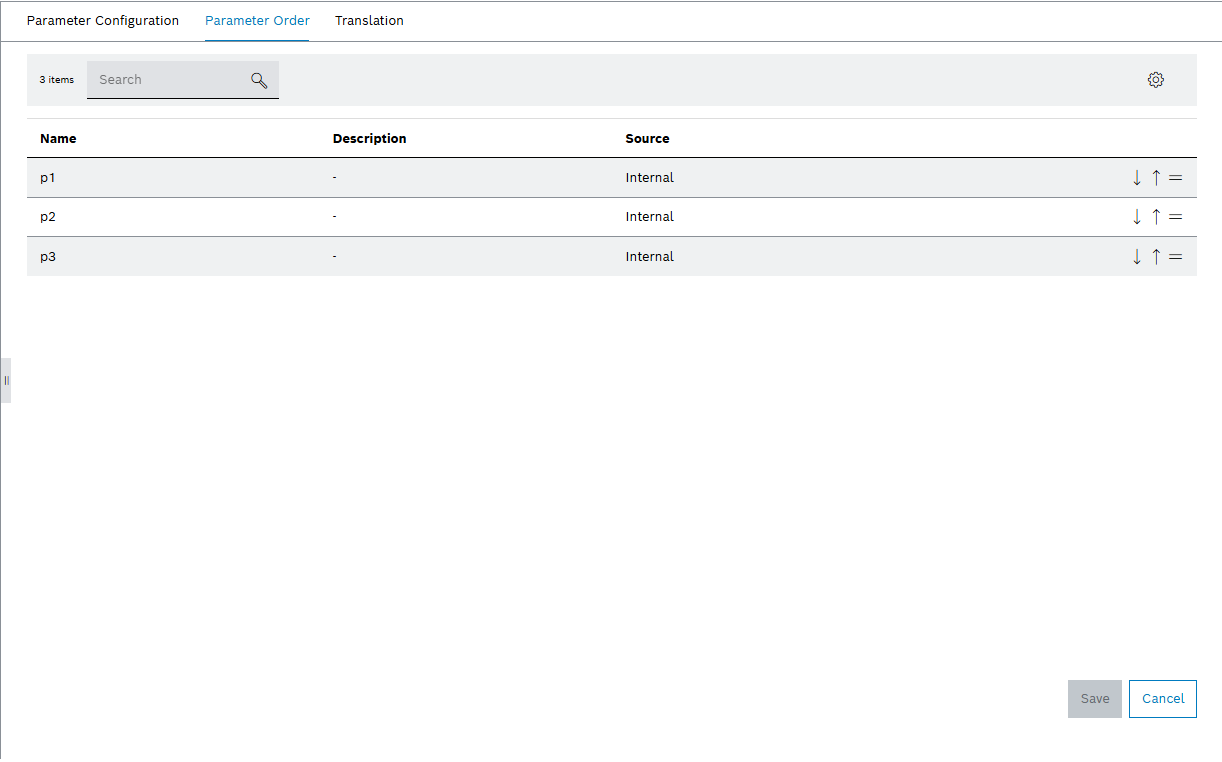
-
Drag individual parameters or use
 to reorder.
 -
Click on Save in the detailed view.
-
Enter a version comment in the Save Changes dialog window.
-
Click on Save.
The order of the parameters is changed.
Add translation of the parameter description and unit
Prerequisites
Procedure
-
Open the Product & Quality > Setup Specs menu entry.
-
Click on the Configurator tab.
-
Select Production Area or Type Group from the radio buttons.
-
Click on the dataset or dataset template in the detailed view or on
in the row of dataset on detailed view. -
Click on a structure element.
-
Open the Translation tab in the detailed view.
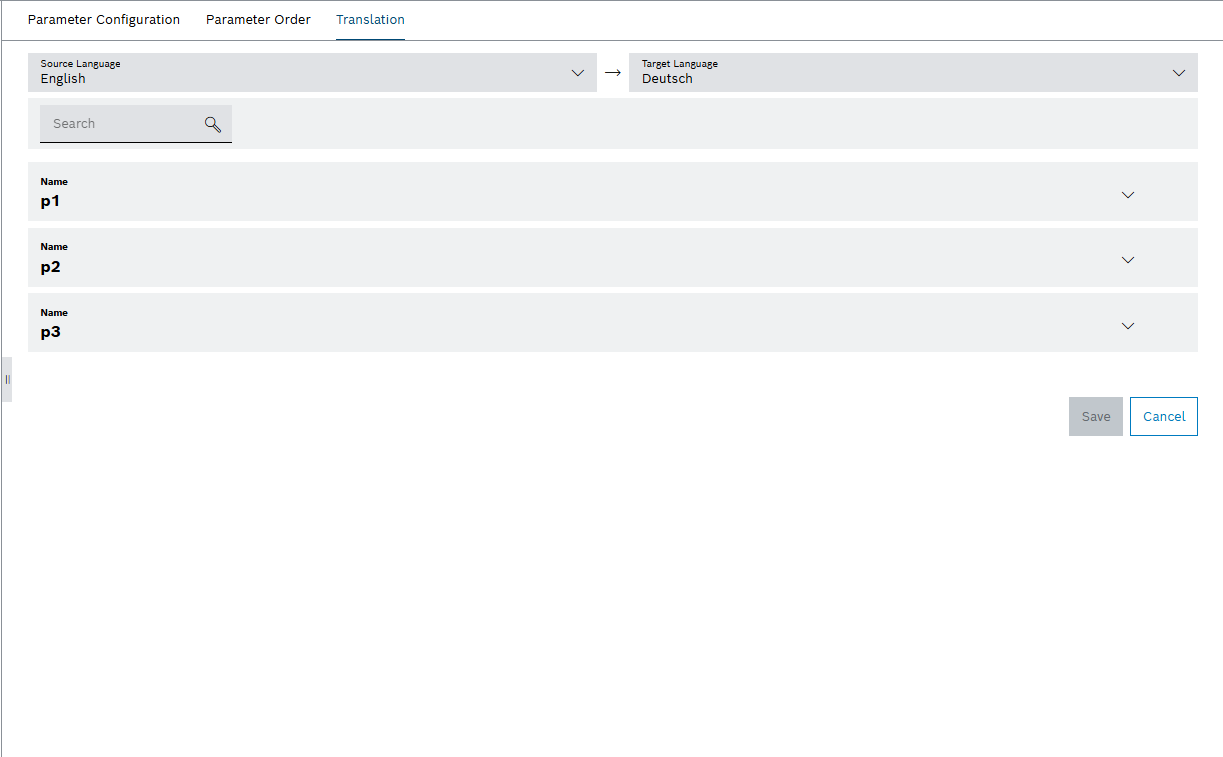
-
Select the desired language besides English in the language drop-down list.
-
Click on
in the row of a parameter. -
Enter the translation of the parameter description in the Description row.
-
Enter the translation of the parameter unit in the Unit row.
-
Click on Save in the detailed view.
-
Enter a version comment in the Save Changes dialog window.
-
Click on Save.
The translation of the parameter description is added.
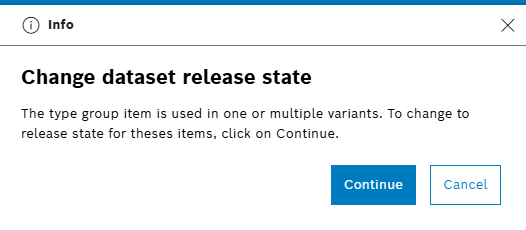
Release from the query
Setup Specs offers jump to the Query after the update on datasets and parameters from a Type Group if the dataset was a part of a released variant. This navigation starts from Configurator, leading to the Query; to ease the release process for the datasets and variants.
Prerequisites
Procedure
-
Open the Product & Quality > Setup Specs menu entry.
-
Click on the Configurator tab.
-
Select Type Group from the radio buttons.
-
Click on the dataset in the detailed view or on
in the row of dataset on detailed view. -
Click on a structure element.
-
Change the dataset structure by:
-
Click on Save in the detailed view.
-
Enter a version comment in the Save Changes dialog window.
-
Click on Save.
-
Click on Continue to jump to Query to proceed with the release process.
|
Confirm the saving process with Cancel and stay in Configurator. |
The Query tab is opened. Search results are highlights the affected variants and datasets.
|
In the Query tab, change the status of variants, or change the status of datasets. |