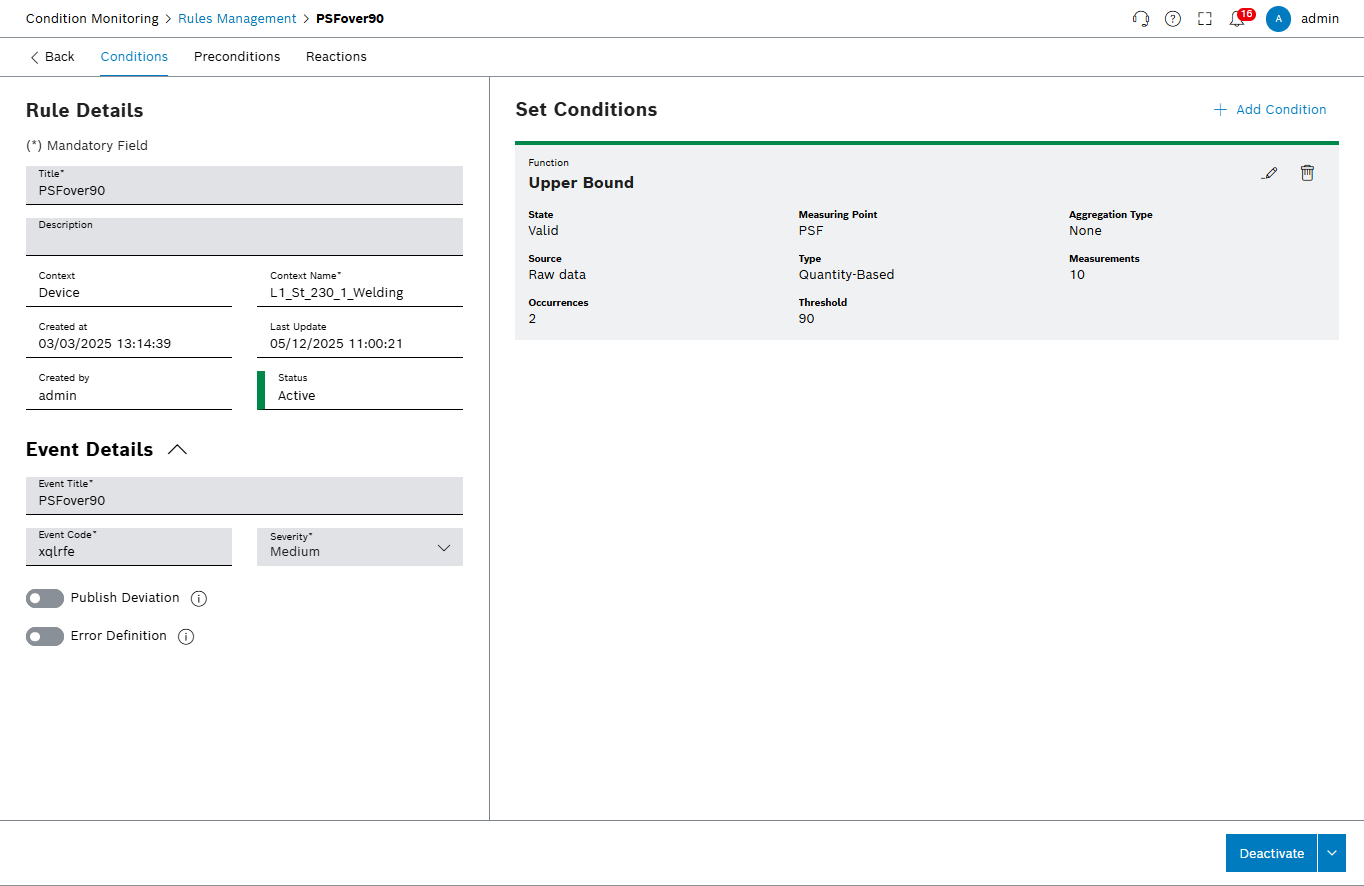
Rule details
In this view, the details of a rule can be managed.
It is possible to define the main details of a rule, event details, conditions, preconditions and reactions. These details are seperated into different tabs within this details page.
This page will open after creating a new rule or by clicking on a rule in the overview page.
|
If Rules Extended is installed, additional rules are available: Process capability index, jump detection, trend (method of least squares, time-based or normalized) and trend. |
Prerequisite
Rules Management Expert or Rules Management Administrator role
Rule state change
The state of a rule can be changed to Active, Inactive or Waiting for Approval. In the details page, the state can be changed by click on the button in the lower right corner.

Flow: Waiting for Approval > Active > Inactive
-
After creating a new rule, the state is Not Valid, because no conditions are defined yet.
-
After adding the rule with at least one valid condition, the state will be changed to Waiting for Approval.
-
After approving the rule, the state will be changed to Active and the rule will be executed when the conditions are met.
-
The state can be changed to Inactive to disable the rule temporarily. In this state, the rule will not be executed.
-
The state can be changed back to Active to enable the rule again.
-
In all valid states, it can be also changed back to Waiting for Approval to review the rule again.
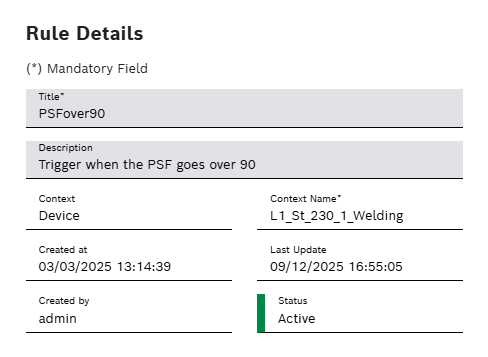
Rule details
In this section, the main details of a rule are displayed and can be edited. Title and Description are possible to edit.
Changes need to be saved with click on Save. With click on Cancel changes will be discarded.

Event details
In this section, the event details of a rule are displayed and can be edited.
The Event Title will be used when the rule gets triggered. In default the Event Title has the same content as the title of the rule.
The Event Code needs to be unique, so that there is no conflict with a code generated by another rule or a machine message. There is automatically a code generated on rule creation, but it can be changed.
The Severity of the event can be Low, Medium or High.
The Publish Deviation toggle defines if a deviation will be created in the Deviation Management Module when the rule gets triggered.
The Error Definition toggle defines if an corresponding error definition in Master Data Management is managed. On activating an error definition is linked or created. On deactivating the Device or Device Type is removed as relation from the error definition. Central managed Error Codes can be used to reference in other modules, for example Maintenance Management.
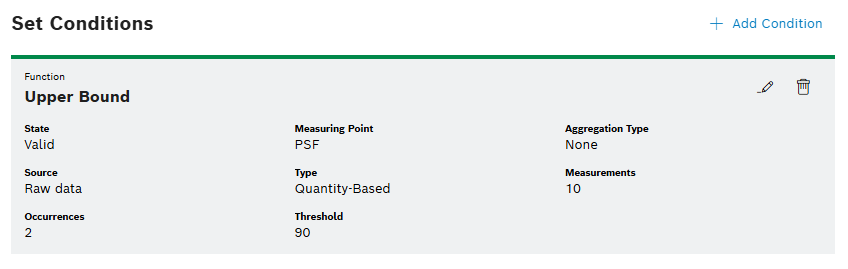
Conditions
In this section, all conditions of a rule are displayed and can be managed. Conditions define when a rule gets triggered. Multiple conditions are automatically AND-linked. It is possible to add, edit or delete conditions.
The cards visualizes a overview of the condition settings.
-
To add a new condition, click
 Add condition.
 -
To edit a condition, click
 on the corresponding card.
 -
To delete a condition, click
 on the corresponding card.
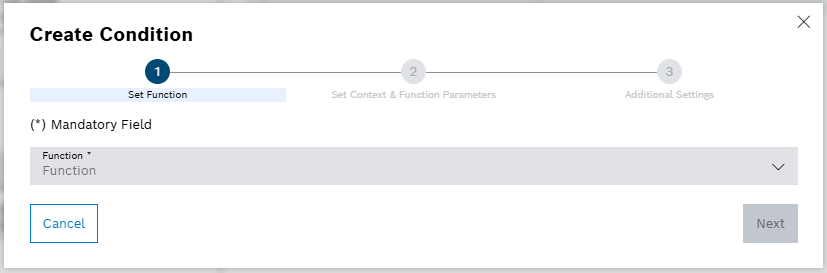
Add or edit a condition
In this overlay, all details of a condition can be setup. This wizard guides through the steps to create or edit a condition.
-
Set the Function of the condition.
-
Select the function from the drop-down list.
-
Choose between a wide range of functions. See: Rule Types - Standard Functions.
-
-
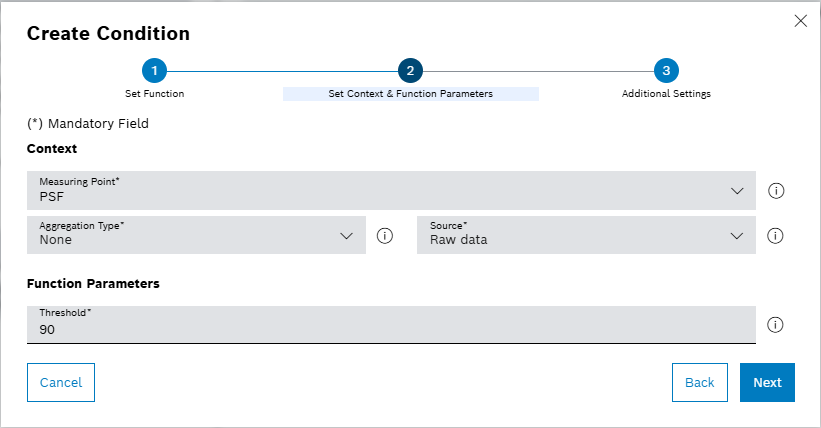
Set Context & Function Parameters of the condition.
-
Select the Measuring Point , Aggregation Type and Source from the respective drop-down lists.
-
Define the Function Parameters of the condition. The parameters depend on the selected function.
-
-
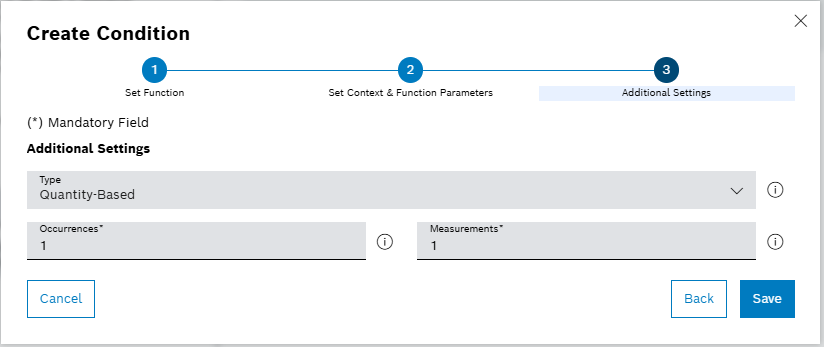
Define Additional Settings of the condition.
-
These settings depending on the selected function
-
Choose between Quantity-based or Time-based measure.
-
in most cases its needed to define how often functions has to occur within the amount measurements/seconds.
-
-
Click on Save to save the condition or Cancel to discard changes.
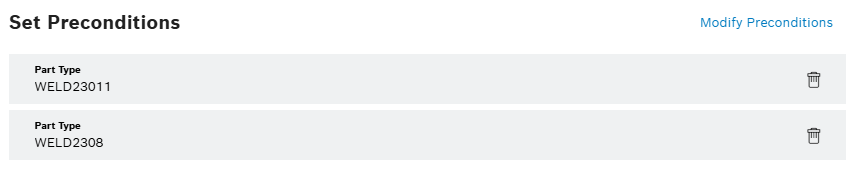
Preconditions
In this section, all preconditions of a rule are displayed and can be managed. Preconditions define additional conditions that must be met before a rule can be executed. Multiple preconditions are automatically AND-linked. It is possible to add, edit or delete preconditions.
-
Click on *Modify Preconditions" to open add or modify already added preconditions.
-
Click on
to delete a precondition.
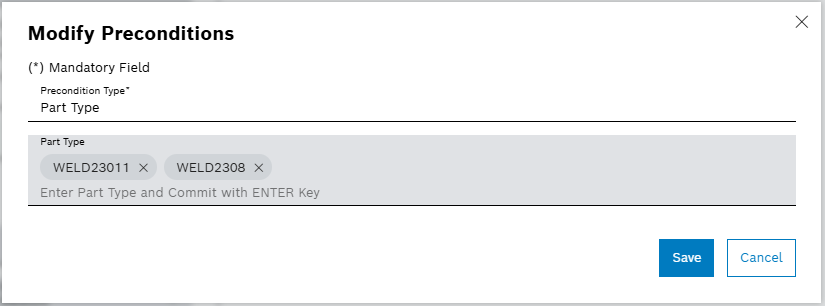
Add or modify preconditions
In the current implementation state of Condition Monitoring, only preconditions of type Part Type are supported. In future releases, more precondition types will be available. Here it is possible to select or type in multiple part types. One of the part types needs to match the part type of the measurement to execute the rule. With click on Save the selected preconditions will be added to the list, or with Cancel changes will be discarded.
Reactions
In this section, all reactions that belongs to this rule are displayed and can be managed. If the rule gets triggered, all reactions will be executed.
|
To enable the Reactions tab, the Deviation Management Module needs to be installed. All reactions are created and managed in the Deviation Management Module. Depending on the installed modules, different reaction types are available. For example Ticket Creation, Email Notification or Maintenance Management Tasks. |

| Element | Description |
|---|---|
Search field |
Search for a reaction by Title |
Action dropdown |
Filter reactions by available raction types. |
Only Active |
Show only active reactions. |
|
Refresh the list of reactions. |
|
Select one reaction of the list, then click on edit to apply changes. |
|
Select one reaction of the list, then click on delete to remove the reaction from the rule. |
|
Add, remove or reorder columns in the overview. |
Add Reaction |
Add a new reaction to the rule. |
Active |
Activate or deactivate the reaction. |


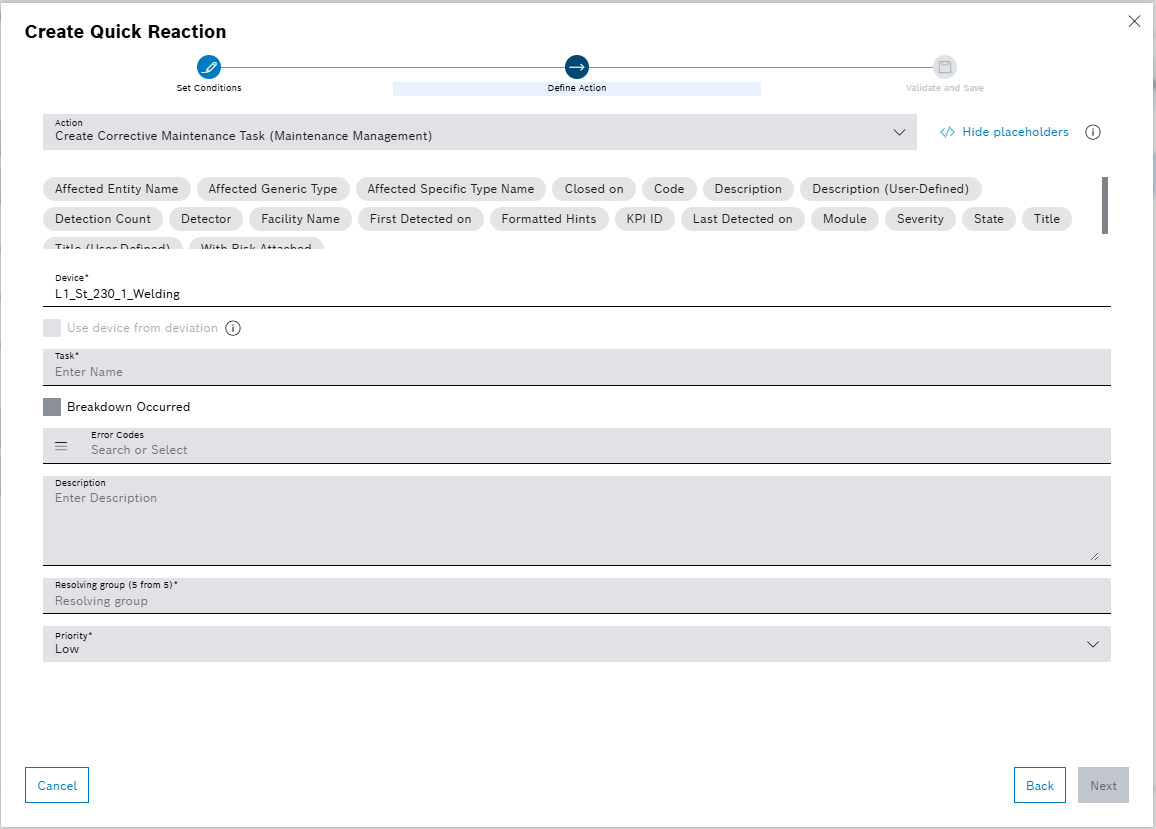
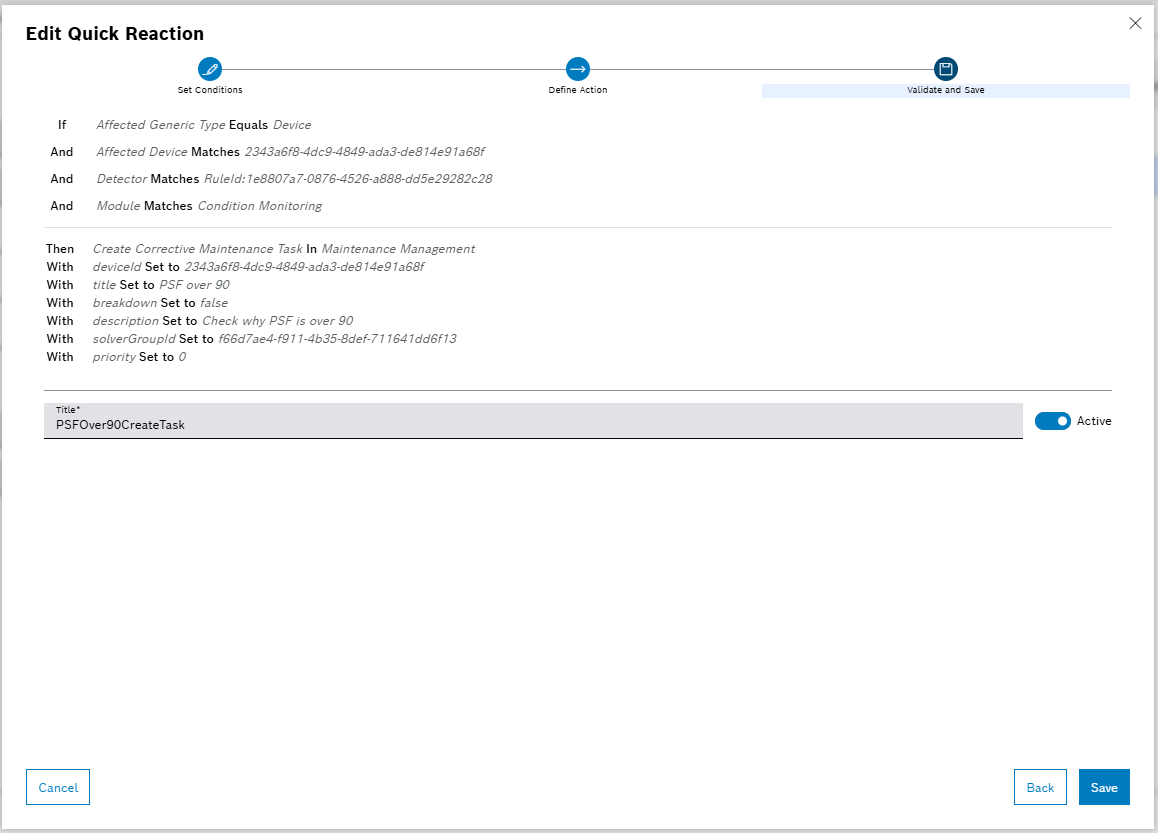
Add or edit a reaction
In this overlay, all details of a reaction can be setup. This wizard guides through the steps to create or edit a reaction.
-
Define action
-
Select a available Action Type from the drop-down list.
-
Depending on the selected action type, different parameters needs to be defined. These parameters are defined by the module which provides the action type.
-
Fill the mandatory fields (marked with an asterisk \*).
-
On top of the page, multiple placeholders are available. By click on the placeholder, the name will be copied to the clipboard. The placeholder can be used in text fields of the action parameters. On execution of the reaction, the placeholder will be replaced by the corresponding value.
-
-
Click on Next to proceed to the next step or Cancel to discard changes.
-
-
Validate and Save
-
A summary of the defined action is displayed. It shows how the reaction will be executed.
-
Define the Title of the reaction.
-
Activate or deactivate the Active toggle to define if the reaction should be active or inactive.
-
Click on Save to save the reaction, Back to navigate to the previous step, or Cancel to discard changes.
-