View Supermarkets
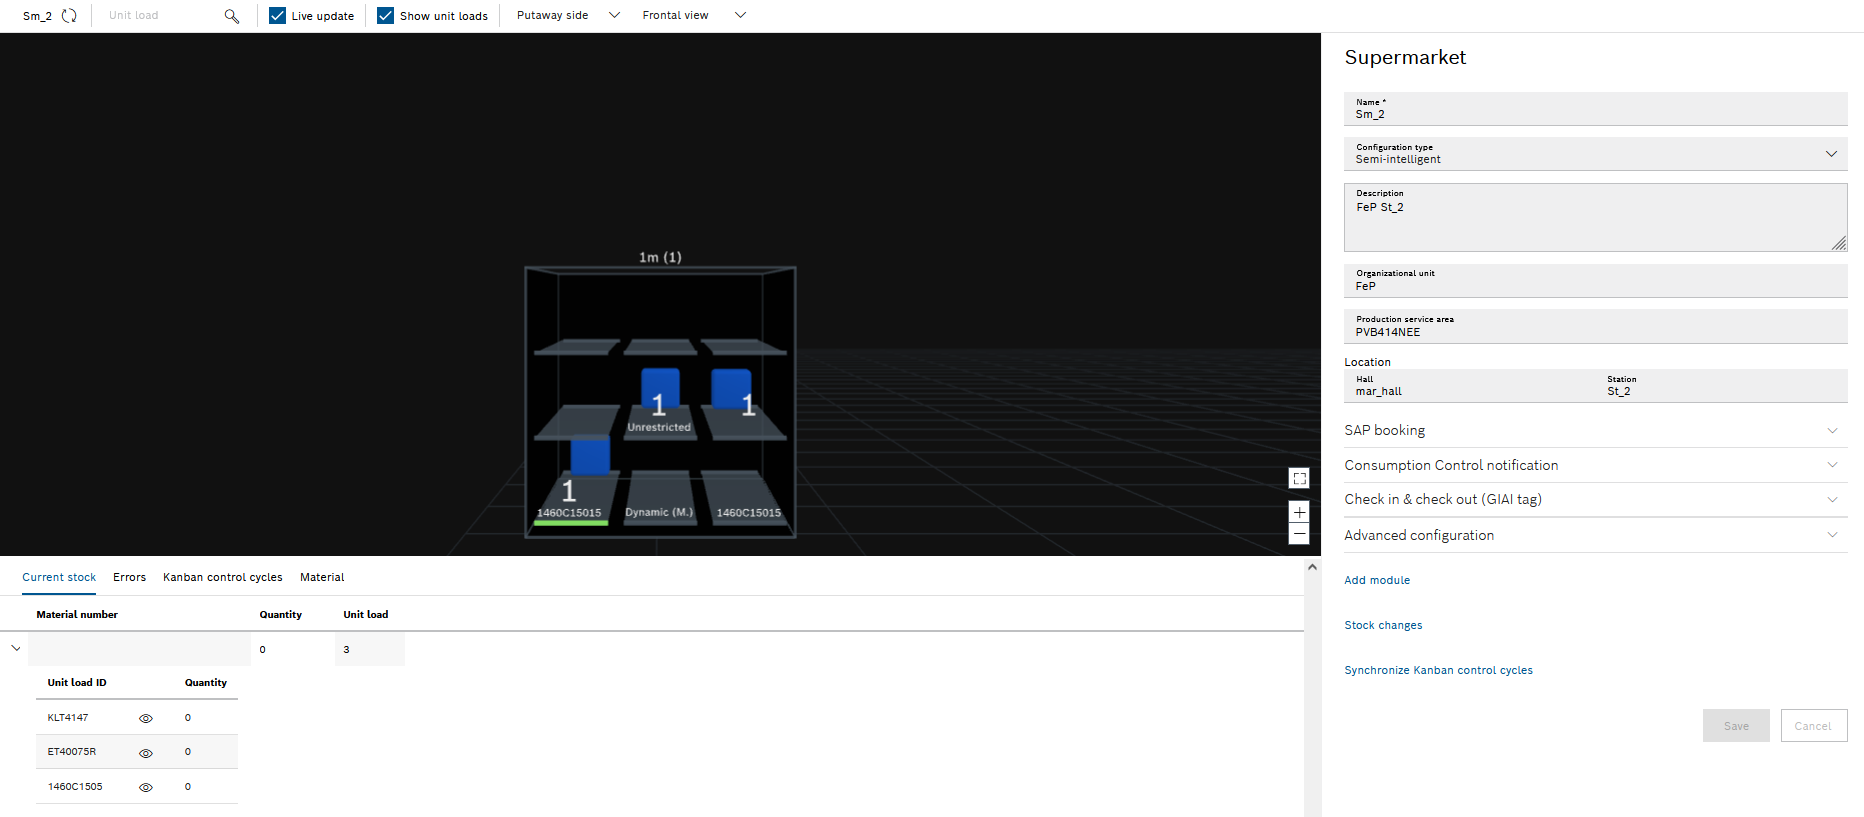
The Supermarkets view is opened with  . In the Supermarkets view, the supermarket and its components (modules, lanes and unit loads) can be configured and planned.
There are four areas in the Supermarkets view:
-
Header Supermarkets view
Refreshing the view, filtering by unit load, customizing the 3D view -
Graphical representation
Graphical view of the supermarket and its components -
Inventory area
Information on stocks, error messages -
Configuration Area
Configuration and planning of the supermarket and its components
Header Supermarkets view

| Element | Description |
|---|---|
<Supermarket> |
Refresh supermarket view. |
Unit loads |
The unit load entered in the search is highlighted in light blue. |
|
Activate or deactivate live update. |
|
Show or hide unit loads in the 3D view. |
Loading side or Unloading side |
Select the perspectives of the 3D view:
|
Frontal or bird’s eye view |
Select the perspectives of the 3D view:
|


Graphical representation

The graphic representation shows the supermarket with all modules, lanes/storage locations and unit loads.
A supermarket consists of any number of modules. Modules of the Shelf module type consist of any number of levels. The levels contain any number of lanes. Modules of the Surface module type consist of one level. The level contains any number of lanes or storage locations.
|
The representation of lanes and storage locations is identical. The 3D view is described below using the lane. |
The graphic display view can be customized with the following buttons:
| Button | Description | ||
|---|---|---|---|
|
Zoom in or out.
|
||
|
Switch to full-screen display. |
||
|
Exit full-screen display.
|


|
The view or the section of the supermarket can be moved: To do this, place the mouse pointer in the required area and move the view or section by holding down the left mouse button. |
Information about unit loads and planning is displayed on the lanes:
-
The lane shows the Kanban ID of the unit load.
-
The number on the lane shows the current stock of unit loads.
-
White up arrow indicates that the maximum stock has been exceeded.
-
White down arrow indicates that the minimum stock has not been reached.
-
The green line on the lane indicates the lane that is currently being filled.
Color of the lanes and storage locations
| Color | Description |
|---|---|
Gray |
There are no lane messages. |
Blue |
The lane has been selected. Disconnect from the physical supermarket — Troubleshooting mode: Disabled |
Red |
Error message There is an error on the lane. To view the error message in the stock area in the Errors tab, click the red lane. |
Color of the unit loads
| Color | Description |
|---|---|
Transparent blue |
The unit load contains residual quantities. |
Blue |
The unit load is filled. |
Light blue |
The unit load has been selected. |
Gray |
Reserved space for a specific unit load. The space cannot be occupied by other unit loads. To see the transport order number, Kanban ID, material, and number of parts in the unit load in the configuration area, click the gray unit load. |
Yellow |
Warning Unknown carrier. To view the warning in the stock area in the Errors tab, click the yellow unit load. Entry deadline: Unit load expiration date‑Threshold value (days) warning has been reached. |
Red |
Error message Unit load was stored in the wrong lane. To view the error message in the stock area in the Errors tab, click the red unit load. Entry deadline: Unit load expiration date‑Threshold value (days) error has been reached. |
Inventory area

In the stock area, all information about the stored material in the supermarket is displayed under the tabs.
| Element | Description |
|---|---|
|
Expand or retract the detailed view. |
|
In the 3D view, display lanes or unit loads in the bird’s eye view and highlight them in light blue. |
|
Delete row. |


Current stock tab
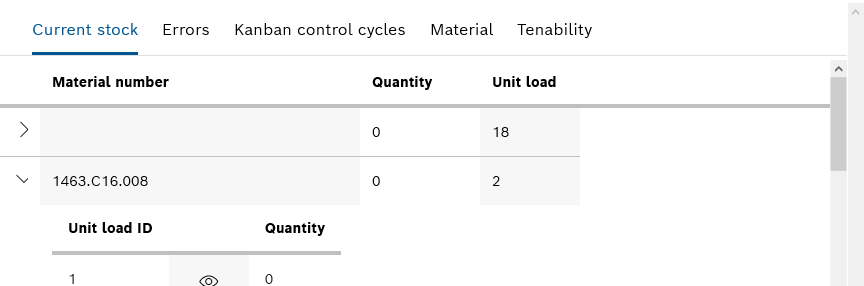
All materials, their unit loads and their number are listed in the Current stock tab. The detailed view shows the individual unit loads and their quantity.
Reservations tab
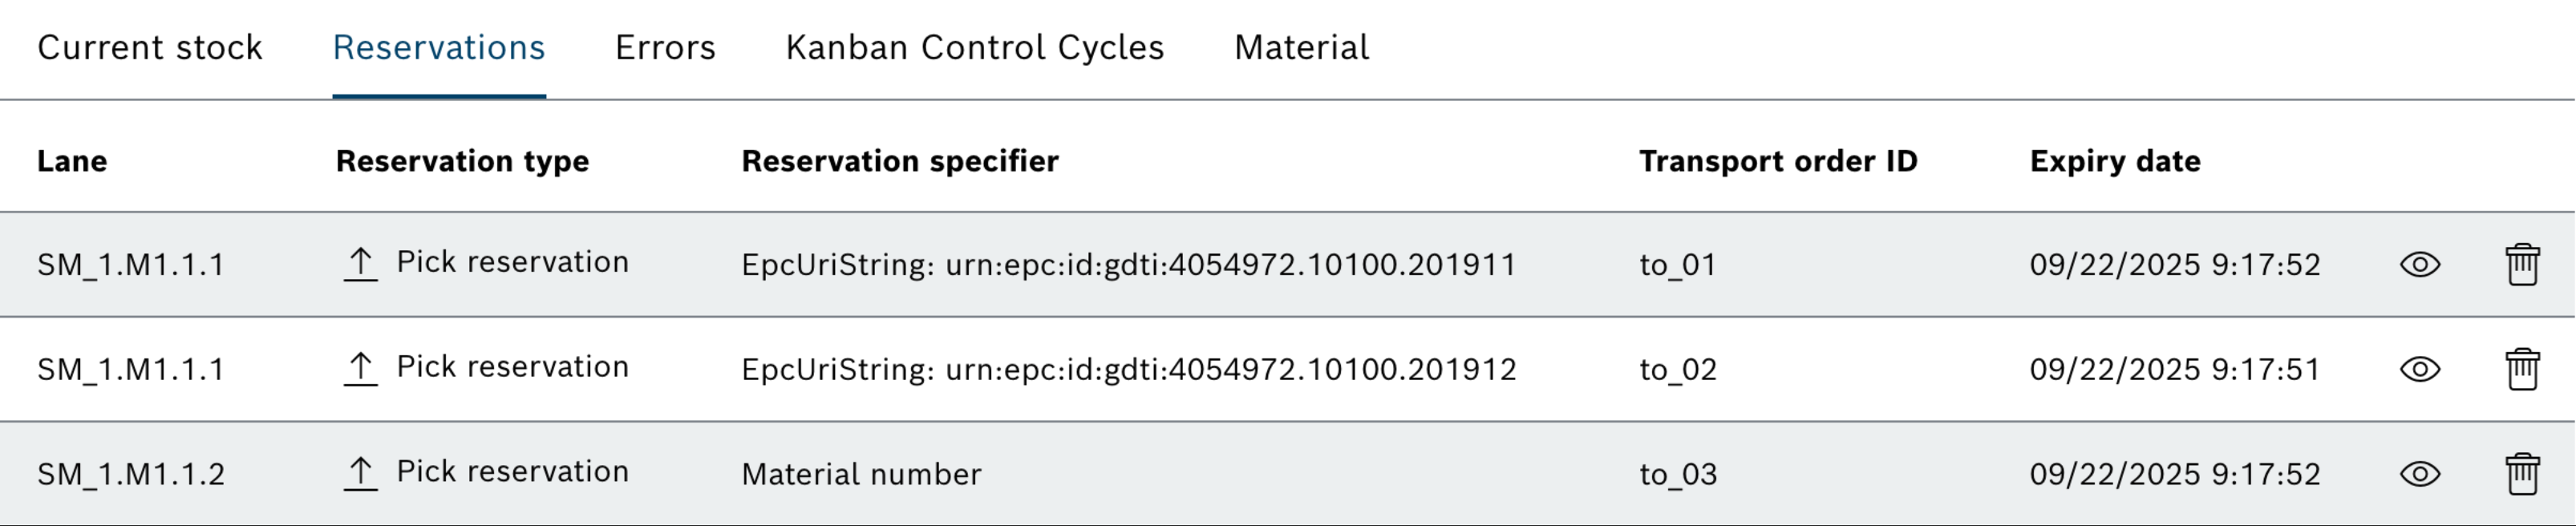
All active reservations in a supermarket are displayed in the Reservations tab. The following details for each reservation are shown:
| Element | Description |
|---|---|
Lane |
The lane of the reservation |
Reservation type |
Pick or put reservation |
Reservation specifier |
|
Transport order ID |
ID of the related transport order the reservation belongs to |
Expiry date |
Expiration date and time of the reservation |
The reservation can be selected or deleted by clicking on the icons on the right hand side.
Errors tab

The Errors tab lists error messages for the supermarket. An error message consists of an error type and an error description. The error messages can include the lane, storage location, material number, and Kanban ID.
Error messages can be deleted with  . To delete multiple error messages at the same time, activate the checkboxes of the error messages and remove them in the header with .
|
Before deleting an error message, verify that the error has been corrected. If an error has not been corrected, it will not be shown again after deletion and it is therefore not processed. |
Kanban control cycles tab
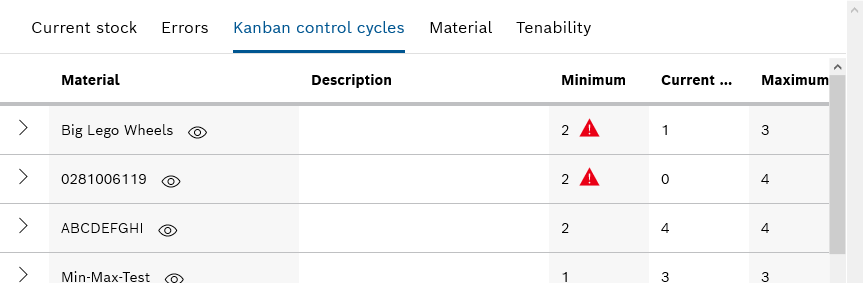
The Kanban control cycles tab lists the materials and their description. For each material, the specified minimum stock, the current stock, the maximum stock and the number of parts per container (PPCs) are displayed. The detailed view shows the lane or storage location where the material is stored with the current material stock and its position.
Material tab
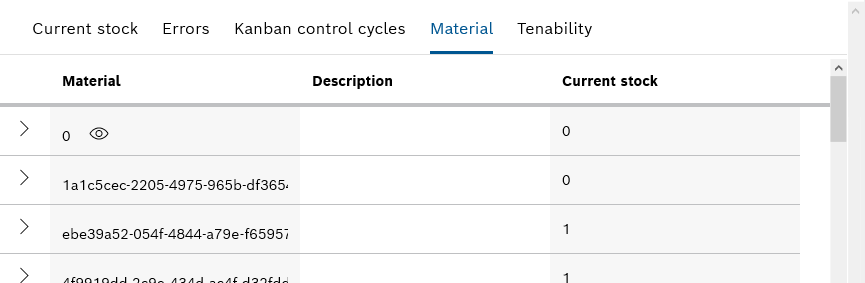
The Material tab lists the materials with their description and current stock. The detailed view shows the lane or storage location where the material is stored current stock.
Configuration Area

The configuration area is used to configure the supermarket and its components. The display depends on the selection in the 3D view:
-
Supermarket
No element is selected in the 3D view (click in the black area).
Overview: Supermarket Configuration Area -
Module
A module is selected in the 3D view.
Overview: Module Configuration Area -
Lane or Storage location
A lane or a storage location is selected in the 3D view.
Overview: Lane/Storage Location Configuration Area -
Unit loads
A unit load is selected in the 3D view.
Overview: Unit load details
Overview: Supermarket Configuration Area
|
The supermarket configuration has identical effects on lanes and storage areas. The functions of the text boxes and drop-down lists are described below for the lane as an example. |
| Element | Description | ||||||||||
|---|---|---|---|---|---|---|---|---|---|---|---|
Name |
Name of the supermarket |
||||||||||
Configuration type |
Assign a supermarket to a configuration type. The drop-down list contains the following configuration types:
|
||||||||||
Description |
Description of the supermarket |
||||||||||
Organization unit |
Description of the organization, e.g. plant or area |
||||||||||
Production service area |
Description of the production unit, e.g. production service area (PSA) |
||||||||||
Location |
Define the Building , Hall and Station through which the supermarket can be supplied. |
||||||||||
SAP booking |
|
||||||||||
Consumption control message |
|
||||||||||
Check in (GIAI tag) |
Associates equipped with an RFID reader on their wrist can log in to the supermarket as soon as they begin work there. Using the RFID reader, the associate scans a GIAI tag, which is located at the corresponding positions (filling and removal side) of the supermarket. This makes it possible to tell where the unit loads are to be stored at any time.
|
||||||||||
Extended configuration |
|
||||||||||
Adding a Module |
Add a module to the supermarket. |
||||||||||
Stock Changes |
Display stock changes in the supermarket. |
||||||||||
Stock Thresholds |
Display stock thresholds |
||||||||||
Synchronize Kanban control cycles |
Synchronize Kanban control cycles with SAP. |
Overview: Module Configuration Area
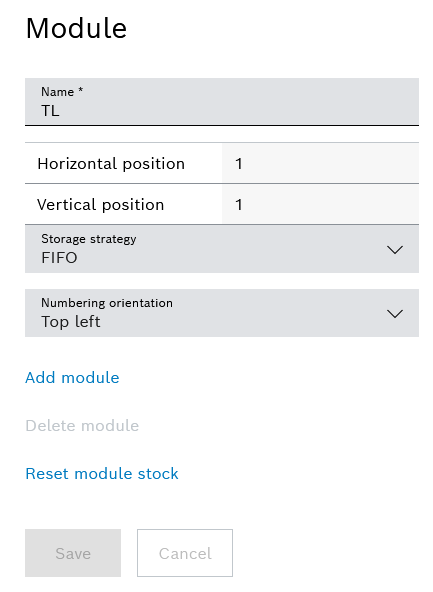
| Element | Description | ||
|---|---|---|---|
Name |
Name of the module |
||
Horizontal position |
Horizontal position of the module from left to right (starting from the filling side)
|
||
Vertical position |
Vertical position of the module from bottom to top
|
||
Storage strategy |
Procedure for removal from the module
|
||
Numbering alignment |
|
||
Adding a Module |
Add a module to the supermarket. |
||
Deleting a Module |
Delete the module from the supermarket.
|
||
Reset module stock |
Delete all unit loads and materials for a module. |
Overview: Lane/Storage Location Configuration Area
Modules with shelf module type consist of any number of levels with any number of lanes. Modules with a surface module type consist of one level with any number of lanes or storage locations.
|
The configuration area of a lane and a storage location is identical. The configuration area is described below, using the lane as an example. |
There are two tabs in the Lane configuration area:
-
Details
Planning of the lane (assignment of the unit loads, troubleshooting) -
Configuration
Configuration of the lane (unit loads, visual tags)
|
Before editing the details, the lane must be configured as the definition of the unit load types essential for the assignment mode. |
Lane configuration area, tab details

| Element | Description |
|---|---|
Name |
Name of the lane The name is made up as follows: <Name Supermarkt>.<Name Modul>.<Name Ebene*>.<Name Bahn**>
|
Current stock |
Number of unit loads on the lane |
Material number |
Material number of the unit loads on the lane Assign a Kanban control cycle to the material with |
Assignment mode |
Procedure for assigning unit loads to the lane
|
Description |
Any text input. Issued as an ESL (electronic shelf label) tag on the item label of the material. |
|
Unit loads can or cannot be removed and booked out. |
|
Unit loads can or cannot be moved into stock and booked in. |
Re-set stock |
Delete all unit loads and materials of a lane. |
Booking in a Load Unit |
Book unit load in on the lane. |
Lane configuration area, configuration tab
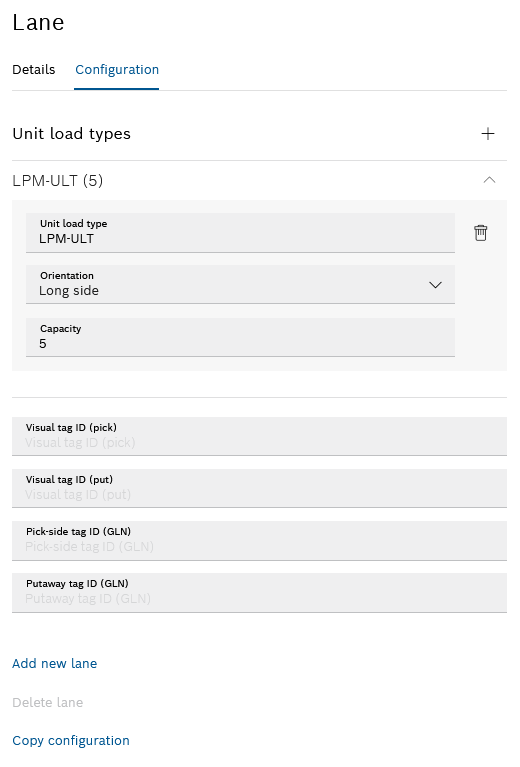
| Element | Description | ||
|---|---|---|---|
Unit load types |
Add a unit load type to the lane.
|
||
Unit load type |
Compatible unit load type of the lane
If multiple unit loads are assigned to the lane, and if no unit loads are booked in on the lane, use |
||
Visual tag ID (removal) |
Identification number of the visual tag for the removal side |
||
Visual tag ID (filling) |
Identification number of the visual tag for the removal side |
||
Removal tag ID (GLN) |
Identification number of the removal tag in GLN format |
||
Filling tag ID (GLN) |
Identification number of the filling tag in GLN format |
||
Add new lane |
Add a new lane to the right of the highlighted lane. |
||
Delete lane |
Delete lane from the module. |
||
Copy configuration |
Apply the configuration of the lane for the entire module. |


Overview: Unit load details
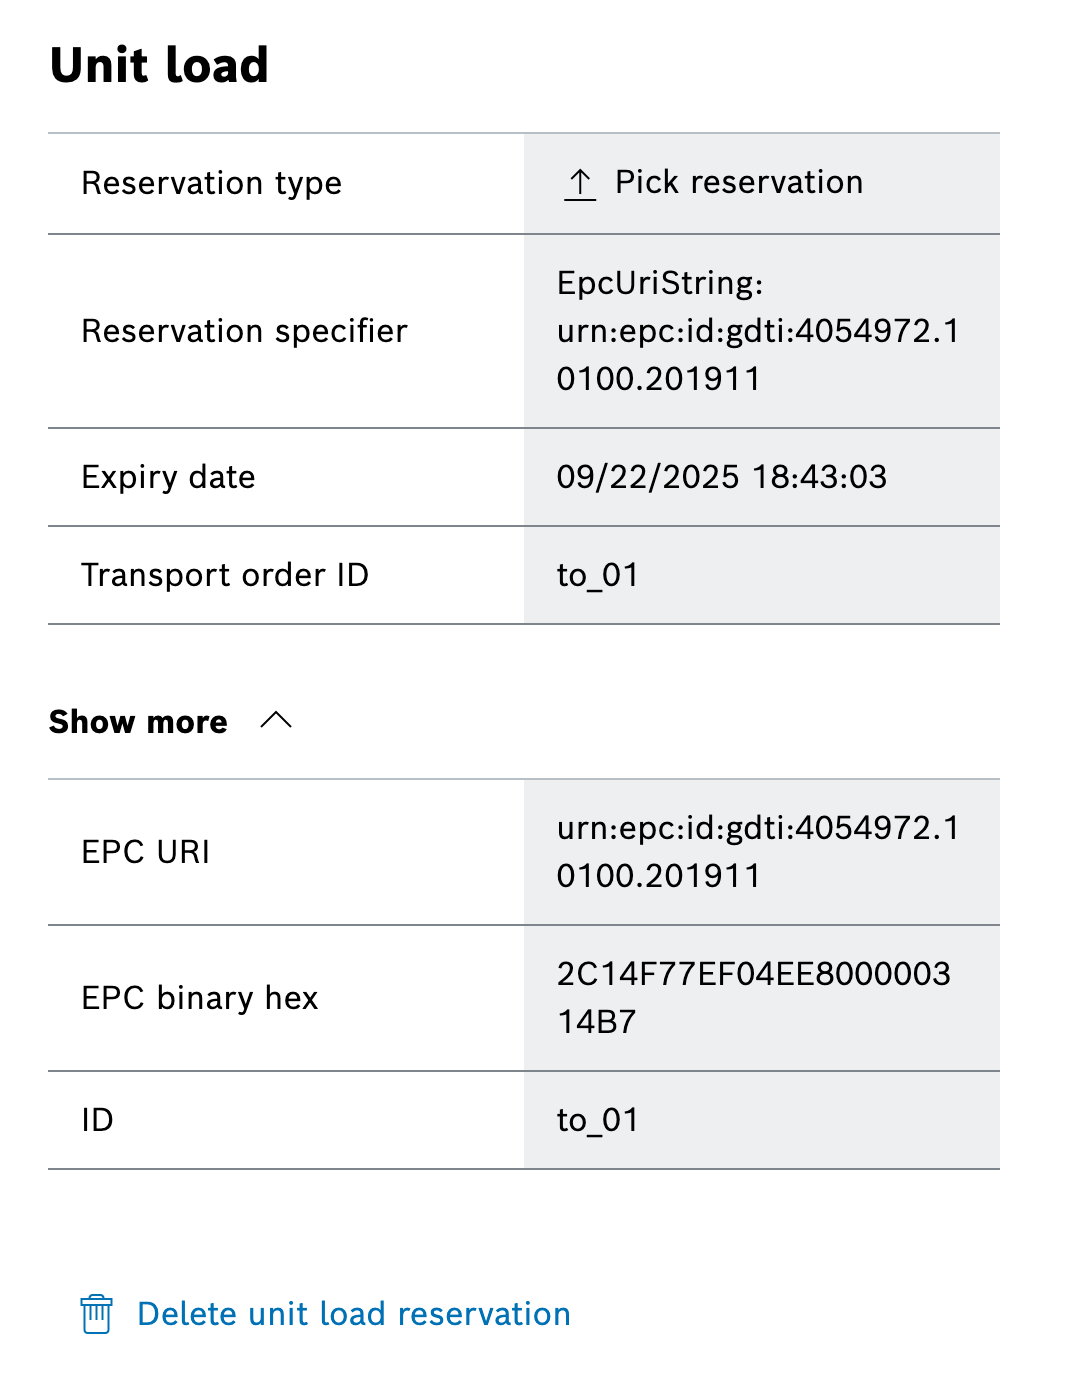
| Element | Description |
|---|---|
Material number |
Material number of the material assigned to the unit load |
Quantity |
Number of unit loads on the lane |
Reservation type |
Pick or put reservation |
Reservation specifier |
For specific reservations: Id kind (EPCUriString, EPCBinaryHex, KanbanId, UnitLoadInfoId) followed by the Id is shown. For unspecific reservations the material number or unit load type. |
Transport order ID |
ID of the related transport order the reservation belongs to |
Expiry date |
Expiration date and time of the reservation |
More details |
Details of the material |
Delete a unit load |
Remove the assignment of the unit load to the lane. |
Remove a unit load |
Remove the unit load from the lane. |
Delete a reservation |
Delete a reservation. |