Setting Up a Supermarket
A supermarket is set up in this order:
The supermarket is set up.
Creating or Editing a Supermarket
Prerequisite
Role Stock Management Administrator or Stock Management Logistik Planer
Procedure
-
Select the Supermarkets menu.
-
In the header, click
 to add a new supermarket.
Or:
In the row containing the supermarket, click
 to open the supermarket for editing.
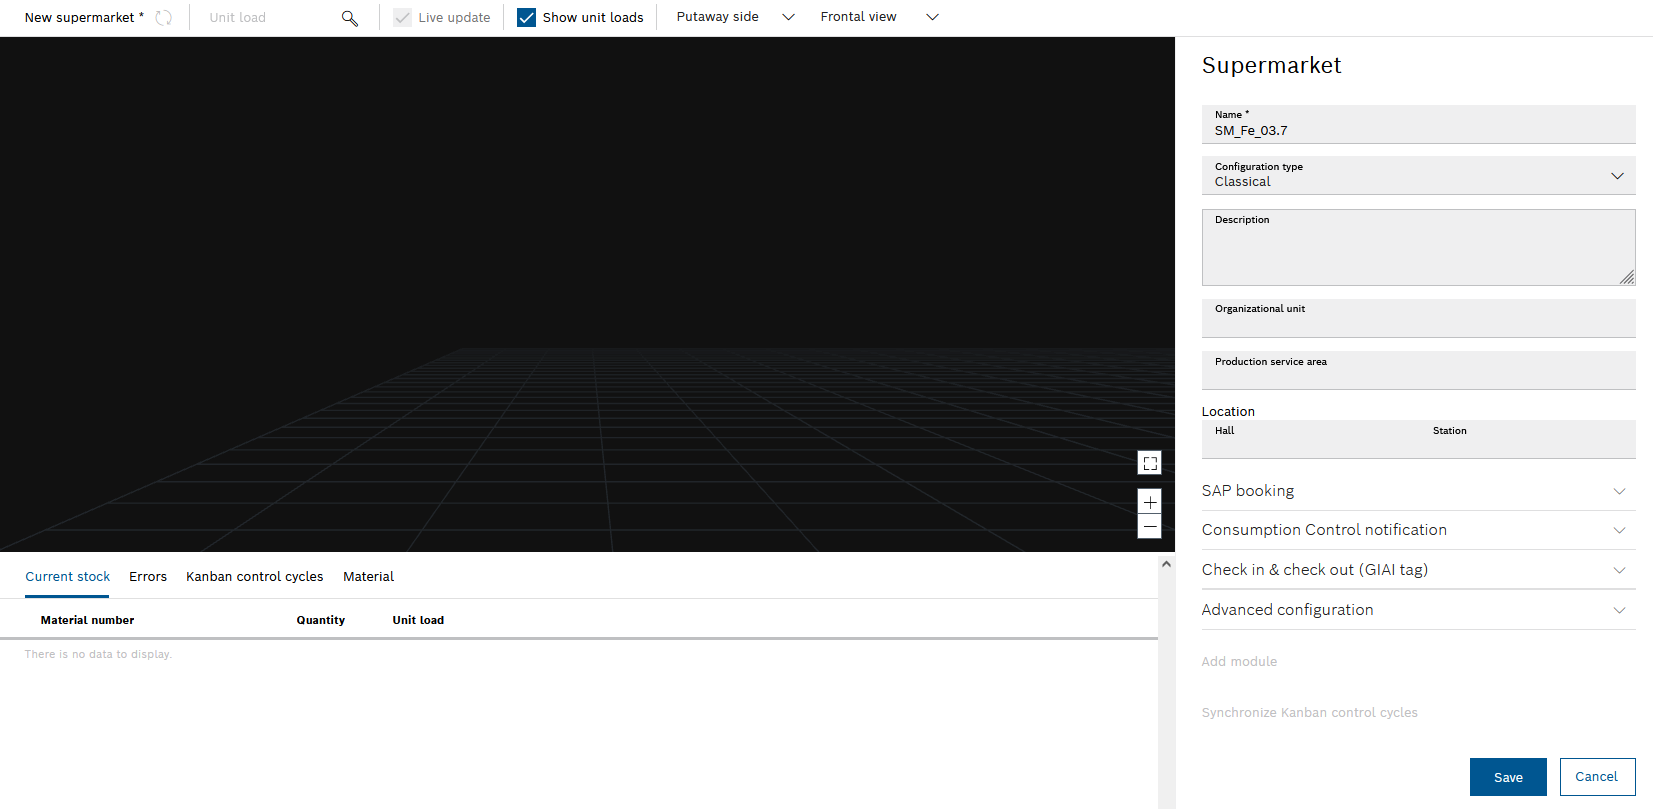
-
Implement settings in the configuration area.
Overview: Supermarket Configuration Area -
Click Save to create a supermarket or save the changes in the configuration area.
The new or edited supermarket appears under Material flow > Supermarkets.
-
To create modules in the supermarket, continue with Creating a Module.
Creating a Module
Requirements
-
Stock management administratororStock management logistics plannerrole -
A supermarket has been created.
Creating or Editing a Supermarket
Procedure
-
Select the Supermarkets menu.
-
If necessary, search for the required supermarket.
-
In the row containing the supermarket, click
to open the supermarket for editing. -
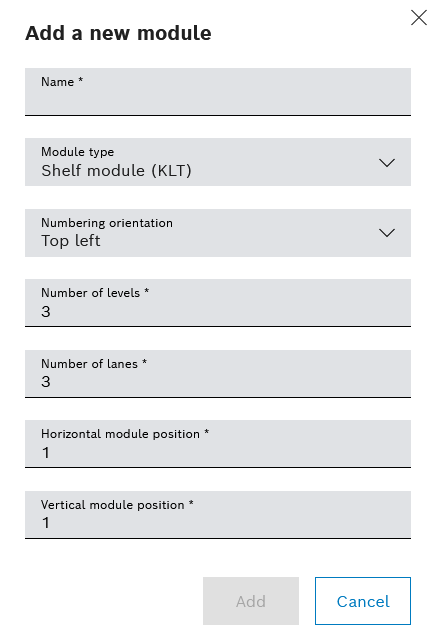
In the configuration area, click Add Module.
-
Enter details:
-
Name
Name of the module -
Module type
Shelf module (KLT) : Shelf supermarket with small load units
Area module (floor roller) : Floor roller supermarket with lanes
Area module (individual stations) : Supermarket with individual storage locations -
Numbering alignment
-
|
Can only be selected for the Shelf module (KLT) module type. |
+
Top left: The lanes are numbered from the top row of the module downward and from left to right in each row.
Bottom left: The lanes are numbered from the bottom row of the module upward and from left to right in each row.
* Number of levels
Number of levels, including empty levels
* Number of lanes
Number of lanes per level
* Horizontal module position
Horizontal position of the module from left to right (starting from the filling side)
|
If position 1 is entered for the new module and there is already a module in the supermarket, the new module is placed to the left of the existing module. |
-
Vertical module position
Vertical position of the module from bottom to top
|
Different module types can be stacked on top of one another. |
-
Only for module type area module with individual stations: Number of rows
|
To ensure that the storage locations are accessible, one aisle is released after two rows. |
-
Only for module type area module with individual stations: Storage positions per row
Number of storage locations per row-
Use Add to create a module.
-
The module is added to the supermarket and the module appears in the graphical display.
-
To edit the module, continue with Editing a Module.
-
To edit lanes or storage locations, continue with Configuring a Lane or Storage Location.
Editing a Module
Preconditions
-
Role
Stock Management AdministratororStock Management Logistik Planer -
The module has been created.
Creating a Module
Procedure
-
Select the Supermarkets menu.
-
If necessary, look for the supermarket where the required module is located.
-
In the row containing the supermarket, click
to open the supermarket for editing. -
Click the module in the graphical display.
The module frame is highlighted in light blue. The module configuration area appears next to the graphical display.
-
Make changes.
Overview: Module Configuration Area -
Click Save to accept the changes.
-
In the header, click
 to update the supermarket.
The changes are displayed in the graphical display.
-
To edit lanes or storage locations, continue with Configuring a Lane or Storage Location.
Configuring a Lane or Storage Location
|
The configurations of a lane and a storage location are identical. The configuration is described below using a lane as an example. |
Preconditions
-
Role
Stock Management AdministratororStock Management Logistik Planer -
A module has been created.
Creating a Module
Procedure
-
Select the Supermarkets menu.
-
If necessary, look for the supermarket where the required module is located.
-
In the row containing the supermarket, click
to open the supermarket for editing. -
Click the lane in the graphical display.
The lane is highlighted in light blue. The Lane configuration area appears next to the graphical display.
-
Switch to the Configuration tab.
-
Add a load unit type with Load unit types
 .
. -
Click New load unit type
 to open the details for the load unit type.
 -
Enter details for the load unit type.
Overview: Lane/Storage Location Configuration Area -
If necessary, enter details for the visual tags.
Overview: Lane/Storage Location Configuration Area -
If ergonomic put is enabled, enter a maximum ergonomic weight for the lane. If no value is entered, the lane or storage location will be excluded from the ergonomic put calculation.
Overview: Lane/Storage Location Configuration Area -
Click Save to apply the configuration.
The configuration is complete.
-
To copy the configuration to lanes/storage locations in the module, continue with Copying a Lane or Storage Location Configuration.
-
To edit details of a lane or a storage location, continue with Defining Rules for Booking Load Units In and Out.
Manually booking in and out unit loads
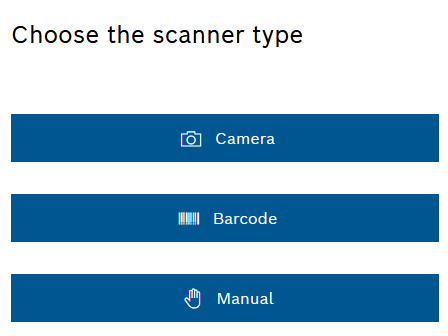
The booking in and out of unit loads depends on the configuration type of the supermarket (classic, semi-intelligent or intelligent with mobile scanner).
Overview: Supermarket Configuration Area
Prerequisite
Stock role Management Administrator or Stock Management Logistics Planner or Stock Management Shopfloor associate
Procedure
-
Select Manual scanner type.
-
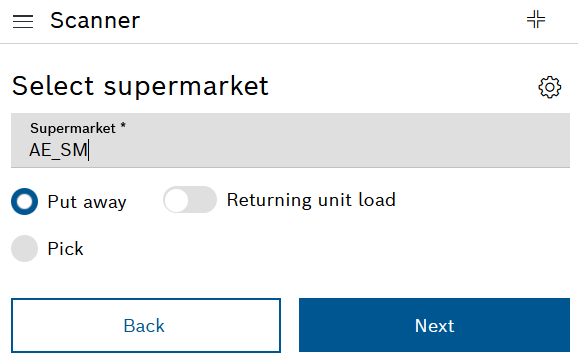
In the Supermarket selection field, enter the name of the supermarket in which you want to make a booking in or booking out.
-
Activate the Put away radio button for a booking in or the Pick radio button for a booking out.
-
If a unit load is to be returned for a booking in, activate the Returning unit load switch.
Wie der Ladungsträger ordnungsgemäß zurückgelegt wird, der erweiterten Konfiguration des Supermarkts entnehmen.
Overview: Supermarket Configuration Area -
Proceed to the next step with Next.
-
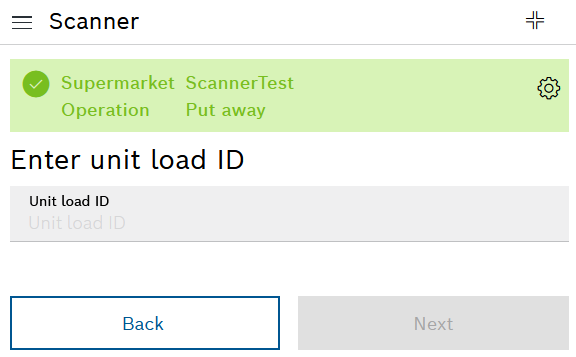
Enter the unit load ID in the Unit load ID input field.
-
Proceed to the next step with Next.
If the supermarket has the configuration type Semi-intelligent or Intelligent with mobile scanner , the information area indicates the lane in which the unit load is to be placed or removed.
Continue according to the configuration type of the supermarket.
Classic configuration type
If the supermarket has the configuration type Classic , perform the following steps:
-
Enter the code of the lane on which the removal or booking in is to be made in the Enter lane ID input field.
-
Continue with Next.
-
Park the unit load in the desired lane or remove it from the desired lane.
The booking in or booking out has been completed. The information area confirms which unit load has been booked into which lane. The graphical representation of the supermarket shows the current number of unit loads on the lane.
Configuration type semi-intelligent or intelligent with mobile scanner
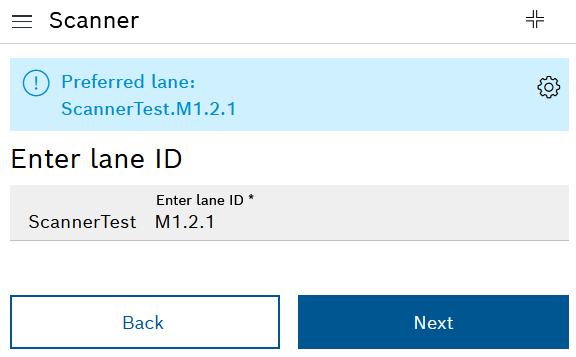
If the supermarket has the configuration type Semi-intelligent or Intelligent with mobile scanner , perform the following steps:
-
Enter the code specified as the preferred lane in the information bar in the Enter lane ID input field.
-
Park the unit load in the preferred lane or remove it from the preferred lane.
In the case of a supermarket with the configuration type Intelligent with mobile scanner , a green LED lights up on the preferred lane. The system detects when the unit load has been deposited in the correct physical lane or removed from the correct physical lane.
The booking in or booking out has been completed. The information area confirms which unit load has been booked into which lane. The graphical representation of the supermarket shows the current number of unit loads on the lane.
-
To book unit loads in or out by scanning a QR code, continue with Book unit loads in and out via QR code.
-
To book unit loads in or out by scanning a bar code, continue with Book unit loads in or out via bar code.
Copying a Lane or Storage Location Configuration
The configuration of the load unit types can be transferred to all lanes or storage locations of the module.
|
The configurations of a lane and a storage location are identical. The configuration is described below using a lane as an example. |
Preconditions
-
Role
Stock Management AdministratororStock Management Logistik Planer -
A lane in the module is configured.
Configuring a Lane or Storage Location
Procedure
-
Select the Material flow > Supermarkets menu.
-
If necessary, look for the supermarket where the required module is located.
-
In the row containing the supermarket, click
to open the supermarket for editing. -
In the graphical display, click the lane whose configuration you want to copy.
The lane is highlighted in light blue. The Lane configuration area appears next to the graphical display.
-
Switch to the Configuration tab.
-
Use Copy configuration to copy the configuration of the lane.
The configuration of the load unit types is transferred to all lanes in the module.
-
To edit details of a lane, continue with Defining Rules for Booking Load Units In and Out.
Defining Rules for Booking Load Units In and Out
The rules for booking load units in and out is defined in the Details tab.
|
The editing of a lane and a storage location is identical. The editing is described below using a lane as an example. |
Preconditions
-
Role
Stock Management AdministratororStock Management Logistik Planer -
A lane has been configured.
Configuring a Lane or Storage Location
Procedure
-
Select the Material flow > Supermarkets menu.
-
If necessary, look for the supermarket where the required module is located.
-
In the row containing the supermarket, click
to open the supermarket for editing. -
Click the lane in the graphical display.
The lane is highlighted in light blue. The Lane configuration area appears next to the graphical display.
-
Select assignment mode:
Overview: Lane/Storage Location Configuration Area-
Control cycle static
Only the specified material number can be booked in. The material number must be included in the Kanban control cycle.The same Kanban control cycle can be assigned to multiple lanes.
Copying a Lane or Storage Location Configuration -
Control cycle dynamic
All material numbers can be booked in if they are contained in a Kanban control cycle that is assigned to the supermarket.Only materials with the same load unit type can be booked onto this lane.
-
Material static
Only the specified material number from the Nexeed Industrial Application System can be booked in.At least one load unit type must have been configured. If more than one load unit has been configured, you must select in the Configuration tab which loan unit is to be permitted for the lane.
-
Material dynamic
All material numbers from the Nexeed Industrial Application System can be booked in.Only materials with the same load unit type can be booked onto this lane.
-
Unlimited
All material numbers can be booked in if they are assigned to a load unit type assigned to the lane. -
Empties
Only empty load units can be booked.
-
-
If the Control cycle static assignment mode has been selected, select the materials with Material number
.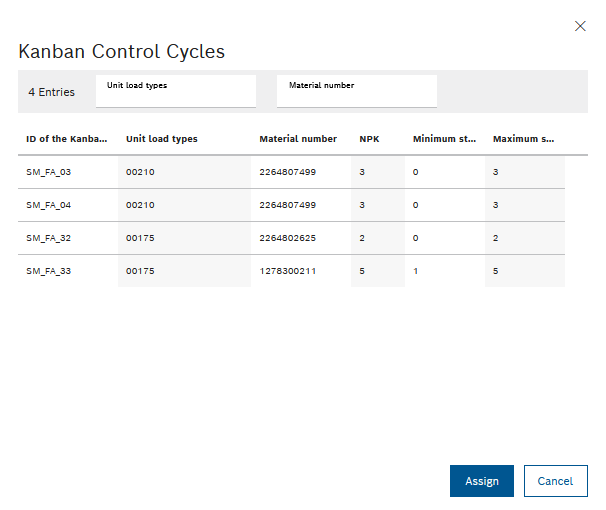
Only the materials whose Kanban control cycles have been assigned to the open supermarket are visible.
-
In the Kanban control cycles dialog window, click the required Kanban control cycle and assign the material to the lane with Assign.
All materials created in the Nexeed Industrial Application System are visible.
-
If the Material static assignment mode has been selected, select the materials with Material number
.
-
In the Materials dialog window, click the required material and assign the material to the lane with Assign.
-
Click Save to accept the changes.
The rules for booking in and out on the lane are defined. Depending on the assignment mode selected, the assignment mode or the material number is displayed in the graphical display on the lane.