Product assembly plan
All products that have a product assembly plan are displayed in Product assembly plan. The associated product assembly plan can be opened by selecting a product.
A product assembly plan contains the assignment of the components and materials of the associated product parts list to production lines and their stations. The Order Management module retrieves the data from the product parts list and the product assembly plan for the product to coordinate the further processing of the components and materials.
By selecting a product assembly plan in the overview, the lines and their stations can be displayed with the assigned components and materials.
A product assembly plan can be created for a product parts list. Both must belong to the same product (same type/item number).
Product parts lists
The products can be grouped under umbrella terms for greater clarity.
Group products and packaging specifications or change grouping
Any number of product assembly plans can be created or imported for each product.
Example:
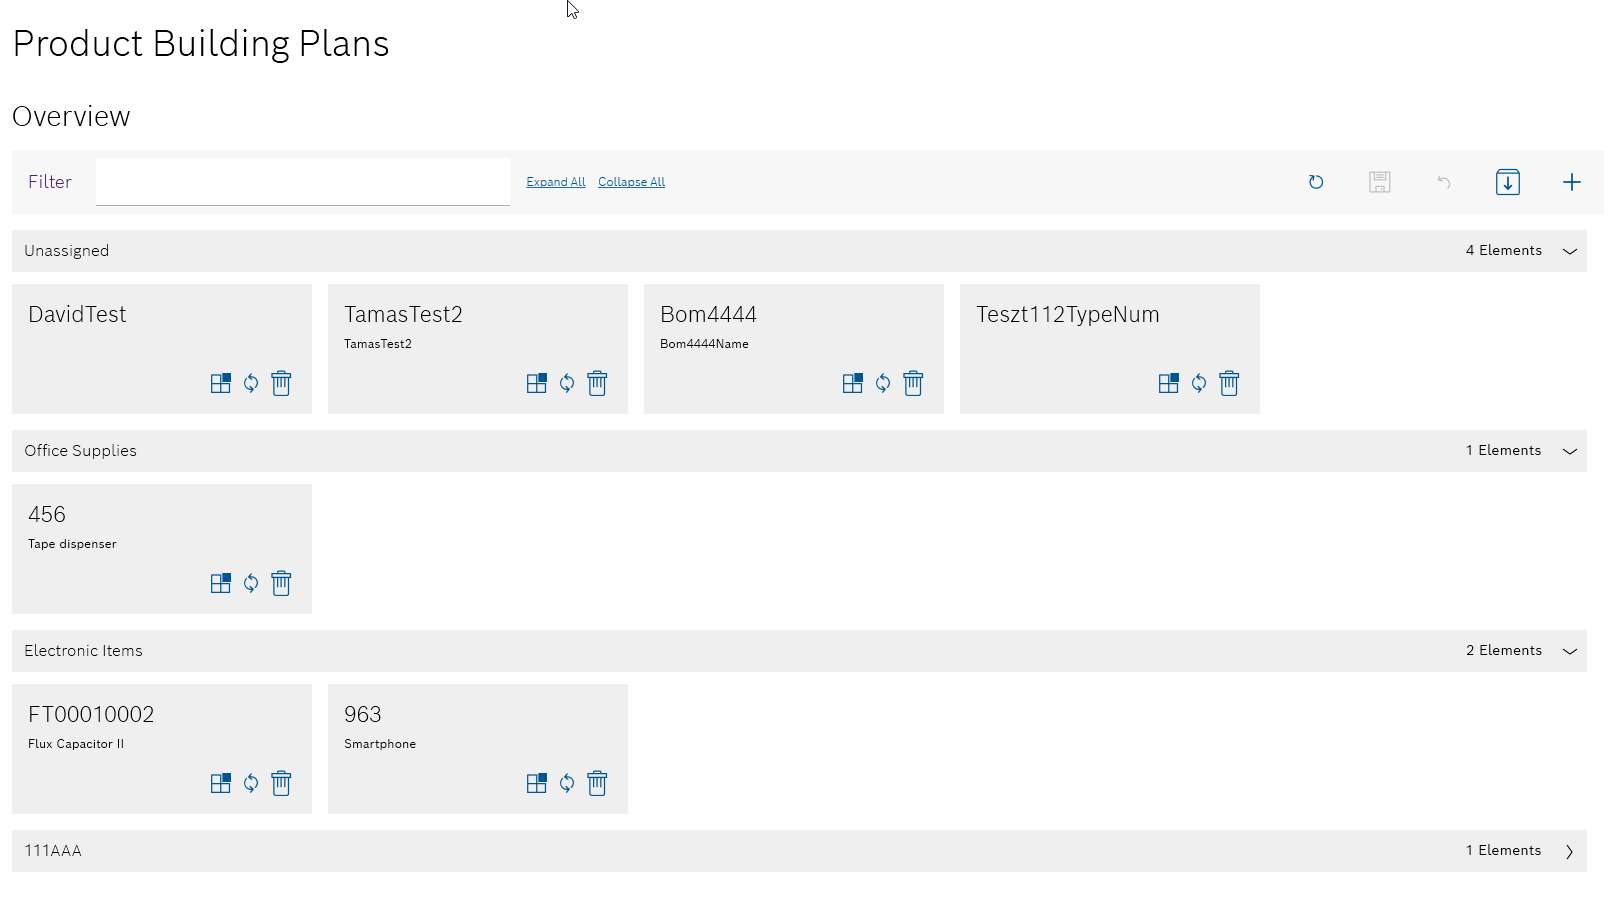
Functions in the product assembly plan overview
| Element | Description | ||
|---|---|---|---|
Filter |
Search for a product. |
||
Expand all |
Expand all groups of products. |
||
Collapse all |
Collapse all groups of products. |
||
|
Refresh page. |
||
|
Save changes in the overview. |
||
|
Undo changes in the overview. |
||
|
Import product assembly plans. |
||
|
Add another product with product assembly plan. |
||
|
Collapse group. |
||
|
Expand group. |
||
|
Change the assignment of the product to a group. |
||
|
If changes are made to the product assembly plan in the ERP system, synchronize the product assembly plan for the product in the Product Setup Management client.
|
||
|
|


Functions in the variants/versions view of the product assembly plan
To display the product assembly plans of a product, click on the product.
Example:
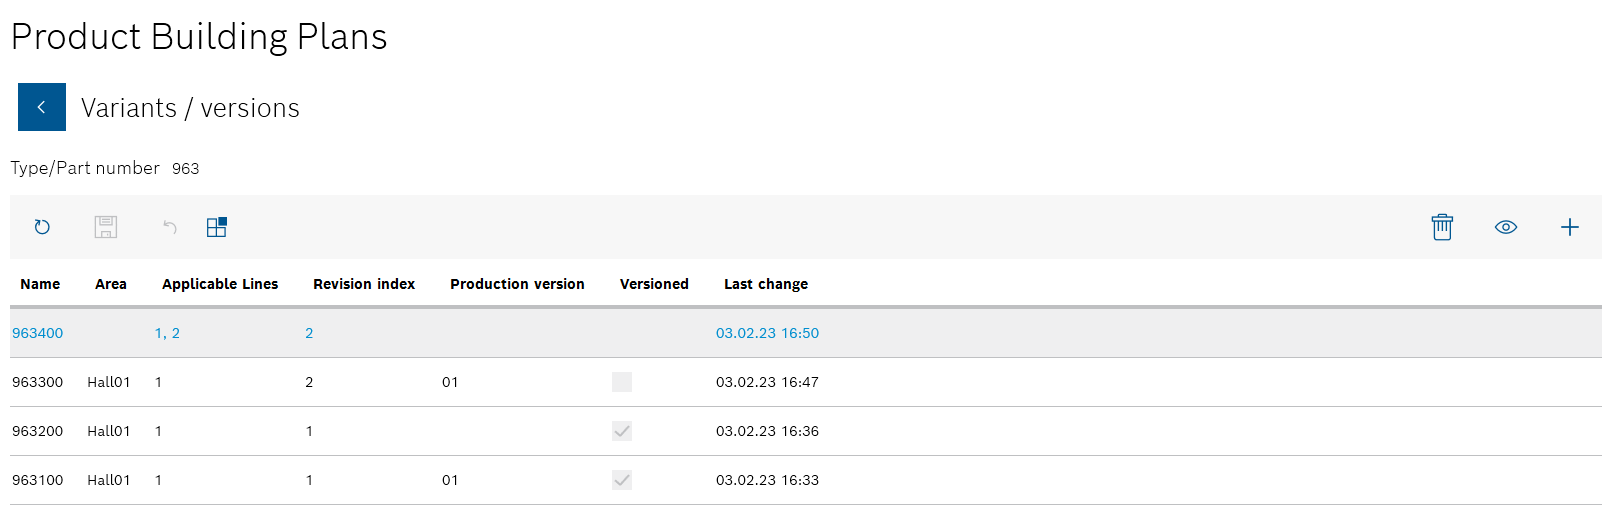
All product assembly plans are sorted by Name in the Variants/versions view.
| Element | Description | ||
|---|---|---|---|
|
Go back to the overview of products with product assembly plans. |
||
|
Refresh page. |
||
|
Save changes in the Variants/versions view. |
||
|
Undo changes in the Variants/versions view. |
||
|
Change the assignment of the product to a group. |
||
|
|
||
|
Display component and material list of the product parts list.
|
||
|
Create a new product assembly plan for the product. |

Functions in the component/material assignments view of the product assembly plan
Double-click on a product assembly plan to display the assignment of the individual components and materials of a product parts list to the lines and their stations.
Or:
Select the product assembly plan and open the Component/material assignments view using  .
.
Example:
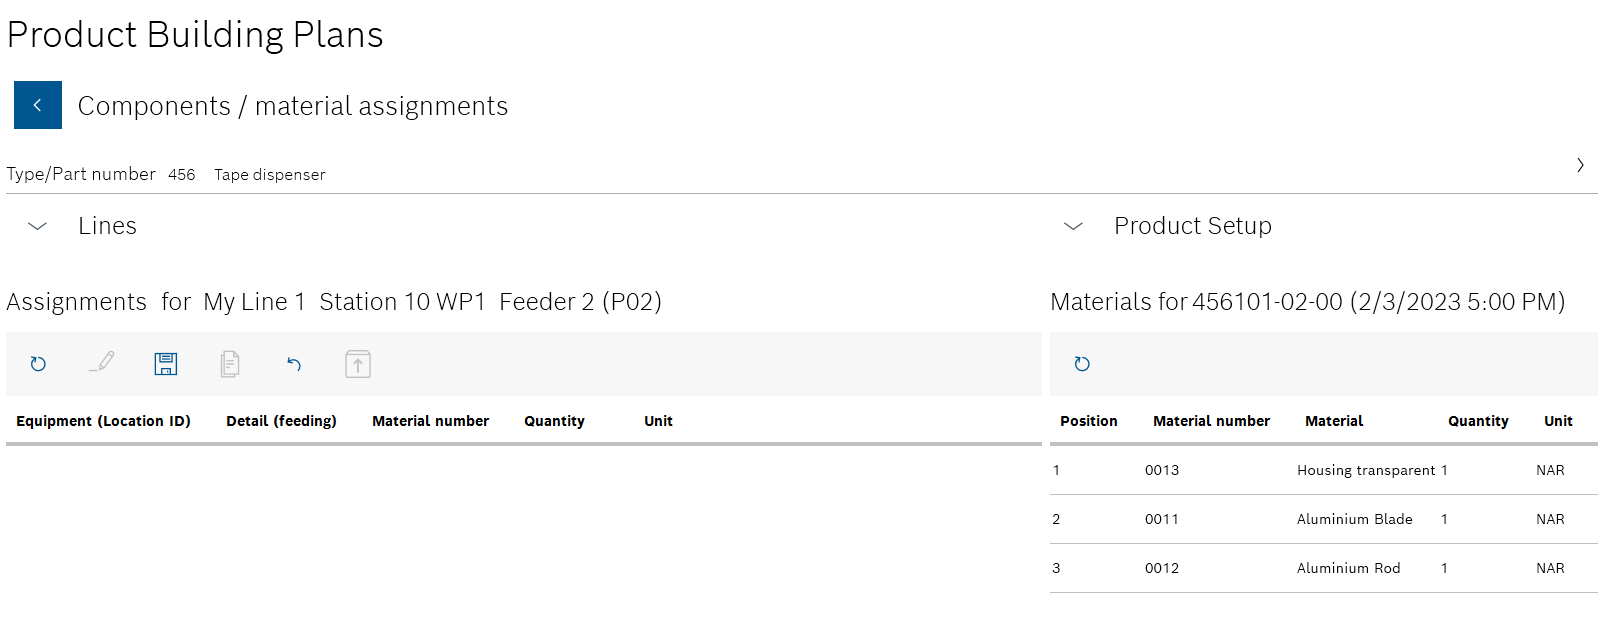
The Component/material assignments view is divided into three areas:
-
The details of the product and the assigned product parts list are displayed at the top. If parameters have been created for the product assembly plan, they are listed under the name of the product assembly plan.
-
The line details are displayed in the middle area Lines. By selecting the available lines, the individual stations of the line can be displayed.
Only the lines that are permitted for the selected product assembly plan can be displayed. The permitted lines are defined when a product assembly plan is created.
Create product assembly plan -
The assignment of the components and materials of the assigned product parts list is displayed in the lower Assignments area.
Selecting a line in the Lines area displays only the components and materials that have been assigned to the line. Selecting a station in the table in the Lines area displays only the components and materials that have been assigned to the station. If no line and no station are selected, all stations are displayed regardless of the lines that have a component or material assignment.
| Element | Description |
|---|---|
|
Go back to the Variants/versions view. |
|
Close details of the product. |
|
Expand details of the product. |
|
Close the Lines area. |
|
Expand the Lines area. |
|
Update area. |
|
Edit assignment of components and materials. |
|
Create product assembly plan
A product assembly plan can be created for a product if it has at least one product parts list.
|
A product assembly plan applies to a product parts list of the same product. |
Requirements
-
At least one product with at least one product parts list has been created.
Create product parts list -
ExpertorAdministratorrole
Procedure
-
Open the Product assembly plan menu.
Product assembly plan -
If the product is not yet displayed in the overview, open the Add new product assembly plan dialog window in the overview with
 .
.The product is displayed in the overview after the product assembly plan has been created.
Or:
If the product to which the new product assembly plan is to be added is present in the overview, select the product. Filter by product if necessary.
All product assembly plans for the product are listed in the Variants/versions view. * In the Variants/versions view, open the Add new product assembly plan dialog window using
in the header.+ The new product parts list is assigned to the product after the product assembly plan has been created.
+ image::psm_product_building_plan_add_new_manually_window_2023_01.png[psm_product_building_plan_add_new_manually_window]
-
Enter the following details:
-
Type/item number
Select the product identifier in the drop-down list.If the product assembly plan is to be linked to a product parts list, the type/item number must be the same.
Link the product parts list to a product assembly plan -
Type/item name
Is filled in automatically if the Type/item number is selected. -
Assembly plan name
Enter the product assembly plan identifier. -
Range
Enter the location of the lines at which the components and materials are to be processed. -
Production version
Select the production version from the drop-down list.
-
-
If the product assembly plan is to be versioned after changes, activate the Versioned checkbox.
 : A new version of the product assembly plan will be created after each change.
 : The product assembly plan can be edited without creating a new version of the product assembly plan.
 -
If necessary, create user-specific parameters for the processing machines:
-
Create a new parameter type using Parameter.
Input fields appear under Name and Value. -
Select the required parameter from the Name drop-down list.
-
Enter the desired value of the parameter in the Value input field.
You can use
 to add up to ten parameters to the product assembly plan.
TheAdministratorcan delete the parameter using in the row of a parameter.
-
-
Under Available lines , activate the checkboxes of the lines on which the components and materials can be processed.
This entry cannot be undone. When assigning the components and materials, only the lines selected here can be selected.
-
Use Add to create the product building plan.

The details of the generated product assembly plan are displayed in the upper area of the Component/material assignments view. In the middle area Lines , you can select the lines and stations to which the components and materials are assigned in the lower area Assignment. The name of the line selected in the Lines area and the station is displayed in the Assignments area.
Product assembly plan -
Select the line and station of the line to which the components and materials of a product parts list are to be assigned:
-
In the Lines area, select a line from the drop-down list.
Only the lines that have been activated in the Add new product assembly plan dialog window can be selected in the drop-down list.
-
In the Lines area, select a station of the selected line from the table.
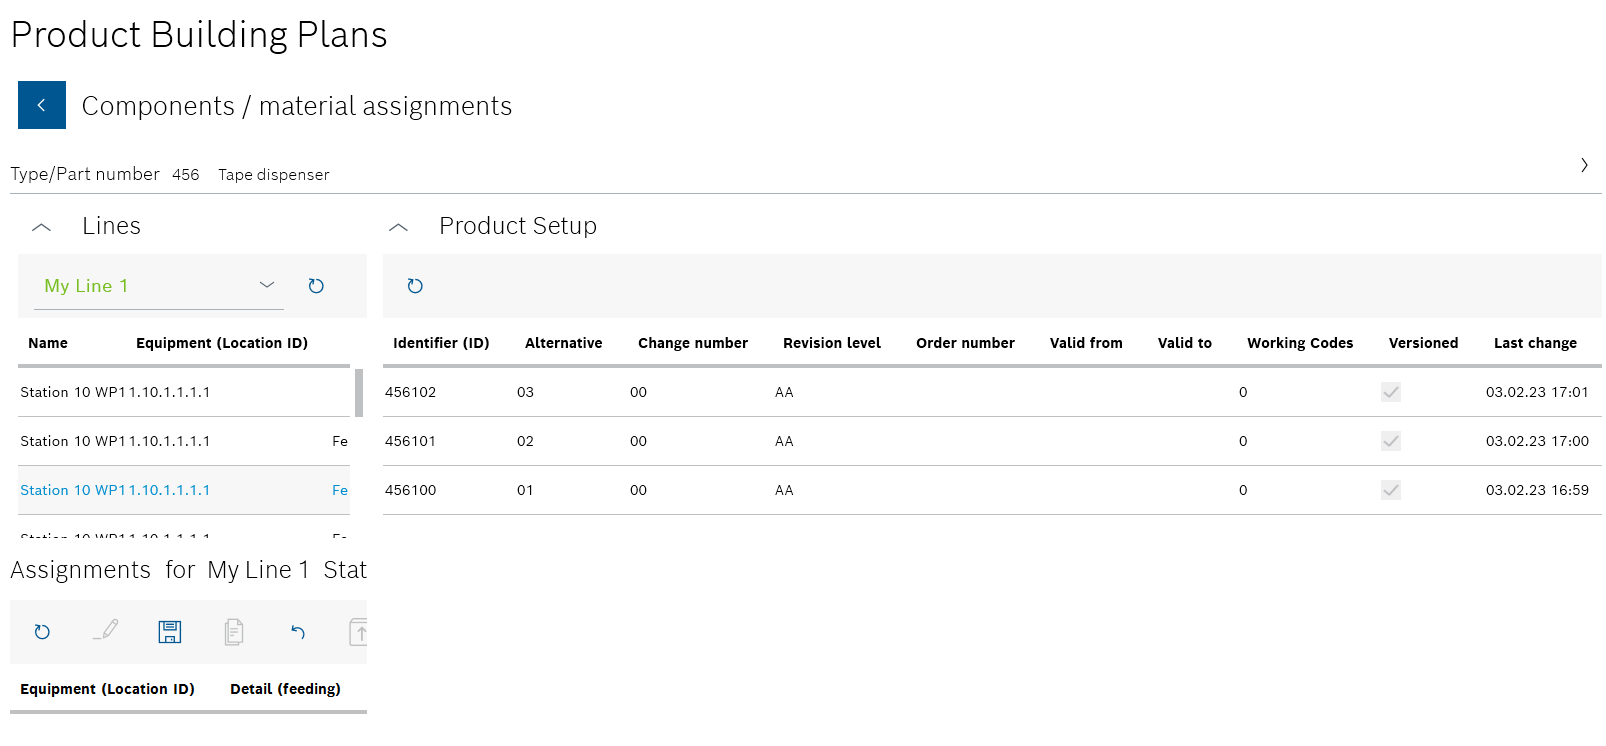
The name of the line selected in the Lines area and the station is displayed in the Assignments area. The Product parts list area appears on the right-hand side.
-
-
In the Product parts list area, select the product parts list that the components and materials are to be assigned to the station from.
Only one product parts list can be used for the product assembly plan. Components and materials from different product parts lists cannot be assigned in the same product assembly plan.
The Lines and Product parts list areas are automatically collapsed. The Materials area appears on the right under the Product parts list area with the abbreviation of the selected product parts list: <Typ-/Sachnummer>-<Alternative>-<Change number> (date and time of the last change).
All components and materials of the selected product parts list are displayed in the Materials area.
-
Assign the required components and materials to the selected station:
-
Drag and drop the component or material from the Materials area to the Assignments area.
To remove a component or material from the assignment of the station, the
Administratorcan select the component or material in the Assignments area and delete it in the header of the area using .
.
-
-
If necessary, switch between the lines and their stations:
-
Use
 in the Lines area to open the lines and their stations.
 -
Select the desired line from the drop-down list in the Lines area.
-
Select the desired station of the line from the table in the Lines area.
The name of the line selected in the Lines area and the station is displayed in the Assignments area.
The components and materials of a product parts list can be assigned to any number of stations.
-
-
Use
 to save the product assembly plan in the header of the Assignments area.
 -
Confirm the operation with Yes in the dialog window.
image::psm_product_building_plan_add_new_components_result_2023_01.png[psm_product_building_plan_add_new_components_result]
All lines and stations are displayed with the assigned components and materials in the Component/material assignments view.
|
By selecting the line and the station in the Lines area, you can check which components and materials have been assigned to which station. |
-
Continue with Edit product assembly plan or create a copy as a variant to edit the product building plan.
-
Continue with Import product assembly plan from file to import a product assembly plan.
-
Continue with Exporting a product building plan to export a product assembly plan.
-
Continue with Delete product assembly plan to delete a product assembly plan.
Edit product assembly plan or create a copy as a variant
Depending on the client setting, it is possible to save the changes in the open product assembly plan or to create a variant from it in which the changes are saved. The product assembly plan that has been edited retains its original data.
|
A product assembly plan applies to a product parts list of the same product. |
Requirements
-
At least one product with at least one product parts list has been created.
Create product parts list -
At least one product assembly plan has been created.
Create product assembly plan -
ExpertorAdministratorrole
Procedure
-
Open the Product assembly plan menu.
Product assembly plan -
In the overview, select the product whose product assembly plan is to be changed. Filter by product if necessary.
All product assembly plans for the product are listed in the Variants/versions view.
-
Select the desired product assembly plan to be changed.
-
Use
to open the Component/material assignments view.
All lines and stations are displayed with the assigned components and materials in the Component/material assignments view.
The details of the product assembly plan and the underlying product parts list are displayed in the upper area. The lines and stations for which the assignments of components and materials are to be displayed can be selected in the middle Lines area. The individual components and materials assigned to the selected line and station are displayed in the Assignments area. The name of the line selected in the Lines area and the station is displayed in the Assignments area.
By selecting the line and the station in the Lines area, you can check which components and materials have been assigned to which station.
-
Select the line and station of the line in which the assignment of components and materials is to be edited:
-
In the Lines area, select the line for which the assignment is to be edited from the drop-down list.
Only the lines that have been activated for the product assembly plan can be selected
Create product assembly plan -
In the Lines area in the table, select a station of the line for which the assignment is to be edited.
-
-
Click on
 in the Assignments area to edit the assignments of the components and materials of the underlying product parts list.
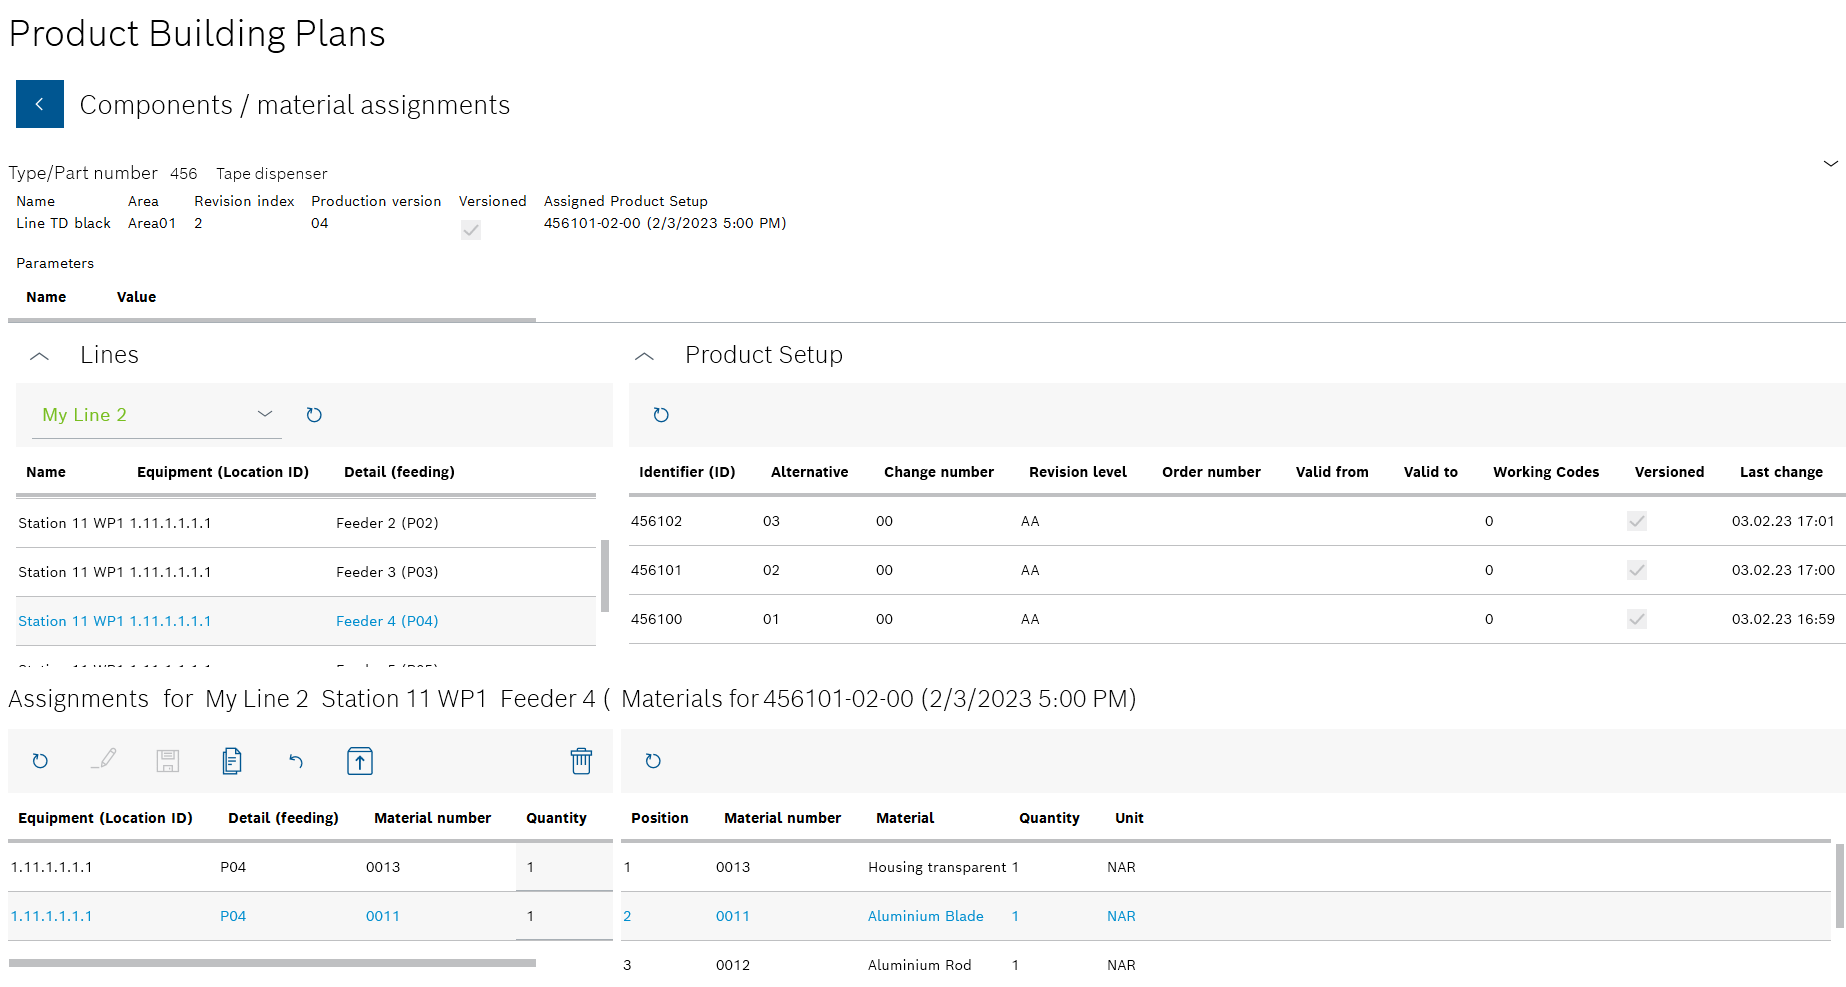
The Product parts list area appears to the right of the Lines area. The Materials area with the abbreviation of the selected product parts list appears to the right of the Assignments area: <Typ-/Sachnummer>-<Alternative>-<Change number> (date and time of the last change).
All components and materials of the selected product parts list are displayed in the Materials area.
You can use
 to collapse the Lines and Product parts list areas.
You can use to expand the Lines and Product parts list areas. -
Assign or remove the required components and materials from the selected station:
-
Drag and drop the component or material from the Materials area to the Assignments area.
-
To remove a component or material from the assignment of the station, select the component or material in the Assignments area and delete it in the header of the area using
.Only the
Administratorhas the right to delete.
-
-
If necessary, switch between the lines and their stations:
-
Select the desired line from the drop-down list in the Lines area.
-
Select the desired station of the line from the table in the Lines area.
The name of the line selected in the Lines area and the station is displayed in the Assignments area.
The components and materials of a product parts list can be assigned to any number of stations.
-
-
Apply the changes to the product assembly plan using
in the header of the Assignments area and confirm this with Yes in the dialog window.No other version of the product parts list is created.
is available if the original product assembly plan has been saved as Versioned or not Versioned.Or:
Use
 to save the changed product assembly plan as a new version.
This does not change the original product parts list.
is only available if the original product assembly plan has been saved as Versioned.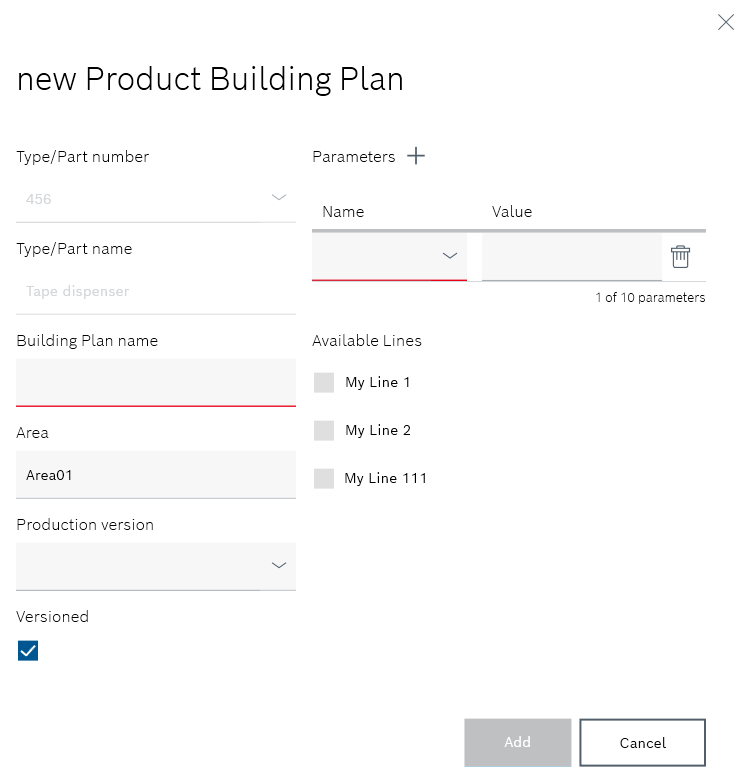
The information about the original product assembly plan is displayed in the Add new product building plan dialog window
-
If necessary, edit the following information in the Add new product assembly plan dialog window:
-
Assembly plan name
Enter the product assembly plan identifier. -
Range
Enter the location of the lines at which the components and materials are to be processed. -
Production version
Select the production version from the drop-down list. -
If the product assembly plan is to be versioned after changes, activate the Versioned checkbox.
: A new version of the product parts list will be created after each change.
: The product parts list can be edited without creating a new version of the product parts list. -
If necessary, use Parameters
to create new user-specific parameters for the processing machines.
Input fields appear under Name and Value to define the parameters.You can use
to add up to ten parameters to the product assembly plan.
TheAdministratorcan delete the parameter using in the row of a parameter. -
Under Available lines , activate the checkboxes of the lines on which the components and materials can be processed.
This entry cannot be undone. When assigning the components and materials, only the lines selected here can be selected.
-
Use Add to create the new version of the product assembly plan.
-
If the changed product assembly plan has been saved as an additional version, it is displayed in the Variants/versions view of the product. If the changes to the product assembly plan have been saved, the changed data is displayed in the Component/material assignments view of the product assembly plan.
Import product assembly plan from file
Only files created from a supplied template can be imported as a product assembly plan. The template can be downloaded, edited and uploaded during the process.
|
A file can be used for multiple products and multiple product assembly plans. |
Requirements
-
At least one product parts list of the product has been created.
Create product parts listThe product assembly plan is linked to the product parts list by the type/item number of the product.
-
ExpertorAdministratorrole
Procedure
-
Open the Product assembly plan menu.
Product assembly plan -
Select
 in the header.
 -
Select Import from file in the drop-down list.
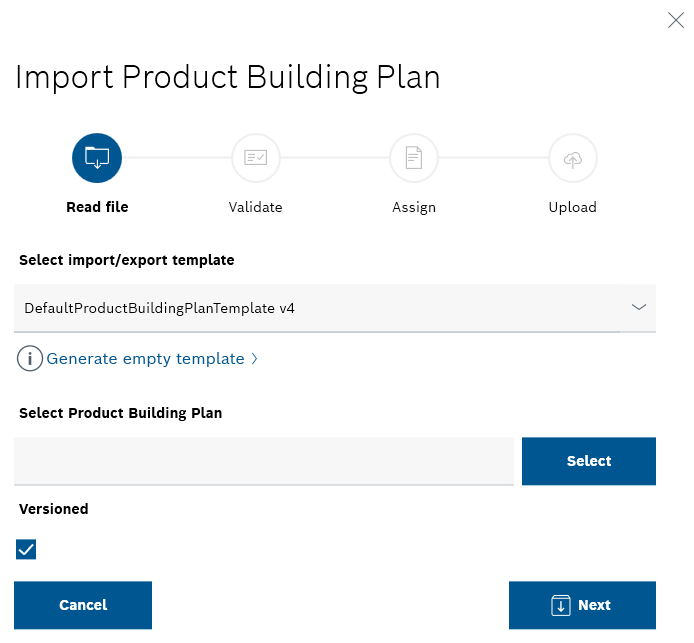
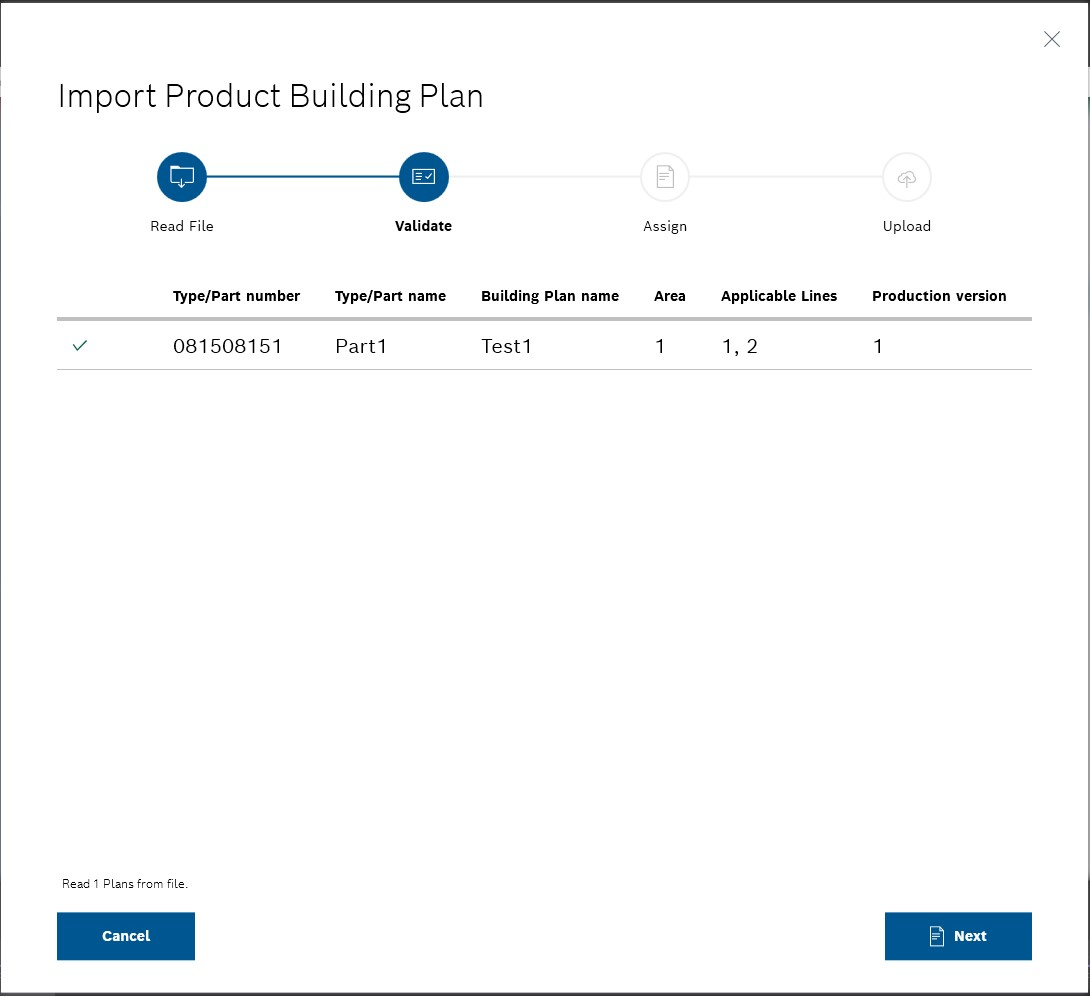
The sequence for importing a file is displayed graphically in the upper part of the Import product assembly plan dialog window. The first step Read file is open. Open steps that have already been completed are shown in blue. Steps that have not yet been completed are grayed out.
Download template
The file of a product assembly plan must be created on the basis of a supplied template. This template can be downloaded, edited and saved under the name of the product assembly plan in the Import product assembly plan dialog window.
|
This step can be skipped if the file of the product assembly plan has already been created on the basis of a supplied template. |
-
Select the desired template from the Select an import/export template drop-down list.
-
Select the Create empty template text in the drop-down list.
The template opens as an Excel file.
-
Enter the data in the Excel file and save it as a product assembly plan in the file manager.
Import product assembly plan
|
The product assembly plan is available as a *.xslx file. |
-
Select the template used for the file from the Select an import/export template drop-down list in the Import product assembly plan dialog window in the Read file step.
-
Click on Select.
The file manager opens.
-
Select and open the product assembly plan (*.xslx file) in the file manager.
The selected file path appears in the Select product assembly plan input field.
-
Click Next to upload the file and go to the next step Validation.
The file is being read. The wait cursor appears while the read process is in progress.
If the Product Setup Management client is exited during this step, Excel can continue to run in the background and block the file that should be imported. The import is canceled due to the error caused by this.
The Next button is disabled while the read process and initial checks are running.
The time required for reading and checking is proportional to the size of the imported file.
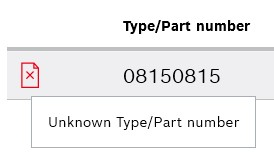
After the checks have been completed, the product assembly plan read from the file is displayed with the type/item number of the product.
One of the following icons is displayed to the left of the type/item number: *

Fault: The product assembly plan cannot be imported. *
Warning: The product assembly plan already exists and cannot be imported again. *
OK: The product assembly plan can be imported.+
Only product assembly plans with
can be imported. If you continue with Next , the product assembly plans are not imported using and . If no product assembly plans are available with , the process cannot be continued. -
Move the mouse pointer over the icon to display the details of the result.
Some messages are not localized.
-
Go to the Assignment step using Next.

The status of the product and the link to a product parts list are displayed on the right in the table under Status. The following statuses are possible: *

Multiple product parts lists are possible. Select a product parts list.+
Click on
 on the right-hand side of the table to display all versions and variants of the product parts lists.
-
The product parts list does not contain all the materials used in the product assembly plan and cannot be linked to the product assembly plan. -
The product parts list is assigned to the product assembly plan. The product assembly plan can now be imported.If only one product parts list is available for the type/item number, the product assembly plan with the same type/item number is automatically assigned to it.
In the expanded list of versions and variants of product parts lists, it is not possible to select or deselect a product parts list to prevent an incorrect assignment.
-
-
If multiple product parts lists are possible for linking a product assembly plan, select the desired version or variant of the product parts list of the product.
The status of a possible link is displayed again as an icon in the row of the selected product parts list. Move the mouse pointer over the icon to display the details of the result.
If a product assembly plan has been assigned to at least one product parts list or if the Skip invalid checkbox has been checked, the Import button is activated.
-
Click Import.
The Upload step is displayed.

If the import is canceled at this time, the uploaded product assembly plans are retained in the Product Setup Management client. Only the outstanding product assembly plans are discarded. The client displays a prompt to confirm this action.
Once the import is complete, the Cancel button is deactivated and the Close button is activated.
-
Exit the operation using Close.
The products appear in the overview of the product assembly plans and the product assembly plans are listed under the relevant product in the Variants/versions view.
Important Notes:
-
The import time depends on the amount of data to be imported. Approx. 30 seconds per 100 product assembly plans should be anticipated. Other influencing factors are the performance of the system and the server load.
-
The maximum number of product assembly plans supported is 1500.
-
Currently, the Product Setup Management client does not check whether the Excel format matches the template, but attempts to read the data as described in the template. Therefore, changing the format of an Excel file will most likely result in a read error.
-
Continue with Import product assembly plan from ERP system to import product assembly plans from the ERP system.
Import product assembly plan from ERP system
|
With an import, multiple product assembly plans can be imported for the same product. |
Prerequisite
-
At least one product parts list of the product has been created.
Create product parts listThe product assembly plan is linked to the product parts list by the type/item number of the product.
-
ExpertorAdministratorrole
Procedure
-
Open the Product assembly plan menu.
Product assembly plan -
Select
in the header. -
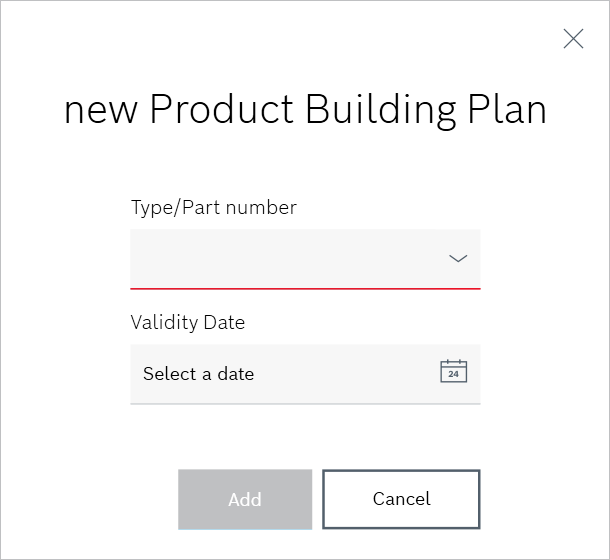
Select Import from ERP in the drop-down list.
-
Enter the following details:
-
Type/item number
-
Validity date
-
|
The validity date does not have to be entered. |
-
Import the product assembly plan using Add.
The product appears in the overview of the product assembly plans and the new product assembly plan is listed under the product in the Variants/versions view.
-
Continue with Import product assembly plan from file to import product assembly plans from a file.
Exporting a product building plan
An individual product assembly plan can be opened and downloaded as an *.xlsx file in Excel.
Requirements
-
At least one product with at least one product parts list has been created.
Create product parts list -
At least one product assembly plan has been created.
Create product assembly plan -
ExpertorAdministratorrole
Procedure
-
Open the Product assembly plan menu.
Product assembly plan -
In the overview, select the product whose product assembly plan is to be exported. Filter by product if necessary.
All product assembly plans for the product are listed in the Variants/versions view.
-
Select the desired product assembly plan to be exported.
-
Use
to open the Component/material assignments view.
All lines and stations are displayed with the assigned components and materials in the Component/material assignments view.
The details of the product assembly plan and the underlying product parts list are displayed in the upper area. The lines and stations for which the assignments of components and materials are to be displayed can be selected in the middle Lines area. The individual components and materials assigned to the selected line and station are displayed in the Assignments area. The name of the line selected in the Lines area and the station is displayed in the Assignments area.
Product assembly planBy selecting the line and the station in the Lines area, you can check which components and materials have been assigned to which station.
-
In the Assignments area, open the Export product assembly plan dialog window with
 .
.
-
Select the desired template to which the data of the product assembly plan is to be transferred in the Select an import/export template drop-down list.
-
Open the .xslx file with
*Export.
The data of the product parts list is opened in an Excel file. The file can be saved.
-
Continue with Import product assembly plan from file to import a product assembly plan from an Excel file.
Delete product assembly plan
Individual product assembly plans of a product can be deleted.
|
The deletion process must be saved in the Variants/versions view. |
Requirements
-
At least one product assembly plan has been created.
Create product assembly plan -
Administratorrole
Procedure
-
Open the Product assembly plan menu.
Product assembly plan -
In the overview, select the product whose product assembly plan is to be deleted. Filter by product if necessary.
All product assembly plans for the product are listed in the Variants/versions view.
-
Select the product assembly plan to be deleted.
Additional tools appear in the header.
-
Use
in the header to delete the selected product assembly plan. -
Click Yes in the dialog window to permanently delete the product assembly plan.
-
Click
to save the change in the Variants/versions view.You can undo the deletion by clicking
 before the change is saved in the Variants/versions view.
The product assembly plan is no longer displayed under the product in the Variants/versions view.
-
Continue with Delete all product assembly plans of a product to delete all product assembly plans of a product.
Delete all product assembly plans of a product
All product assembly plans of a product can be deleted collectively.
|
The deletion process must be saved in the overview. |
Requirements
-
At least one product assembly plan has been created.
Create product assembly plan -
Administratorrole
Procedure
-
Open the Product assembly plan menu.
Product assembly plan -
Click
in the product whose product assembly plans are to be deleted. -
Select Yes in the dialog window to permanently delete all product assembly plans for the product.
-
Click
to save the change in the Overview.Before the change is saved in the Overview , you can undo the deletion by clicking
.
The product is no longer displayed in the overview of the product assembly plans.
-
Continue with Delete product assembly plan to delete individual product assembly plans.