Identity providers
Identity providers act as a central system that users can log into and in which the identity of the users is stored. When you log into the identity provider, the user’s identity is verified. An identity provider can be connected to multiple IT systems. The identity provider allows users to log into multiple IT systems in parallel using their own identities and to authenticate themselves using these specific identities (single sign-on).
If an identity provider is used, users no longer require a local user account for the respective IT system that they want to log into. The user’s access permissions (authorization) are assigned in the same way for local user accounts and through the user identities integrated into the identity provider ( Assigning a User to a Role ).
After selecting an identity provider in the overview of the Multitenant Access Control > Identity provider menu, the identity provider data is displayed in the detailed view on the right. In this view, you can edit details and manage assigned roles.

Header
| Icon/element | Description |
|---|---|
Display Order |
Specifies the order in which the existing identity providers are displayed upon login. |
|
Change settings. |

Identity provider entry
|
|
Add Identity Provider
|
When setting up applications in Microsoft Entra ID, approval may be required due to operator-specific IT guidelines. |
Prerequisite
Identity Provider Manager role
Procedure
-
Call up the Multitenant Access Control > Identity provider menu.
-
In the list of identity providers, add a new identity provider with
 .
.The Add Identity Provider dialog appears with the Add or Import step.
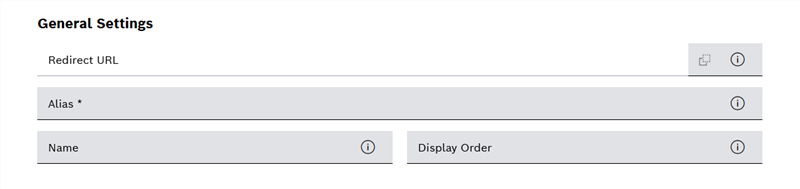
The following figures show the respective sub-areas of the dialog window.
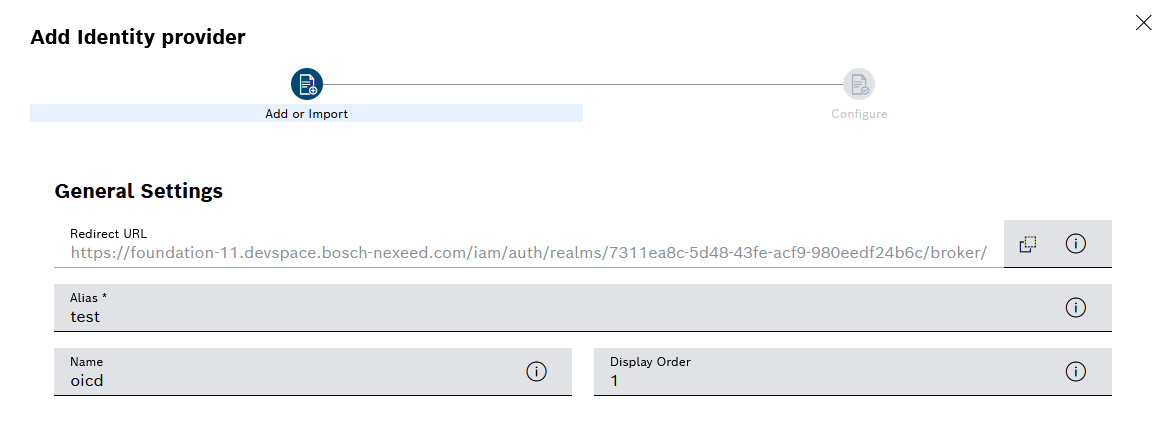
The Alias is defined when the identity provider is created and can then no longer be changed.
The Redirect URL is generated for the identity provider integration and cannot be changed. It has to be configured at the external identity provider to make the login flow work.
-
In the Name text field, enter the display name for the identity provider.
The display name is displayed on the login page.
-
In the Display Order field, enter the position at which the identity provider is to be displayed on the login page.
The smaller the number, the higher the identity provider is displayed in the list on the login page (1 = position 1).
-
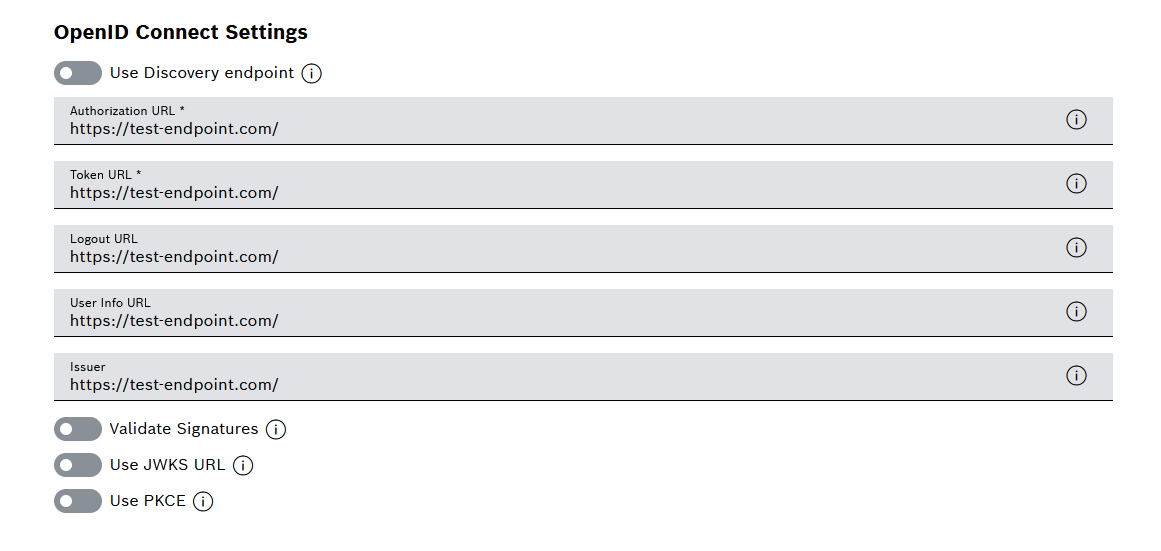
If a well-known endpoint is known for the application, activate the Use Discovery Endpoint function with
 to import the required information.
If a Discovery Endpoint is used, the following fields are filled out automatically.
-
In the Authorization URL field, enter the URL to be used for identifying the organization and the user.
The Authorization URL is provided by the identity provider. Upon login to Nexeed Industrial Application System, it forwards the user to the identity provider for authentication and authorization. The Authorization URL confirms the identity of the user and grants the necessary permissions to access Nexeed Industrial Application System.
-
In the Token URL field, enter the URL for token-based authentication.
The Token URL is provided by the identity provider. It connects the identity provider to Nexeed Industrial Application System and enables the transfer of authentication and authorization data in the form of access tokens. When a user logs in, Nexeed Industrial Application System sends a request to the identity provider to obtain an access token.
-
In the Logout URL field, enter the URL to log out of the identity provider and Nexeed Industrial Application System.
The Logout URL is provided by the identity provider. It forwards the user to the identity provider when logging out of Nexeed Industrial Application System. The identity provider performs the logout process and deletes the user’s authentication information.
-
In the User Info URL field, enter a URL that provides additional user information.
The User Info URL is provided by the identity provider. It is used to retrieve additional information about the user (e.g. name and email address).
-
In the Publisher field, enter a URL that identifies the identity provider.
The URL of the Publisher is provided by the identity provider. This URL uniquely identifies the identity provider as the publisher of the access token and validates it during the login process. This ensures that the access token originates from the identity provider.
-
Use
to enable or disable validation of the signatures.The Validate Signatures function validates the signature of the access token from the identity provider. This ensures that the token has not been manipulated and that it comes from a trusted publisher.
-
Use
to set whether a JWKS URL is to be used.The Use JWKS URL function stores the public keys used to validate JSON web tokens. The JWKS URL is a URL that points to a JSON file containing the public keys. The identity provider uses the JWKS URL to obtain the public key and validate the access token.
-
If the JWKS URL function is activated, enter the URL in the JWKS URL field.
-
Use
to set whether the Use PKCE function is to be used.The PKCE function is an extension of the authorization protocol OAuth 2.0. It is used to ensure that the authorization code is only used by Nexeed Industrial Application System.
-
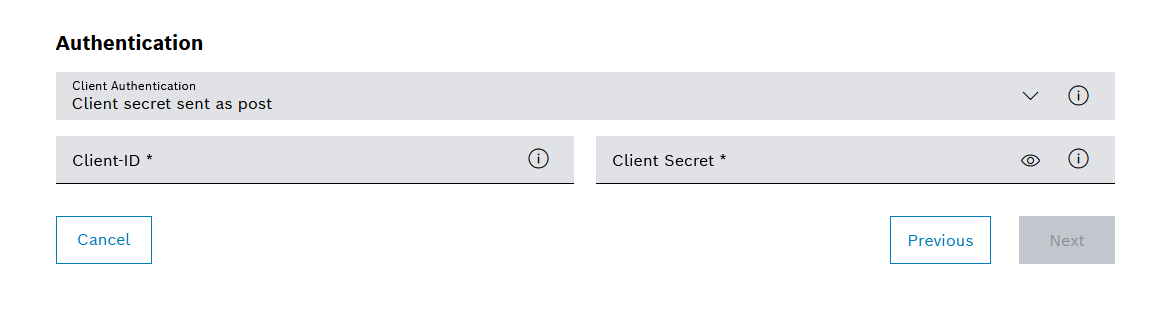
Select the authentication type from the Client Authentication drop-down list:
-
Client Secret Sent via Basic Auth
The client secret is a secret key provided by the identity provider. The client secret is sent as part of the authorization header from the client (Nexeed Industrial Application System) to the identity provider for authentication. Sending the client secret to the identity provider as an authorization header prevents the client secret from being visible in the URL string or in other parts of the request.
-
Client Secret Sent via POST (default value when creating an identity provider)
The client secret is sent as a POST body from the client (Nexeed Industrial Application System) to the identity provider for authentication. Sending the client secret to the identity provider as a POST body prevents the client secret from being visible in the URL string or other parts of the request.
-
Client Secret as JWT
The client secret is sent to the identity provider as a JSON Web Token (JWT). A JWT is a JSON object that contains a digital signature and is used to transfer information between the sender and the recipient. Sending the client secret to the identity provider as a JWT prevents the client secret from being visible in the URL string or in other parts of the request.
-
JWT Signed with Private Key
Similar to Client Secret as JWT. With this function, the JSON Web Token (JWT) is additionally signed with a private key. Signing the JWT with a private key ensures that the JWT has not been manipulated and that it comes from the sender who signed it.
-
-
Enter Client ID.
The Client ID is provided by the identity provider. The Client ID identifies the client. After logging in, the client is authorized to access protected resources.
-
Enter Client Secret.
The Client Secret is a secret password provided by the identity provider. The Client Secret ensures that only authorized and authenticated applications can access protected resources.
-
Click Next.
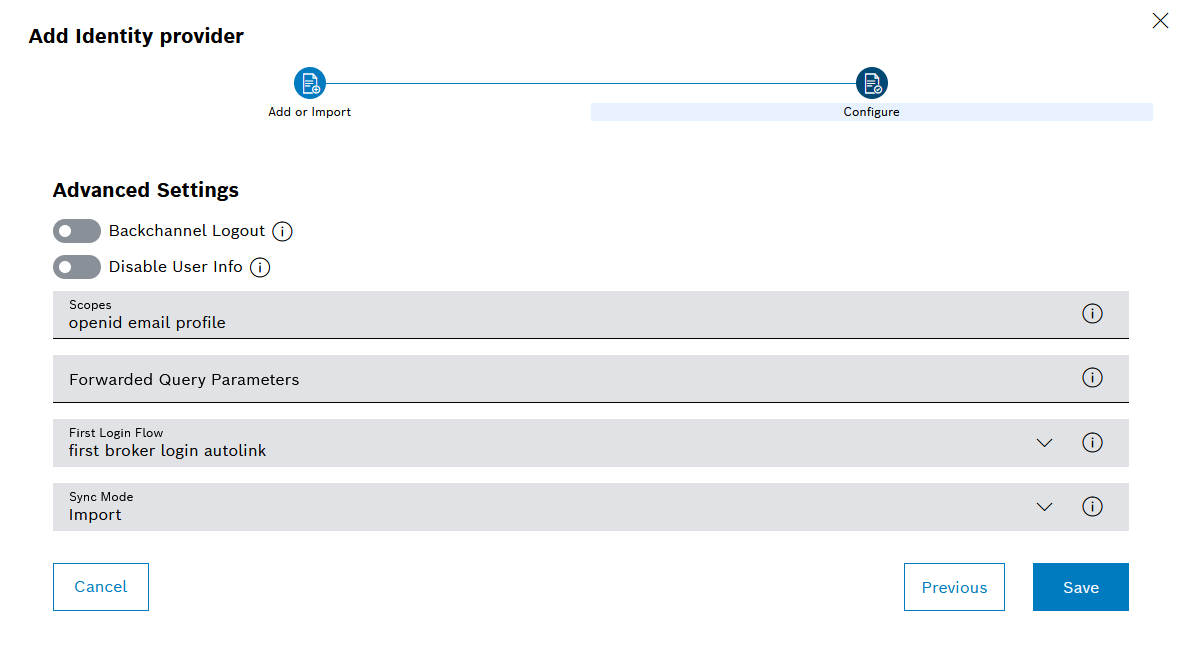
The Configuration step appears.
-
Use
to select whether a Backchannel Logout is to be used.The Backchannel Logout function allows the user to simultaneously log out of all services connected to the identity provider (single logout).
-
Use
to select whether the Switch Off User Info function is to be used.If this function is disabled, additional information about the user (such as name and email address) can be transmitted.
-
In the Scopes field, enter the Open ID scopes, separated by spaces, for authorization. Default value when creating an identity provider: openid email profile
Scopes define which information a client (Nexeed Industrial Application System) can retrieve from an identity provider. Scopes ensure that only authorized clients with the necessary permissions can access this information.
-
Enter Transferred Query Parameters.
This function allows you to forward additional parameters to the identity provider. These parameters can be used to perform authentication or to obtain additional information about the user.
-
Select the Procedure for First Login from the drop-down list. Default value when creating an identity provider: first broker login autolink
This function determines the procedure upon first login with the identity provider. The term "First Login" means that no account is associated with the identity.
-
In the Synchronization Mode drop-down list, specify how the user information is to be synchronized between the identity provider and other systems:
-
Import (default value when creating an identity provider)
The user information is synchronized once when a user logs in for the first time.
-
Legacy
Use current settings.
-
Force
The user information is synchronized upon every login.
-
-
Click Save.
The settings are applied.
Example of an identity provider configuration for Microsoft Entra ID
The following example shows the configuration of an identity provider with Microsoft Entra ID. The illustrations of Microsoft Entra ID correspond to the software version when this user guide was created.
Prerequisite
Identity Provider Manager and Group Mapper Manager role
Procedure
-
Open external software Microsoft Azure.
-
Click on Microsoft Entra ID
 .
.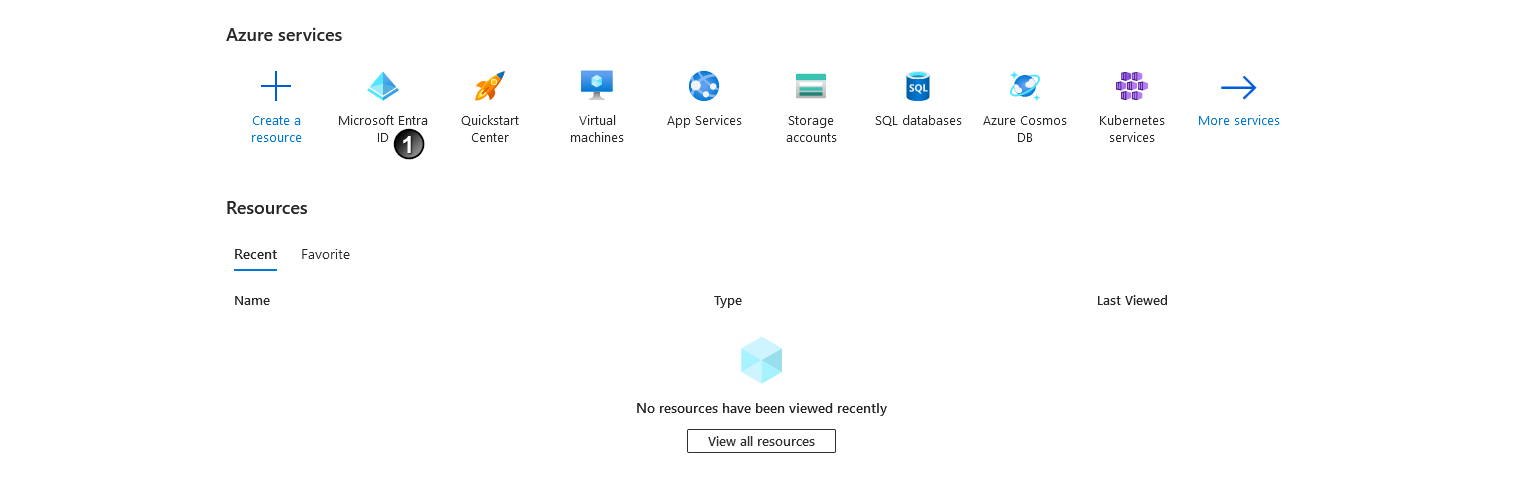
The Azure Active Directory overview is displayed.
-
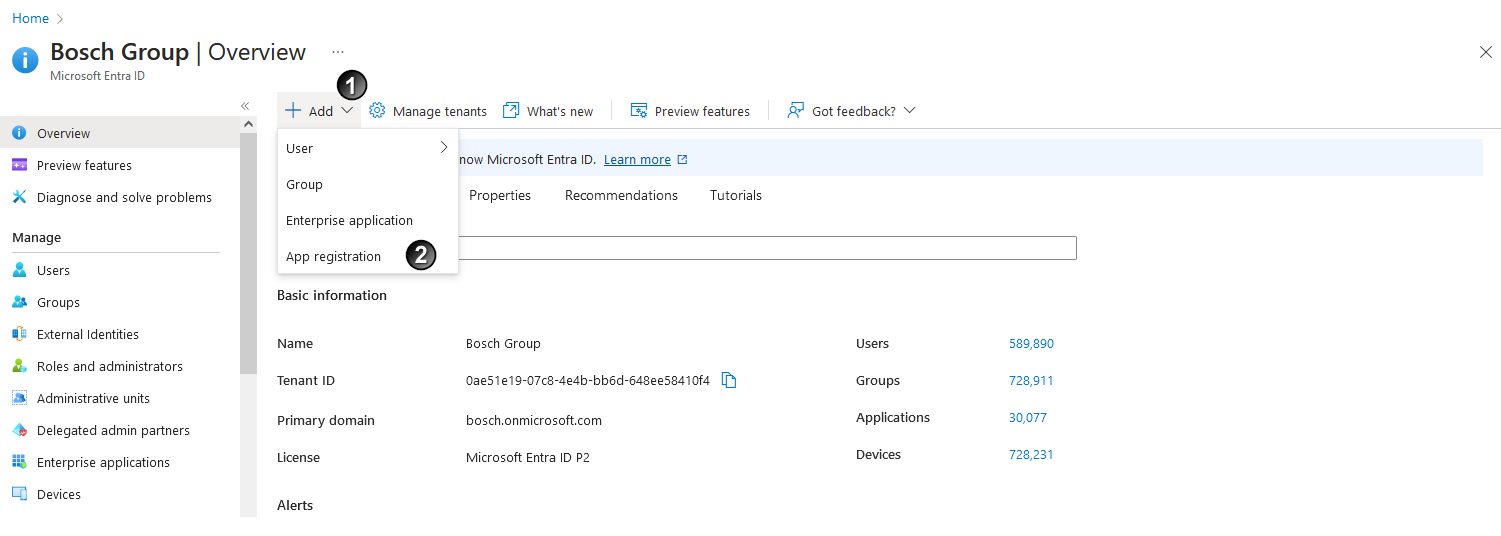
In the selection list + Add
, click on App Registration  .
.A new application is created and opened.
-
Enter the Display name
and select Supported account types .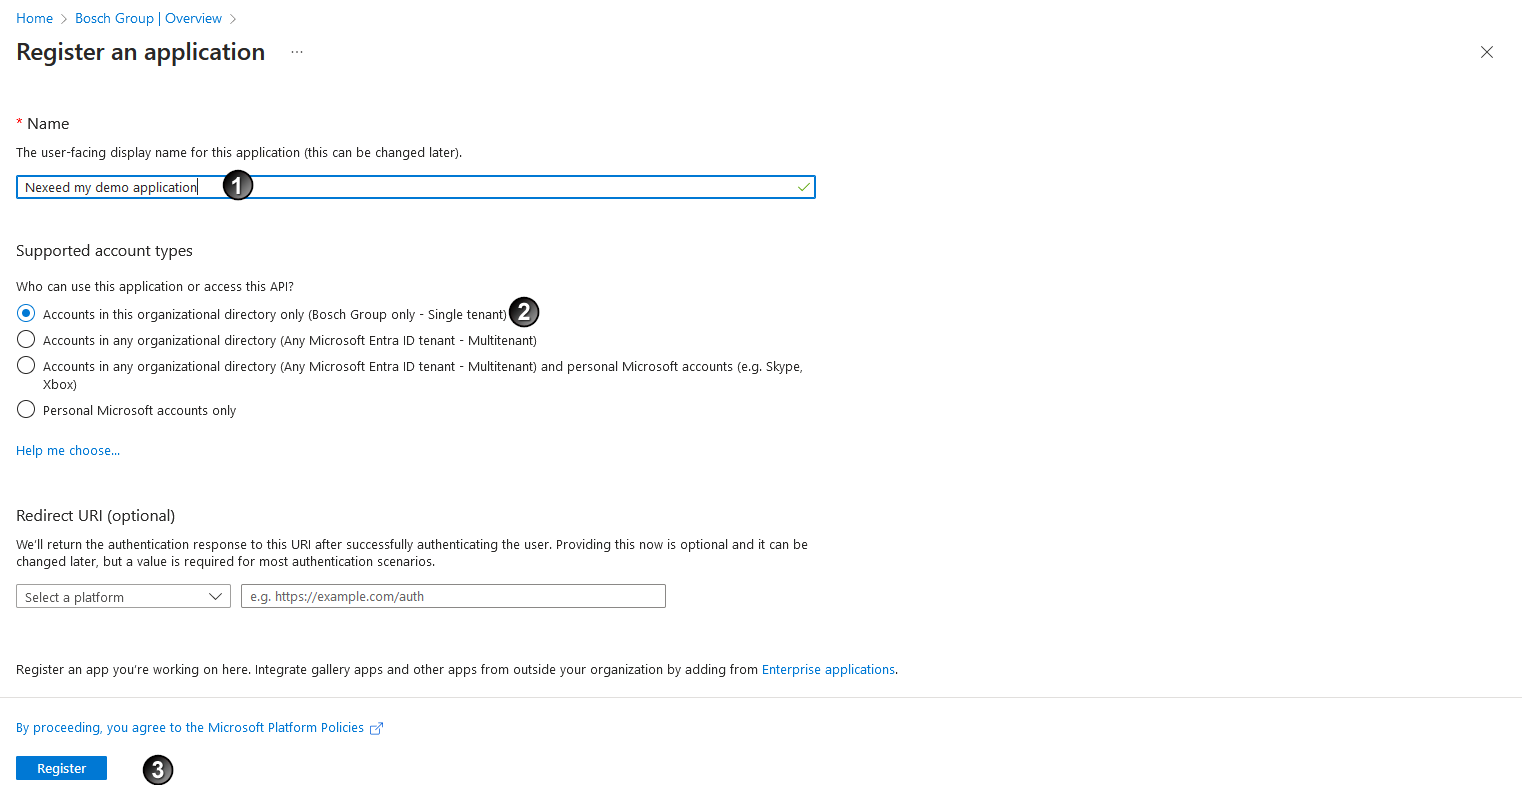
-
Click on Register.
-
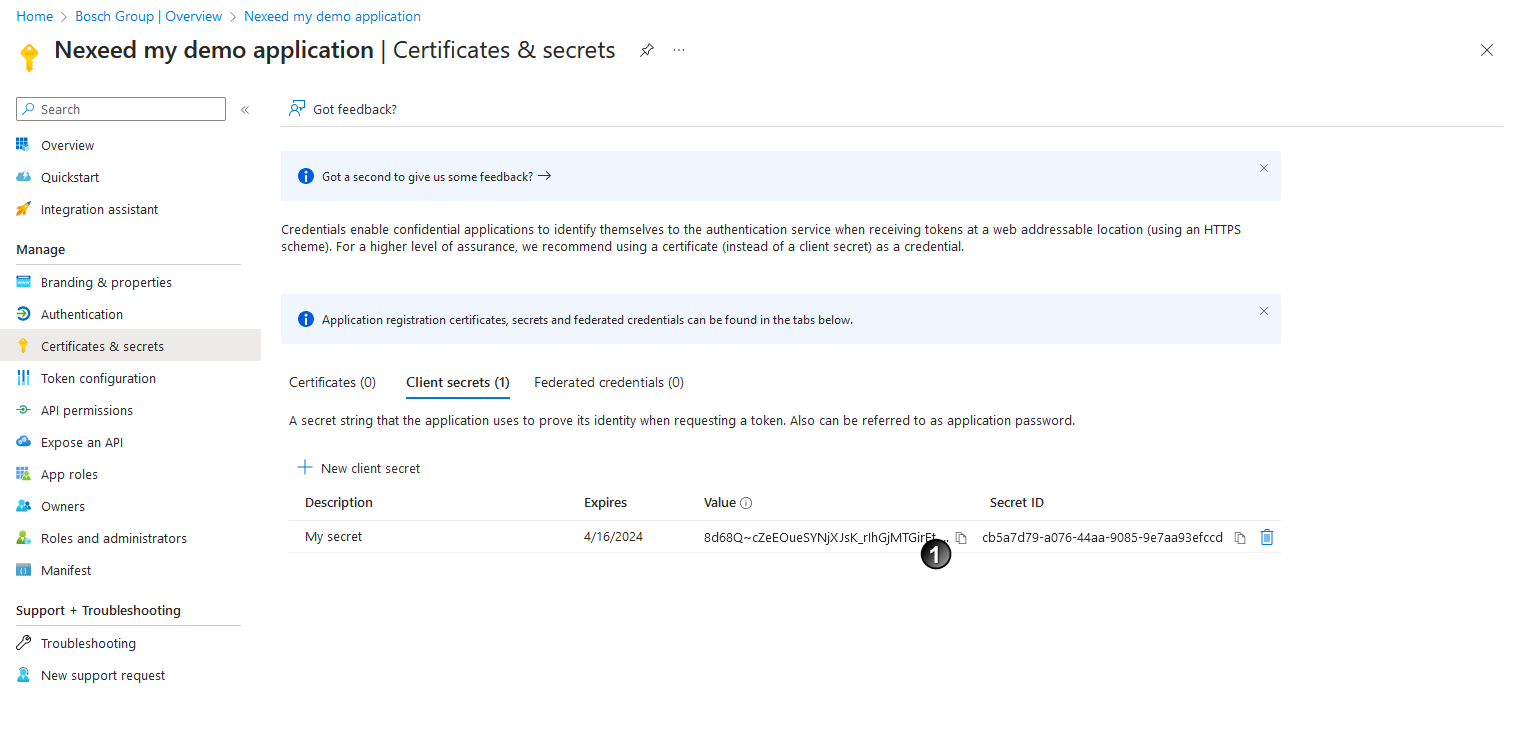
In the Certificates & secrets
area, click + New secret client .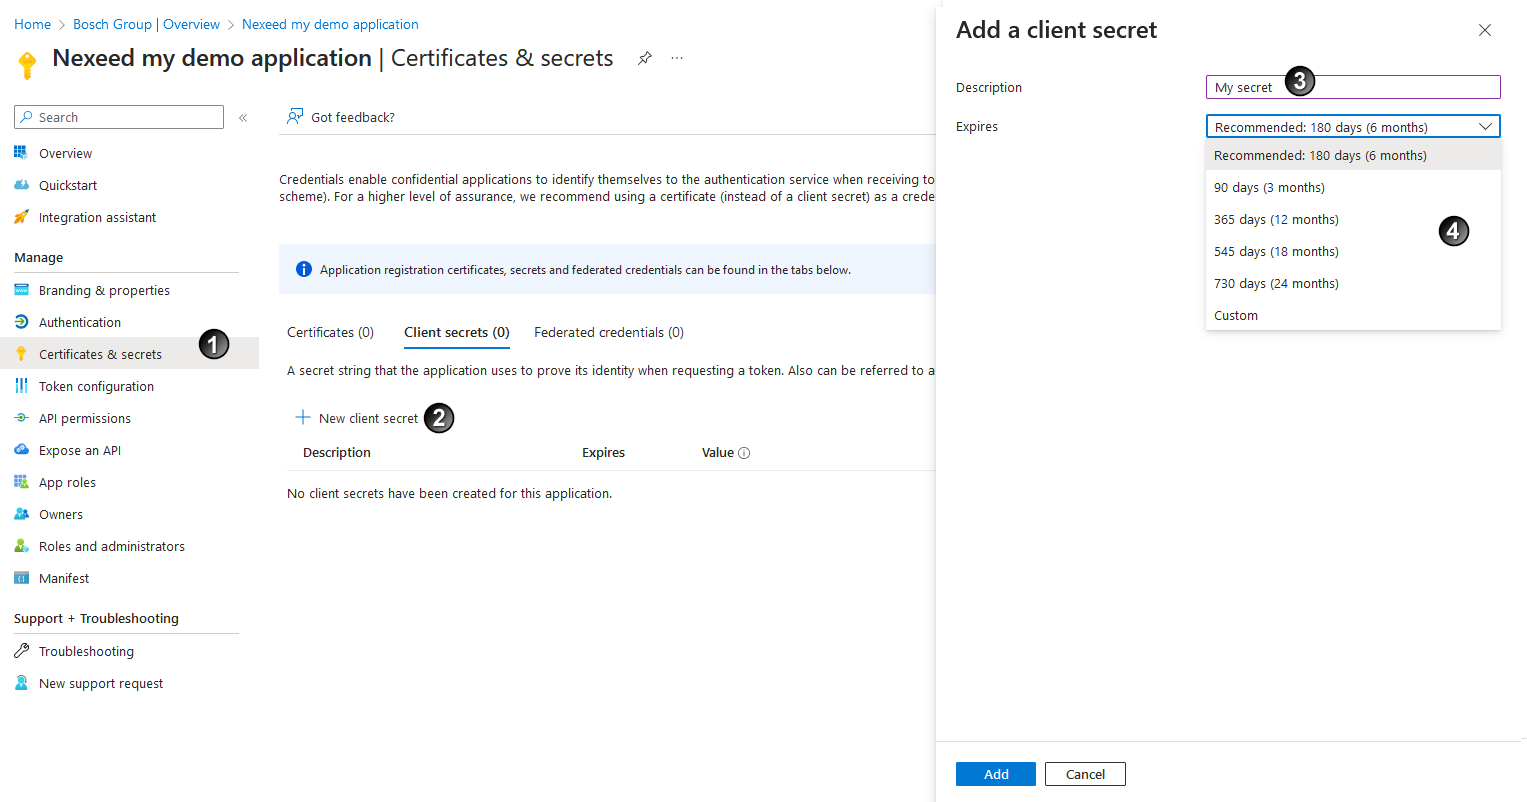
-
Define the Description
 and period of validity
  .
. -
Click Add
 .
. -
Copy the value
of the client secret key and save it locally on the computer.The client secret key can only be copied once at this time. Subsequent copying is no longer possible.
-
In the Token Configuration
area, click on + Add Optional Claim .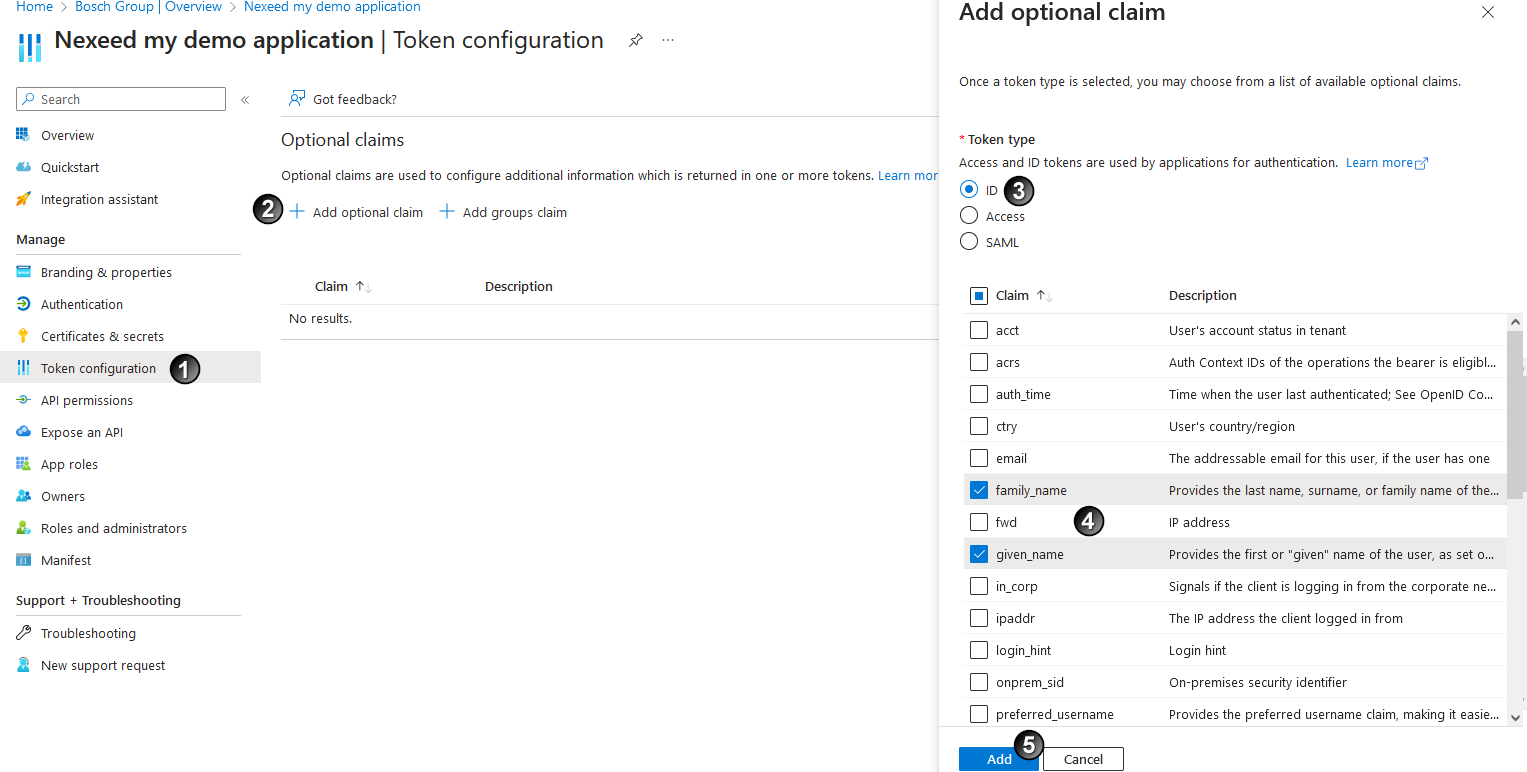
-
Select the token type
. -
Select family_name, given_name, and login_hint
. The login_hint needs to be selected to avoid problems during logout. Also select other claims if relevant for your organisation, such as upn which could be mapped to the username using the Username Template Importer in Multitenant Access Control. -
Click Add
.Up to Nexeed IAS 2024.01.02, the number of groups in the token was strictly limited and the groups claim was needed.
-
The Add optional claim dialog appears. Click on Add.
OpenID Connect is configured by default with Multitenant Access Control.
-
To enable the possibility to have the transitive/nested groups of the user to be resolved and mapped, click on + Add a permission
in the API permissions area and then select the Microsoft Graph API under Microsoft APIs.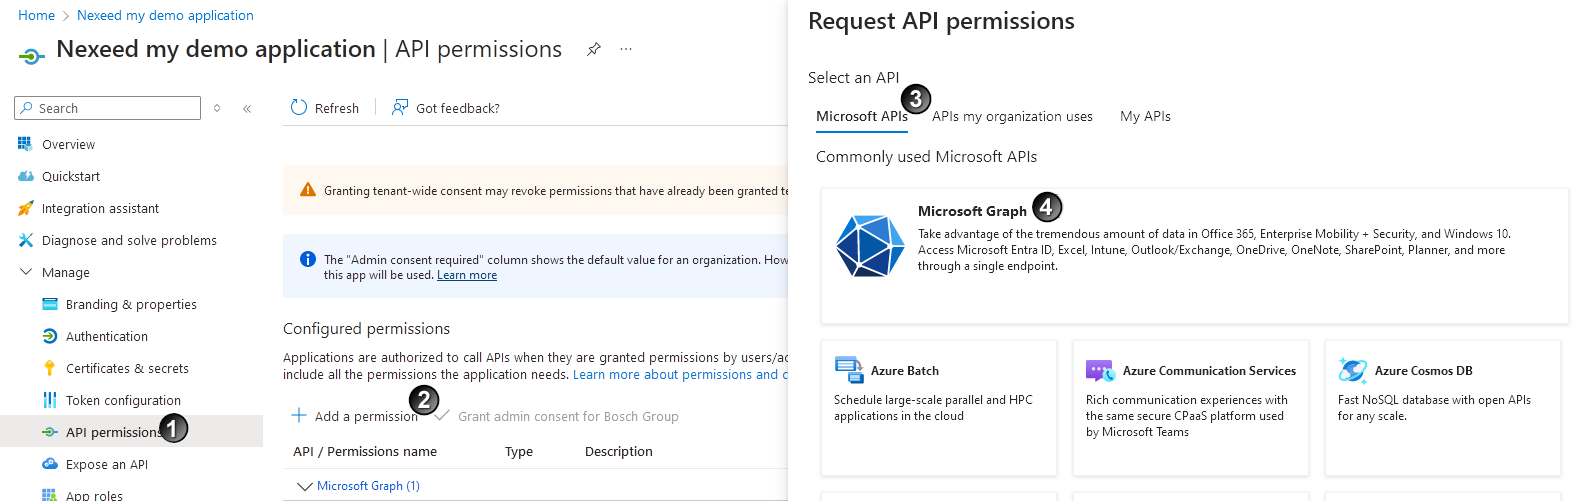
-
Select Delegated Permissions
User.ReadandGroupMember.ReadAlland click on Add Permissions. It is recommended to grant administrator approval, otherwise a user will have to request this during the login process.User.Read permission is required for the API call "/me/transitiveMemberOf/microsoft.graph.group?$select=", for integration of organisation/group hierarchy in Multitenant Access Control.
GroupMember.Read.All permission is required to read the groups via "/me/transitiveMemberOf/microsoft.graph.group?$select=" which the user is a (transitive) member of. This is also required for the integration of organisation/group hierarchy in Multitenant Access Control. image::macoidcazureadidentityprov72023-02-01.png[mac oidc azure ad identity prov 7]
-
Switch to the Overview
area.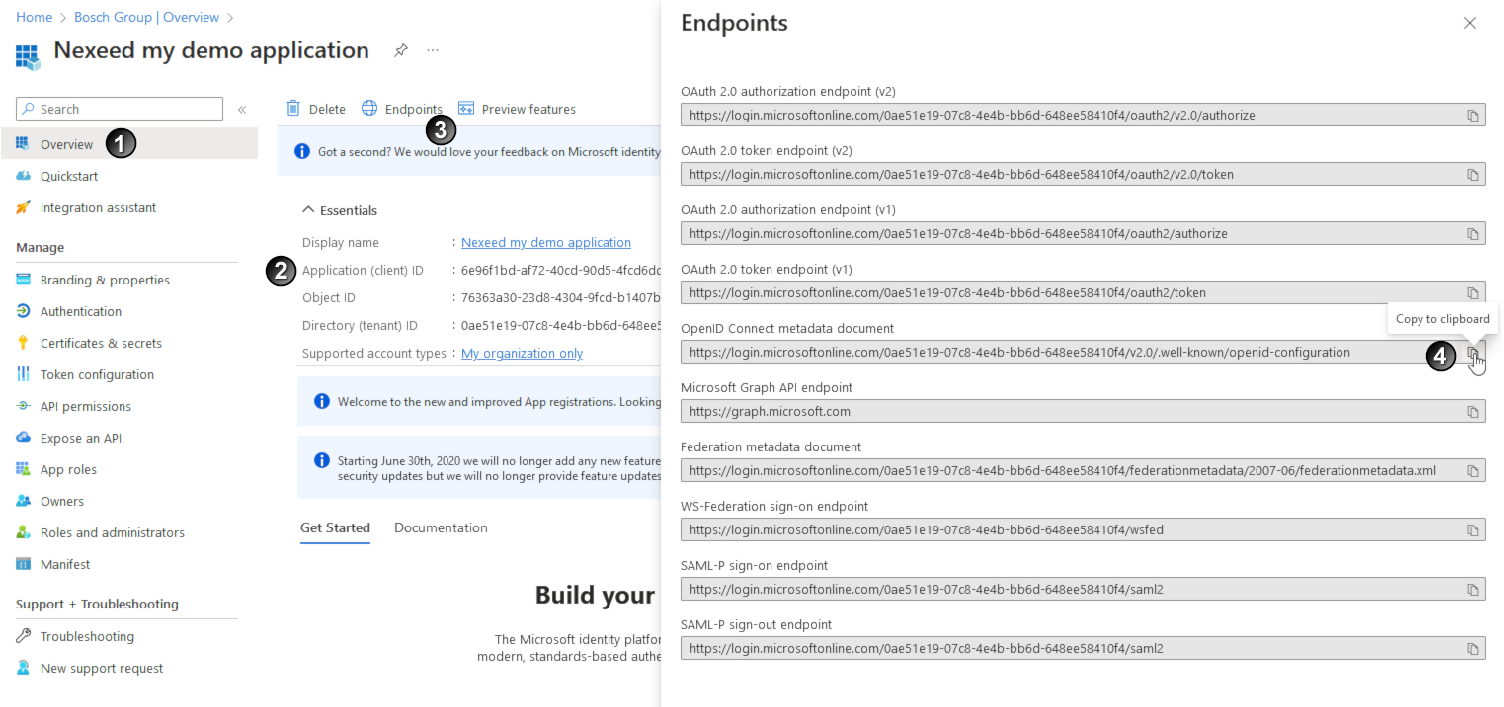
-
Copy the Application ID (Client)
and save it locally on the computer. -
Switch to the End points
tab. -
Copy the OpenID Connect Metadata Document
and save it locally on the computer. -
In the Multitenant Access Control module, call up the Multitenant Access Control > Identity provider menu.
-
Add the identity provider ( Add Identity Provider ).
-
Enter Alias and Name.
-
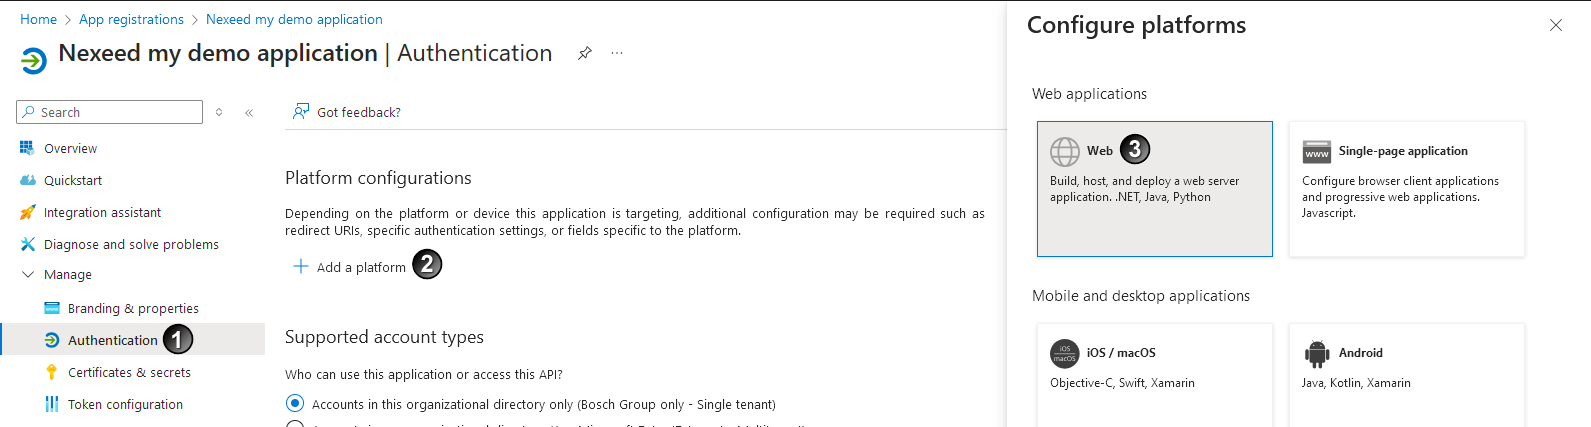
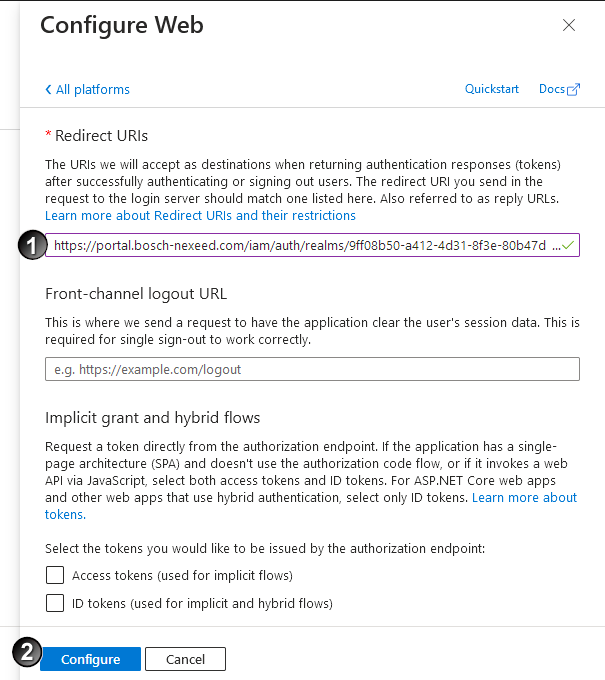
Based on the given alias, the field Redirect URL will be populated. Copy the value and configure it at the application in Microsoft Azure for the application’s Authentication on the Web platform.
-
Go back to Multitenant Access Control and activate the Use Discovery End Point switch.

-
In the Discovery Endpoint text field, insert the previously copied OpenID Connect metadata document.
-
In the selection list Client Authentication: Select Client Secret via POST sent.
-
In the Client ID field, insert the previously copied Application ID (Client).
-
In the Client Secret field, insert the previously saved client secret key value.
-
Search for the group and copy the Object ID of the group
to the clipboard.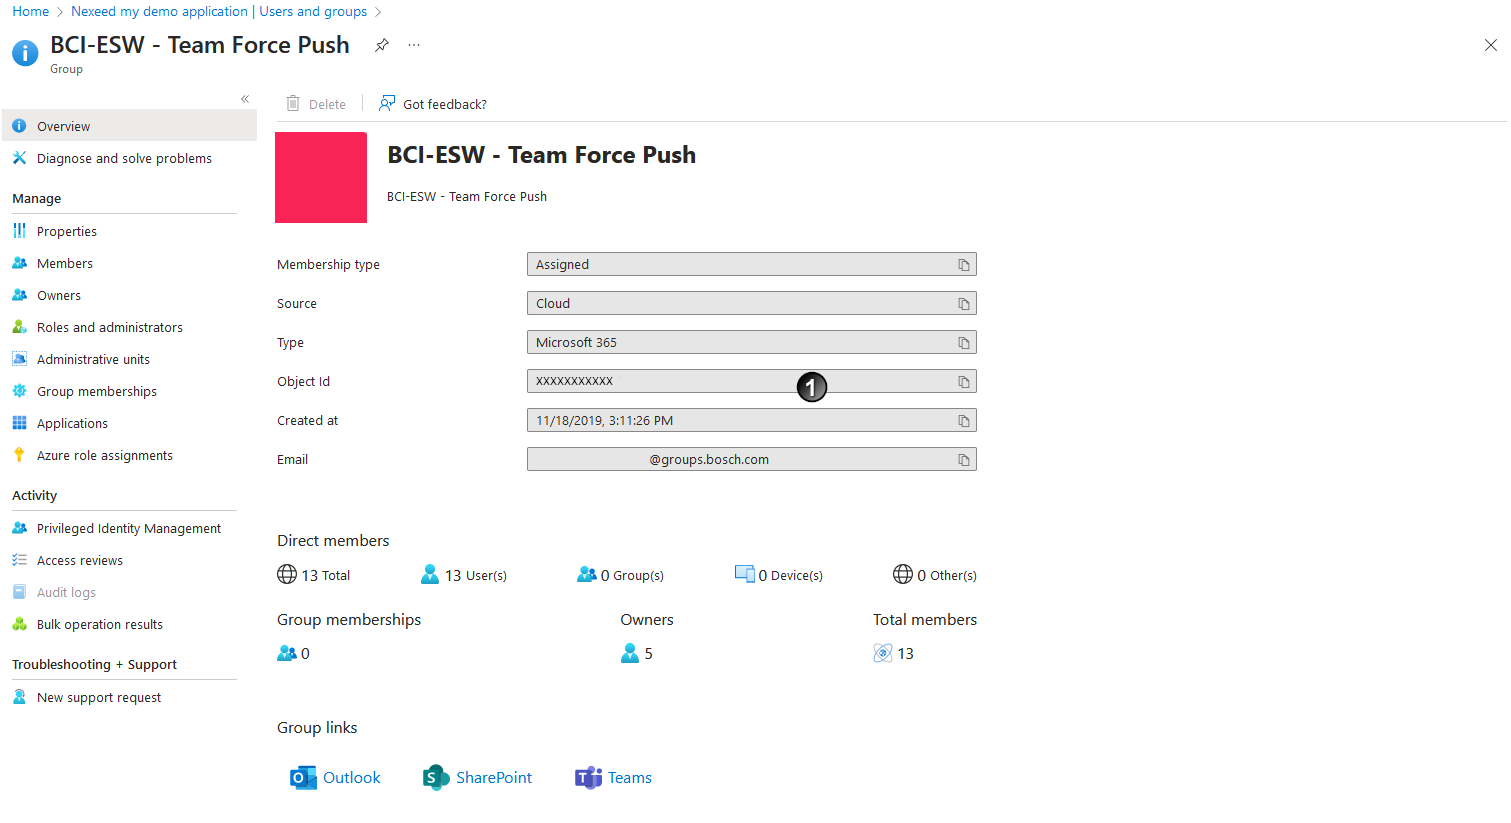
Either the object ID or sAMAccountName can be used to map a Entra ID group to a Multitenant Access Control groups. However, the object ID is recommended.
-
In the Multitenant Access Control module, open the Multitenant Access Control > Identity Provider menu.
-
Open Add Mapper and enter the previously copied Object ID of the group in the Claim Value text field.
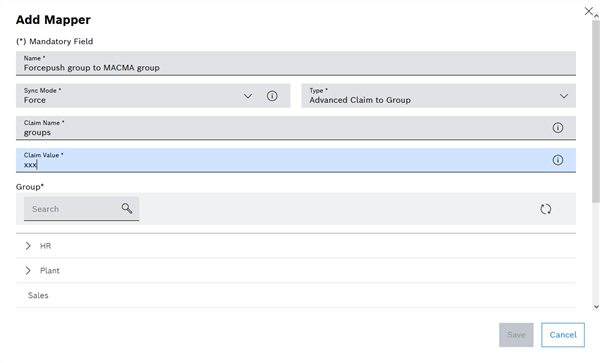
-
Select Force Sync Mode from the drop-down list.
This ensures that the claim is checked each time the token is logged in and the assignment to the mapped group is executed again and updated.
-
Make sure that Claim Name groups is entered in the text field.
-
Click Save.
All users assigned to the user group stored with the identity provider can log in to Nexeed Industrial Application Systems centrally via the identity provider.
Enable Identity Provider
Prerequisites
-
Identity Provider Managerrole -
The selected identity provider has been disabled.
Procedure
-
Call up the Multitenant Access Control > Identity provider menu.
-
Use
 to enable the selected identity provider.
 -
In the dialog window, click Activate.
The identity provider is enabled and appears on the login screen.
Disable Identity Provider
Prerequisites
-
Identity Provider Managerrole -
The selected identity provider has been enabled.
Procedure
-
Call up the Multitenant Access Control > Identity provider menu.
-
Use
to disable the selected identity provider. -
In the dialog window, click Disable.
The identity provider is disabled and no longer appears on the login screen.
Edit Identity Provider
Prerequisite
Identity Provider Manager role
Procedure
-
Call up the Multitenant Access Control > Identity provider menu.
-
Click
 for the identity provider to be changed.
The Edit Identity Provider dialog appears.
-
Make changes to the identity provider ( Add Identity Provider ).
-
To save the changes, click Save.
The identity provider is changed.